
For this post I’m going to walk through how to reverse engineer the Vulnserver application to discover and exploit a basic buffer overflow in the TRUN command. You can do this a variety of ways, but my testing setup is below with the applications installed on each.
- Windows 10 Debugging Machine
- Kali Linux Remote Machine
- IDA Free for reverse engineering
- Python3 for exploit script
With that out of the way, let’s dive in.
Starting app and initial connection
I began by downloading vulnserver.exe and essfunc.dll and transferring them to my debugging machine to start up the application. Using TCPView (SysInternals) we can see the application appears to be listening on tcp port 9999.

Connecting to the open port via netcat displays a greeting and a prompt to enter HELP for help information. Doing so gives a list of valid commands:
- STATS
- RTIME
- LTIME
- SRUN
- TRUN
- GMON
- GDOG
- KSTET
- GTER
- HTER
- LTER
- KSTAN
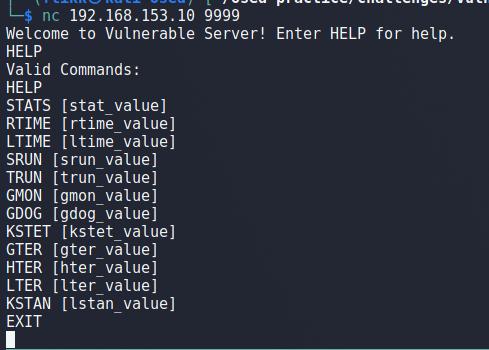
Attempting to use several of the commands just prints a message about the command either succeeding or having a correct value, but nothing interesting. At this point there are two possible ways to try and discover vulnerabilities: fuzzing each command to attempt to discover potential overflows or reverse engineering the binary/DLL. I’m going to use the second method as some additional reverse engineering practice for my upcoming OSED exam.
Identifying the application entry point in IDA
After launching IDA on my Kali machine and opening the binary, I’m presented with the start of the main function for the program.

This by itself isn’t very useful as we’re more interested in what the program does when a user sends it input. In the image above I can see one of the functions it uses is recv(), which is usually used to receive data over a tcp connection, such as when a user sends input to an application. If I attach a debugger to the vulnserver.exe process I can set a breakpoint on the recv function so that it will pause execution when that function is called, which should be immediately after I send it data over my netcat connection.
My debugger of choice in this case is WinDbg, so I opened WinDbg and attached to the currently running process of vulnserver.exe. Next, I used the three commands below to set a breakpoint on the receive function (which is imported from WS2_32.DLL), list the current breakpoints, and continue execution of the application.
# Set breakpoint on recv function in WS2_32.dll
bp ws2_32!recv
# List current breakpoints
bl
# Resume execution of application
g
The breakpoint is actually hit the first time when I initiate the netcat connection from my Kali machine. For now, I used the WinDbg command pt to continue execution until the next ret instruction, which should be at the very end of the function, but it does not finish because no data has been sent yet. When I submit the command HELP, we can see the execution successfully continues to the end of the recv function and pauses execution at the instruction ret 10h.


Stepping forward one more instruction with the p command returns out of the recv function and back into memory space associated with the vulnserver application, which should be immediately following the call to recv.
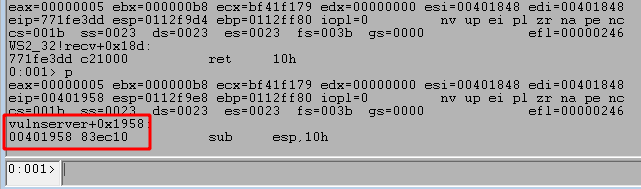
As ASLR is not currently enabled for this application, the memory address listed in the image above (0x00401958) should match up with the same instruction for the application in IDA. Switching back to IDA and using the g shortcut to jump to a memory address takes me to the instruction at 0x00401958, which does indeed come right after the call to recv.
Following execution flow for user data
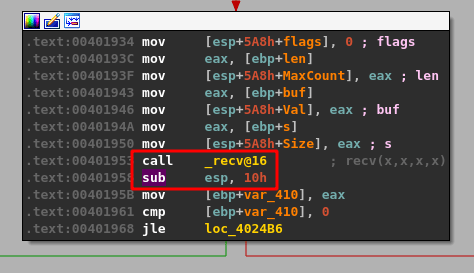
At this point we have oriented ourselves to where the application reads in user input through recv, which means the next group of instructions will likely be logic to first determine if there was any data actually sent and second if the data matches with one of the valid commands the application has defined.
The recv function’s return value is the total number of bytes it received (stored in EAX), so the CMP instruction in the code block above is moving that number into a variable and comparing it against 0, essentially to check whether the data was empty or not. If no data was sent (EAX == 0) then the jump along the green line indicated by the JLE (Jump if less or equal) instruction will be taken, otherwise execution will move to the next block along the red line.
We know we sent the word HELP as the command, so the length of data should be greater than 0, but we can also confirm this in WinDbg by stepping forward a few more instructions to the CMP and JLE calls. The first highlighted box below shows the value returned by recv that is being compared to 0, in this case a length of 5 because ‘HELP’ is 4 characters followed by a null byte to terminate the string. The second highlighted box shows that the result of the compare will cause us not to take the jump indicated because our value is not less than or equal to 0. If the second box contained ‘br=1’ then it would indicate the jump will be taken.

Moving back to IDA and following the red line to the next code block brings us to a call of the function strncmp, which compares two strings. In this case, the arguments we see being used for the compare appear to only take a maximum length of 5 and compare it against the string ‘HELP ‘ (with a space at the end). If the strings compared are the same, strncmp will return 0, which means the test eax, eax instruction following it would also return 0 and set the zero flag. If the strings are not the same, a non-zero number would be returned and the TEST instruction would not set the zero flag. The zero flag is important because the following jump instruction, JNZ, will only be taken if the zero flag is not set.
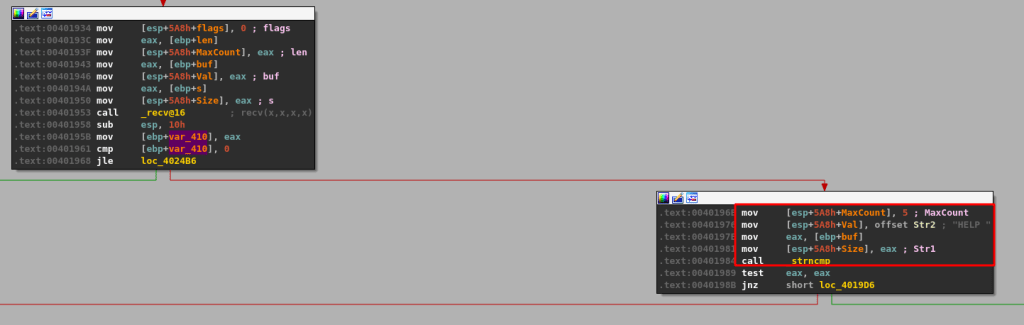
Several more similar comparisons occur after these blocks if the string comparisons continue to not return 0 (equal), each checking for the different commands seen before: HELP, STATS, RTIME, etc.
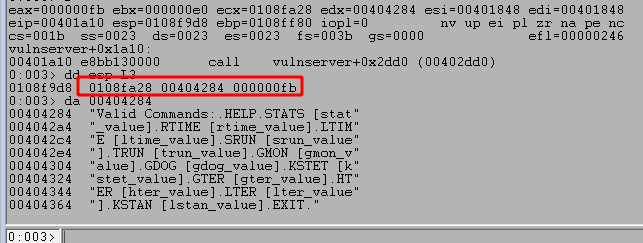
I’ll come back to those later, but for now we want to see what happens if a match is found. If I step forward in WinDbg until the first strncmp call then I can inspect the arguments being passed by using the dd esp L3 command to display the first 3 DWORDs at ESP as strncmp only takes 3 arguments (Reference): string 1, string 2, and the max number of characters to compare. The da command used in the image displays any ASCII strings at the location up to the next null byte, which terminates a string.

Looking at the image above shows the strings being compared and we can see they are slightly different. The one provided by us ends with a newline character (shown as a . here) and the one being checked by the application ends with a space. Because of this strncmp should return a non-zero value and the JNE jump will be taken because the values are not zero. The image below shows the retrun value of strncmp is 0xffffffea because the strings are not equal and the following jump is taken, indicated by the br=1,

Continuing execution in WinDbg to the next compare we saw in IDA appears to check for the same word, HELP, but this time only checks the first 4 characters. As the first 4 characters in our string are the same as the string being checked by the application, this time strncmp returns with 0, indicating they are the same and the next jump will not be taken.

Following execution one more time to the next block finally brings us to some more substantial code that appears to copy a string with a list of valid commands into a buffer with memcpy and send the contents of that buffer back to the user with send().

Inspecting the call to memcpy in WinDbg shows the 3 arguments it takes in: the buffer to copy data into (0x0108fa28), the data to copy (0x00404284), and the number of bytes to copy (0xfb or 251). We can also look at the 2nd argument to see the full string of valid commands it will be returning, which matches what we saw when interacting with the application earlier.
Continuing to step through this code block to this code block to the send() function shows that once that function is complete the string has been sent back to the client.

Now that we have an idea of how the application works, it’s time to focus on some of the specific commands. After stepping through some of the functions in IDA, I’m going to start with the TRUN command as it ends up allowing a basic stack overflow through the use of the strcpy function.
I’m going to end this post here for now to avoid having just one extremely long post as this portion was intended to be an introduction to how we’re using WinDbg and IDA to investigate the program. In the next part I’ll go through the details of how we can discover and exploit the vulnerability through the TRUN command.
